Measure twice, cut once. (1 Viewer)

ambulancekidd

Funster
Sep 23, 2014
10,379
28,401
Ayrshire Scotland
Funster No
33,478
MH
Swift Kon-Tiki 640
Exp
Since 1964 Gosh that makes me feel old.
I've spent ages trying various DAB aerial options on our motorhome with various levels of success, but I still wasn't happy.
So to that end, I decided to fit the new Vision Plus 570 aerial in place of the near to useless Status flying saucer type.
The new aerial comes with a diplexer especially for DAB, sounds ideal.

I measured the placement of the new aerial about 40 times, but still didn't get it quite right.
I eventually took a bravery pill & got on with the drilling, oh pants, first casualty was a cable buried in the roof insulation, much gnashing of teeth with weeping & wailing ensued. In my defence, I couldn't have known that it was there.
It turned out to be the power cable for the toilet light & electric flush, so no major worries there.
Well no option but to carry on, the hole was drilled, so I applied a healthy dose of Sika-Flex & fitted the mounting which I screwed down firmly.
Looks ok, so I popped the aerial in the hole. :unsure:
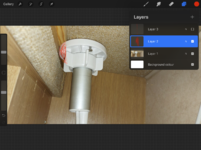
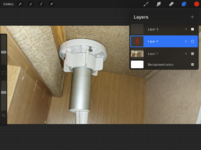
Then to the inside, I discovered that the hole wasn't quite where I'd measured it, this is more like Destroy It Yourself than DIY. :confused:
The hole was very close to a baton which holds up a cupboard, so now I can't fit the inside supporting bracket without further modification. :swear:

Now I need to work out what to do next, all suggestions will be gratefully received. :active:

On a happier note the TV & DAB reception is flawless. :clap:

Aerial oops.jpg

Aerial oops 5.jpg
 
Jun 8, 2019
4,931
18,760
Bexley Kent
Funster No
61,505
MH
Given up Motorhoming
Exp
May 2019
Same aerial as mine but mine came fitted when I bought the van.

I suggest that you cut 2 small half moons and screw into them.
I am sure that you can work out what I mean. Not very good at getting my thoughts on to paper.
 
Apr 17, 2016
5,990
35,572
South Coast
Funster No
42,523
MH
White One..
Exp
3 years….
Now I need to work out what to do next, all suggestions will be gratefully received
Get Mrs ambulancekidd to do it as no doubt she has told you where you’ve gone wrong :rofl:

Obviously if you are not talking because of this go with Lenny’s idea as that’s what I would do....

Subscribers  do not see these advertisements

 
Oct 29, 2016
4,509
52,970
Surrey
Funster No
45,842
MH
Carthago C Tourer
Exp
Motor Homing 5 years, caravan previously
I think you will need to make a circular wood spacer same thickness as the existing batten. Obviously, use the pvc round back plate as a template, mark round it, get the jig saw out, then cut a 50mm hole in the middle of the wood spacer. Offer up your new wood spacer mark where it hits the existing roof batten, then cut off the overlapping bit so that the new wood spacer sits flush against the ceiling. Get the Sikaflex up there to seal it and that should do the job, plus no one would ever know you drilled the hole to position the Ariel pole slightly wrongly:giggle:
Good luck mate(y)
You shouldn't be doing jobs like that in this weather, anyway,:cold: just make your peace again with Hazel, she might let you back in the lounge to watch the tele, provided she has control of the remote,;) now shush! or "Hod yer Wheesht" her fav programme is on its Winterwatch:giggle:
PS: I am fully qualified to give this advice!...which is why I spend hours in the kitchen on Fun, while TinaL is in the lounge watching HER the tele.
Update: there is currently a stand off as the who is making the tea tonight, well its 9.15PM and no food has passed our lips since lunchtime!:banghead::clown:
Best wishes
LES
 
Last edited:
OP
OP
ambulancekidd

ambulancekidd

Funster
Sep 23, 2014
10,379
28,401
Ayrshire Scotland
Funster No
33,478
MH
Swift Kon-Tiki 640
Exp
Since 1964 Gosh that makes me feel old.
OP
OP
ambulancekidd

ambulancekidd

Funster
Sep 23, 2014
10,379
28,401
Ayrshire Scotland
Funster No
33,478
MH
Swift Kon-Tiki 640
Exp
Since 1964 Gosh that makes me feel old.
Should be easy enough to make up a spacer from wood or plastic.
Thanks Lenny, but just popping another piece of wood at the opposite side of the baton looks like the obvious choice.
The bottom part screws on & needs to tighten the aerial when its in position & if I simply added a spacer, there wouldn't be enough thread to lock it off.
 

Campervan_man

Free Member
Jun 24, 2019
997
1,720
Funster No
61,896
MH
Dethleffs Globebus
Exp
2000
Disassemble & remove the plastic ring part with the 3 screws. Remove the 3 screws. Carefully ''cut'' the outer white plastic ring away to leave the minimum diameter screw on plastic ring as to not foul on the wooden batten. You can mark the circular line to cut before removing the plastic part with a marker pen.
You can then screw it on tightening with some parrot pliers { as you have removed the hand tightening bit of the outer ring } and it then won't foul on the batten and will sit flat on the ceiling.
You can also make a thin big 'D' washer with an aerial pole diameter hole to sit under the reduced diameter screw on ring to act as a clamping load spreader plate.
 

Lenny HB

LIFE MEMBER
Oct 18, 2007
53,626
150,726
On the coast in West Sussex
Funster No
658
MH
Hymer B678 DL
Exp
Since 2008 & many years tugging
Thanks Lenny, but just popping another piece of wood at the opposite side of the baton looks like the obvious choice.
The bottom part screws on & needs to tighten the aerial when its in position & if I simply added a spacer, there wouldn't be enough thread to lock it off.
Looks like you will have to cut the batten easy with a multitool. You don't need an expensive one like the Mikta, I've just got a 30 quid Lidl one, works fine.

Subscribers  do not see these advertisements

 
OP
OP
ambulancekidd

ambulancekidd

Funster
Sep 23, 2014
10,379
28,401
Ayrshire Scotland
Funster No
33,478
MH
Swift Kon-Tiki 640
Exp
Since 1964 Gosh that makes me feel old.
Looks like you will have to cut the batten easy with a multitool. You don't need an expensive one like the Mikta, I've just got a 30 quid Lidl one, works fine.
Don't tell Hazel that there are cheaper ones, I prefer the meatier pro power tools, so sssshhhhhhh Lenny :doh:
 
Feb 27, 2011
14,772
76,344
UK
Funster No
15,452
MH
Self Build
Exp
Since 2005
I would cut out the batton in the shape of the ring to allow it to fit flush. Then add an extra screw to the batton on each side to support it. OR remove the batton once you have cut the shape out and glue it back in to provide the support.

Cutting the plastic ring doesn't seem sensible to me as it may weaken it beyond it's ability to do it's job.
A spacer may work but you would need to find longer screws by exactly the right length. Lot of faffing in my view.

If you have a multitool with plunge cutter, cutting a small bit out of the batton should be trivial.

Subscribers  do not see these advertisements

 
Sep 3, 2009
1,532
6,284
NW Surrey
Funster No
8,284
MH
LHD Hymer exsis-i
Plus 1 for cutting the batten. any cut marks on the ceiling will be hidden by the clamp ring, and if the cut edge of the batten isn't perfect, it can be disguised with white or wood coloured silicone
 
May 29, 2013
2,607
19,319
Tyneside
Funster No
26,231
MH
Chausson best of Flash 10
Exp
Several years now
Just a hint for the future, if / when you drill another hole in the roof. A non-invasive damp meter can find buried cables, at least ours does.
 

Join us or log in to post a reply.

To join in you must be a member of MotorhomeFun

Join MotorhomeFun

Join us, it quick and easy!

Log in

Already a member? Log in here.

Latest journal entries

Funsters who are viewing this thread

Back
Top