Hymer A class Bumper (2 Viewers)

Feb 22, 2011
9,598
19,682
Newcastle under Lyme
Funster No
15,397
MH
Hymer B544 A Class
Exp
Since 2015
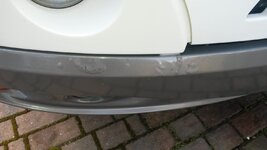
Hi, Has anyone removed the grey front bumper from a Hymer A class ?
The lacquer top coat seems to be coming adrift and deteriorating quite quickly and I`d like to get it sorted.
I presume it`s a body shop job rather than diy, but figured a better job would be possible if it could be removed first. Rather than taking vehicle to body shop and having some apprentice manouvering it around a cramped yard and getting the whole thing coated in dust etc.
So is removal of the front bumper // valance a diy job ?
 

Attachments

  • 20160430_174240.jpg
    20160430_174240.jpg
    117.2 KB · Views: 69

Dave and Ginny

Free Member
Jan 31, 2013
1,569
1,582
Nottingham
Funster No
24,505
MH
Hymer Starline 680
Exp
Since 2011, previously a tugger
I've got a bit of this on my 2002 Hymer where stones have chipped the lacquer. I was thinking about getting someone in like Chips away or similar. Not considered removing the bumper though, although I took the rear one off last weekend to get at the lower fridge vent. Rear bumper was simple, just held on by self tapers located behind the rear lens and number plate! Be interested to know how you get on with both removal and getting the lacquer sorted!

Mine is just bad on the top edge of the bumper. I had thought about sanding down the top edge only and using the natural line where it turns vertical then having a go at it myself with an off the shelf spray can lacquer from Halfords.
 
Last edited:

Judge Mental

Funster
Deceased RIP
Sep 2, 2009
6,650
5,883
Sarth London
Funster No
8,272
MH
Possl 636 FR panel van
Exp
1994 and beyond...
@lennyhb damaged his on holday best ask him he is Mr humer on here:)

Subscribers  do not see these advertisements


JeanLuc

Free Member
Nov 17, 2008
3,304
2,199
Warwickshire
Funster No
4,952
MH
Hymer B630 Star-Line
Exp
Since 2007
To remove, first lie down under the front and remove the four bolts that attach the bottom of the bumper to brackets. Then peel back the grey plastic joint strip between the bumper sides and the wheel arches. This will reveal s/s self-tappers that join the two grey sections; note that the screws go through a small s/s plate which tales the strain. There are two self-tappers visible in the extreme bottom corners of the wheel arches - remove these. Then look up under the arches at the back of the bumper and I think there is a self-tapper fitted vertically upwards at this point - you may need a torch to locate. Finally, look down behind the Hymer logo front white plate from the engine bay and you will see a larger self-tapper at each side going down into the bumper - remove these. The bumper should now pull forward and off but note that the indicator and fog lights (if fitted) are still connected via a mate'n'lok connector on each side which can be pulled apart.
Take to a decent body shop and bob should be your uncle!
 

Join us or log in to post a reply.

To join in you must be a member of MotorhomeFun

Join MotorhomeFun

Join us, it quick and easy!

Log in

Already a member? Log in here.

Latest journal entries

Funsters who are viewing this thread

Back
Top