Cascade Rapide Water Heater Leaking (Immersion/Electric End) (1 Viewer)

Affiliate links here may earn MHF compensation
Feb 13, 2023
180
59
United Kingdom
Funster No
93,987
MH
Bessacarr E695
Hi all,

Just found that my water heater is dripping from within the electric box on the internal side of the heater. I assume this must be coming from where the heater rod/immersion enters the cylinder maybe. I can't see any other connections that side, everything else is the other side and its bone dry that end.

Any pointers on whether this can be fixed? Would it be a seal maybe? All sounds easy enough but with it being 24 years old i guess spares are probably an issue. :(


Cheers all
Gary
 
Dec 24, 2014
9,615
49,888
Hurstpierpoint. Mid Sussex.
Funster No
34,553
MH
Compass Navigator
Exp
Ever since lighting was by Calor gas.
Hi all,

Just found that my water heater is dripping from within the electric box on the internal side of the heater. I assume this must be coming from where the heater rod/immersion enters the cylinder maybe. I can't see any other connections that side, everything else is the other side and its bone dry that end.

Any pointers on whether this can be fixed? Would it be a seal maybe? All sounds easy enough but with it being 24 years old i guess spares are probably an issue. :(


Cheers all
Gary
Yes, it's more than likely necessary to replace the chamfered steel washer, nut and rubber 'O' ring seal set #24 in the diagram.......this can be done with the heater in situ if you have space but it's still a fiddle.
The nut should be tightened to no more than 14NM or there's a danger of snapping the tie rod. Your 24 yr old tie rod will probably already be weak as described in my reply in your other post here:
Spare parts are plentiful and several suppliers if you Google 'Carver Cascade spares'.
My Cascade is 27 years old and I completely refurbished it around 4 years ago.

Carver Cascade nut, seal, washer.jpg


You should also replace the seal indicated below as this will have deteriorated but unless you have plenty of access around the heater you'll need to remove the whole unit from the m/h.

Seal. Tank end..JPG
 
Last edited:
Dec 24, 2014
9,615
49,888
Hurstpierpoint. Mid Sussex.
Funster No
34,553
MH
Compass Navigator
Exp
Ever since lighting was by Calor gas.
It's most likely that it's the tie rod seal leaking but reading your post again it may be that seal #26 is leaking at the heater element #35.
In view of the age of the unit and the safety issue with water leaks in areas of 240v electrical parts you really need to remove and strip the whole heater unit completely and refurbish it with all new seals. It's the only way to expect satisfactory performance for a year or two.
I enjoy the challenge of stripping and repairing stuff but you may not have the time, tools or patience and it is a fiddle as nuts may shear off and corroded threads fail.
You don't say where you are but I'd be happy to talk you through it if you let me have a phone number or by giving me your email address by PM.
 
OP
OP
G
Feb 13, 2023
180
59
United Kingdom
Funster No
93,987
MH
Bessacarr E695
Ok......onto the heater.....

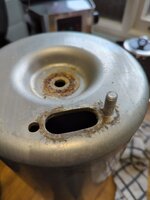
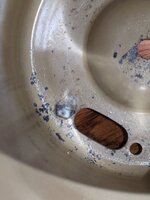
Managed to get it all apart. The rod looks in good condition. No signs of corrosion at burner end.

There is a lot of scale and corrosion around the element end though I think down to it leaking.

Is this bolt supposed to come out do we know?
16773384198985657186663164044559.jpg16773384503972386072621743036687.jpg

It looks like someone has maybe had a go at getting it out previously.l as it looks a bit chewed up maybe, can't fully tell for the scale that's attached itself to it.
 
Last edited:
OP
OP
G
Feb 13, 2023
180
59
United Kingdom
Funster No
93,987
MH
Bessacarr E695
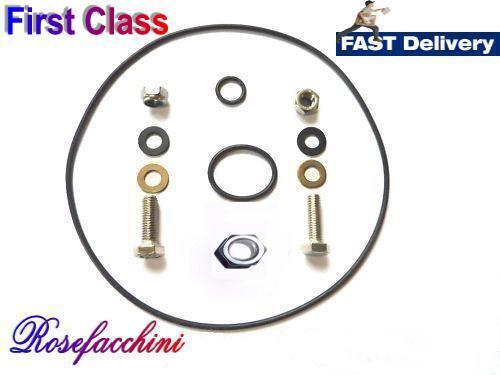
I'm going to buy this kit from Ebay.........

I think this is what I need and should replace all the corroded scaled up parts at the element end of the tank......

Is there anything I'm missing?

s-l500.jpg


Carver Cascade 2 - Henry - & Rapide
Water Heater
BEST QUALITY AVAILABLE
First Class Post Same Day Dispatch
Tank Fixing Kit For All Gas/Electric

Tank Tie Bar And Electric Element
Leak Fixing Kit
Any Questions Please Ask Via Ebay Message

The Kit Contents

1 x Tie Bar Nut (stainless steel) highest grade A4
2 x Bolts (stainless steel) highest grade A4
2 x Lock nuts (stainless steel) highest grade A4
2 x Washers
2 x Flat seals
1 x Tank Main Seal
1 x Heater Element seal
1 x 12mm Tie Bar Seal
1 x Free Information (basic pictures) Instructions Produced and Printed on A4


British Standard BS 2751/AISI 316 All Seals Are Highest Marine Quality.​

 
OP
OP
G
Feb 13, 2023
180
59
United Kingdom
Funster No
93,987
MH
Bessacarr E695
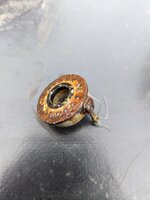
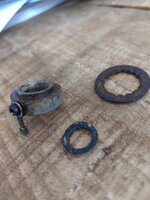
Any suggestions what to do about this part....
PXL_20230225_153138148.jpg

It's a mess and the ring has a very corroded earth ring terminal that won't budge. It doesn't look like I can get this part any longer. :(

Also, the really corroded washer that's on it doesn't seem to exist on the exploded drawings. :/. Is it needed?
 

TheBig1

LIFE MEMBER
Nov 27, 2011
17,810
44,257
Dorset
Funster No
19,048
MH
A class
Exp
many many years! since I was a kid
put it in a saucepan of white vinegar and gently boil for an hour. Then it should clean up easily
 
Dec 24, 2014
9,615
49,888
Hurstpierpoint. Mid Sussex.
Funster No
34,553
MH
Compass Navigator
Exp
Ever since lighting was by Calor gas.
Progress!
That kit has enough bits as far as I remember.
Unfortunately s/steel and aluminium or in this case aluminium alloy don't make good bedfellows due to a degree of galvanic incompatibility and as I mentioned previously, corrosion on the fixings was an issue when I refurbished mine. The damage to the screw in your photo looks to have suffered that way rather than (only) from previous efforts to remove it.
Where was the rusty earth washer/spacer fitted? I don't recall having one on mine. If you can't get a replacement I would be inclined to clean up the existing one as best you can (or fit something similar) and run a new earth lead from another point on the heater which is electrically common to where the original one was attached.
I did put a smear of Copperslip on the threaded part of non-electrical screws and studs when I reassembled mine in the hope of discouraging corrosion.
Pay attention when fitting the tie rod washer as it is dished one side to receive the 'O' ring.
Because it would have been nigh-on impossible to tighten the hose clip on the cold pipe connection on the unit after re-installing it I fitted it to the unit when it was on the bench. I had to cut the cold water one at an accessible point anyway in order to remove the unit, re-joining the cut ends with a straight connector when re-installed.
Refurbed Cacade.JPG
 
Last edited:
OP
OP
G
Feb 13, 2023
180
59
United Kingdom
Funster No
93,987
MH
Bessacarr E695
Progress!
That kit has enough bits as far as I remember.
Unfortunately s/steel and aluminium or in this case aluminium alloy don't make good bedfellows due to a degree of galvanic incompatibility and as I mentioned previously, corrosion on the fixings was an issue when I refurbished mine. The damage to the screw in your photo looks to have suffered that way rather than (only) from previous efforts to remove it.
Where was the rusty earth washer/spacer fitted? I don't recall having one on mine. If you can't get a replacement I would be inclined to clean up the existing one as best you can (or fit something similar) and run a new earth lead from another point on the heater which is electrically common to where the original one was attached.
I did put a smear of Copperslip on the threaded part of non-electrical screws and studs when I reassembled mine in the hope of discouraging corrosion.
Pay attention when fitting the tie rod washer as it is dished one side to receive the 'O' ring.
Because it would have been nigh-on impossible to tighten the hose clip on the cold pipe connection on the unit after re-installing it I fitted it to the unit when it was on the bench. I had to cut the cold water one at an accessible point anyway in order to remove the unit, re-joining the cut ends with a straight connector when re-installed.
View attachment 720564

Where was the rusty earth washer/spacer fitted? I don't recall having one on mine. If you can't get a replacement I would be inclined to clean up the existing one as best you can (or fit something similar) and run a new earth lead from another point on the heater which is electrically common to where the original one was attached.
It was behind the nut that goes on the end of the tie rod at the 240 element end.

Subscribers  do not see these advertisements

 
Dec 24, 2014
9,615
49,888
Hurstpierpoint. Mid Sussex.
Funster No
34,553
MH
Compass Navigator
Exp
Ever since lighting was by Calor gas.
It was behind the nut that goes on the end of the tie rod at the 240 element end.
There definitely wasn't an earth connection on mine. At that end there was just the tie rod 'O' ring then the thick dished washer and then the tie rod nut. Where was the other end of the earth wire connected? My guess is that someone retro-fitted it in the hope of preventing galvanic action between the steel tie rod and the alloy front plate. As I showed in an earlier pic my tie rod suffered from the well known effect (according to the spares supplier) of corrosion causing the tie rod to break at the water jacket end.
 
OP
OP
G
Feb 13, 2023
180
59
United Kingdom
Funster No
93,987
MH
Bessacarr E695
Maybe it was a later addition to help. It's part of a little dual earth run.
It comes from the 240v earth to the immersion element the to this earth point in question.
Screenshot_20230225-185744.png
 
Dec 24, 2014
9,615
49,888
Hurstpierpoint. Mid Sussex.
Funster No
34,553
MH
Compass Navigator
Exp
Ever since lighting was by Calor gas.
Hmm. It doesn't seem to be a galvanic corrosion limiter, but as I'm no electrical whizz I would find some way to maintain that earth wire as it's an electrical safety precaution. I think the water cylinder and heater element may be isolated from earth by the large 'O' ring seal where the water cylinder meets the alloy water jacket and by the small one under the dished tie rod washer.
 
Last edited:
OP
OP
G
Feb 13, 2023
180
59
United Kingdom
Funster No
93,987
MH
Bessacarr E695
Just looking at this wiring diagram from the manual, and you're right, it doesn't show that earth connection I am talking about. On this diagram its just teh one connection straight to teh screw terminal on the back of the electric heating element.
1677372366214.png


So did yours still have the fat chunky metal spacer ring behind the tie rod nut at the electric end? And with that was there also a big washer too like you can see in my picture above?

These are the parts that have come off mine ......
16774116044069217617656924955326.jpg
The bug dished washer above seems to be fitted in a way that dishes against rather than with the shape of the cylinder. I would say it would make that little rubber washer pretty pointless which may suggest why it's been leaking.

Was your thick metal ring machined to accept the big washer like mine is above, or did it just sit flat against it?
 
Dec 24, 2014
9,615
49,888
Hurstpierpoint. Mid Sussex.
Funster No
34,553
MH
Compass Navigator
Exp
Ever since lighting was by Calor gas.
Just looking at this wiring diagram from the manual, and you're right, it doesn't show that earth connection I am talking about. On this diagram its just teh one connection straight to teh screw terminal on the back of the electric heating element.
Yes, the Earth on mine is just connected to a heater element fixing screw. Important for electrical safety.
So did yours still have the fat chunky metal spacer ring behind the tie rod nut at the electric end? And with that was there also a big washer too like you can see in my picture above?
No. The chunky washer was flat both sides with a recess on one side to locate/retain the 'O' ring.
The bug dished washer above seems to be fitted in a way that dishes against rather than with the shape of the cylinder. I would say it would make that little rubber washer pretty pointless which may suggest why it's been leaking.
I agree, the point of having an 'O' ring and a recess in the thick washer is so that as the tie rod nut is tightened the 'O' ring is compressed within the tapered recess causing it to squeeze 'inward' tightly against the tie rod. That wouldn't occur with a flat rubber washer which would just flatten. From your pic of the repair kit it looks like it contains the correct 'O' ring rather than a flat rubber washer.
Was your thick metal ring machined to accept the big washer like mine is above, or did it just sit flat against it?
No, there's no machined upstand on mine. It's flat both sides.
Your big steel washer looks standard, probably an earlier or later design than mine. I would first fit the 'O' ring over the tie rod, then the big washer (which I assume will fit over the upstand on the thick recessed washer), then the thick recessed washer, then the tie rod nut. ('d probably put a thin steel washer between the recessed thick washer and the nut).
It's important the 'O' ring is well compressed to make a good seal between the tie rod and the end of the water cylinder.
There would be no point in having a tapered recess in the the thick washer if a flat rubber washer was used.

Tie rod seal 2.jpg

Subscribers  do not see these advertisements

 
Last edited:
OP
OP
G
Feb 13, 2023
180
59
United Kingdom
Funster No
93,987
MH
Bessacarr E695
Yes, the Earth on mine is just connected to a heater element fixing screw. Important for electrical safety.

No. The chunky washer was flat both sides with a recess on one side to locate/retain the 'O' ring.

I agree, the point of having an 'O' ring and a recess in the thick washer is so that as the tie rod nut is tightened the 'O' ring is compressed within the tapered recess causing it to squeeze 'inward' tightly against the tie rod. That wouldn't occur with a flat rubber washer which would just flatten. From your pic of the repair kit it looks like it contains the correct 'O' ring rather than a flat rubber washer.

No, there's no machined upstand on mine. It's flat both sides.
Your big steel washer looks standard, probably an earlier or later design than mine. I would first fit the 'O' ring over the tie rod, then the big washer (which I assume will fit over the upstand on the thick recessed washer), then the thick recessed washer, then the tie rod nut. ('d probably put a thin steel washer between the recessed thick washer and the nut).
It's important the 'O' ring is well compressed to make a good seal between the tie rod and the end of the water cylinder.
There would be no point in having a tapered recess in the the thick washer if a flat rubber washer was used.

View attachment 720842
The flat rubber looking washer, is tapered on the other side, so sits in the tapered part of the thick metal ring with the earth ring on it. I'm wondering if it once was an o ring but has taken the shape of where its been sat for all these years maybe? :/

PXL_20230226_151423280.jpg
 
OP
OP
G
Feb 13, 2023
180
59
United Kingdom
Funster No
93,987
MH
Bessacarr E695
Problem eleventy hundred and seven, in the land of owning an old motorhome

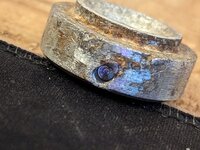
Earth connection screw was impossible to get off due to corrosion, so had to drill it out. It's left me with this wonky hole now.....

PXL_20230226_164608439.jpg

Any expert knowledge to recreate an earth fixing would be much appreciated as i cant get this part anymore it seems. Can I do anything with this smooth hole, or maybe create some other kind of fixing maybe? Is it easy to create another threaded hole maybe? I assume there are tools for this?

Oh also, is there a certain material screw/fixing i need to use to stop any kind of corrosion in the future?

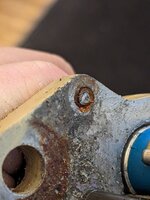
I've also got another snapped screw in the heating element where the other earth was attached. Is there a better way to extract without ending up with another wonky hole like above?

PXL_20230226_171324069.jpg

Cheers all :)
 
Last edited:
Dec 24, 2014
9,615
49,888
Hurstpierpoint. Mid Sussex.
Funster No
34,553
MH
Compass Navigator
Exp
Ever since lighting was by Calor gas.
The flat rubber looking washer, is tapered on the other side, so sits in the tapered part of the thick metal ring with the earth ring on it. I'm wondering if it once was an o ring but has taken the shape of where its been sat for all these years maybe? :/

View attachment 720879
I don't think it was 'O' ring but has adopted the shape of the washer recess. It has crumbled and may also have hardened making it useless as a seal. Does your repair kit contain a proper 'O' ring for it? The supplied seals are unlikely to be be rubber but will be Viton or Nitrile which won't deteriorate like rubber.
is that to get rid of rust or scale, or both?
What?
Problem eleventy hundred and seven, in the land of owning an old motorhome

Earth connection screw was impossible to get off due to corrosion, so had to drill it out. It's left me with this wonky hole now.....

View attachment 720912

Any expert knowledge to recreate an earth fixing would be much appreciated as i cant get this part anymore it seems. Can I do anything with this smooth hole, or maybe create some other kind of fixing maybe? Is it easy to create another threaded hole maybe? I assume there are tools for this?
I'd drill and tap a new hole for a new screw. You might get away with just drilling a new hole and using a self-tapper.
Oh also, is there a certain material screw/fixing i need to use to stop any kind of corrosion in the future?
The corrosion you have is due to the water leak. I'd use Copperslip or Vaseline on the screw threads. Provided that you cure the leak you won't get the same corrosion.
I've also got another snapped screw in the heating element where the other earth was attached. Is there a better way to extract without ending up with another wonky hike like above?

View attachment 720922
, then drill
Cheers all :)
Steel into alloy is always liable to corrosion, especially in the presence of water.
I'd leave it soaking in releasing fluid (Diesel fuel, Plusgas or WD40 might do it) for a day or two drill into the centre of the screw then heat the area with a hot air gun, and try using an 'Easyout'.
If it isn't broken off completely flush with the casting you could try hacksawing a screwdriver slot in the end then soaking and heating it as above.
If all that fails then you need to find an engineering business with a spark-eroder.
As a last resort you may be able to drill the stud out which may damage the female thread in the casting but it may be possible to use a nut and bolt instead of a stud or drill and tap the hole oversize - possibly insert a Helicoil to restore the thread.
 
Last edited:
OP
OP
G
Feb 13, 2023
180
59
United Kingdom
Funster No
93,987
MH
Bessacarr E695

That was in response to someone else's reply about boiling the corroded items in vinegar for an hour :)

Steel into alloy is always liable to corrosion, especially in the presence of water.
I'd leave it soaking in releasing fluid (Diesel fuel, Plusgas or WD40 might do it) for a day or two drill into the centre of the screw then heat the area with a hot air gun, and try using an 'Easyout'.
If it isn't broken off completely flush with the casting you could try hacksawing a screwdriver slot in the end then soaking and heating it as above.
If all that fails then you need to find an engineering business with a spark-eroder.
As a last resort you may be able to drill the stud out which may damage the female thread in the casting but it may be possible to use a nut and bolt instead of a stud or drill and tap the hole oversize - possibly insert a Helicoil to restore the thread.
Yeah its been soaking for a while. Ive been adding a solution to it for teh last few days hoping it would make it come out easier. i ended up trying to drill it out again thinking the drill bit my bite and screw it right through and out the other side. No such luck though, with the alloy being much softer than the screw itself, it eventually went off at an angle and drilled a fresh hole through the heater element next to teh existing screw.

I think I'm going to have to do as you say and find somewhere locally that can create two new threaded holes in both the thick alloy spacer, and the heater element too.
Does your repair kit contain a proper 'O' ring for it? The supplied seals are unlikely to be be rubber but will be Viton or Nitrile which won't deteriorate like rubber.
I think so yes. Its this isn't it.........

1677436257173.png
?

Subscribers  do not see these advertisements

 
Dec 24, 2014
9,615
49,888
Hurstpierpoint. Mid Sussex.
Funster No
34,553
MH
Compass Navigator
Exp
Ever since lighting was by Calor gas.
That was in response to someone else's reply about boiling the corroded items in vinegar for an hour :)
Never tried that but not sure that acidic vinegar is a good idea on alloy if left long enough to do any good.
I think I'm going to have to do as you say and find somewhere locally that can create two new threaded holes in both the thick alloy spacer, and the heater element too.
I couldn't determine from your pic if it was an 'O' ring or thick washer/sleeve.

Presumably you'll block the fresh holes that you've ended up with. Obviously the result will have be leakproof.
Whether the holes go right through or are 'blind' (i.e. they don't go right through the casting) fitting Helicoils is simple but the kit is quite dear just for a one-off job and you really need at least a pillar drill to ensure that the new holes are vertical to the face of the casting.
I've fitted no end of Helicoils into old and new blind holes in ali castings on vintage motorbike engines and they work well. It may not be necessary to drill an oversize hole in the heater plate as only the hole in the casting needs to be oversize in order to fit the Helicoil, then you can use the existing size screws.


A drive around small local business parks (e.g. ex farm use buildings) can be fruitful in finding small engineering places that will be able to undertake small one-off challenges for just a tenner or so. Established firms with websites and receptionists are unlikely to be very helpful unless you're very lucky. You haven't indicated where you are..............
 
Last edited:
OP
OP
G
Feb 13, 2023
180
59
United Kingdom
Funster No
93,987
MH
Bessacarr E695
You haven't indicated where you are..............
I'm in Northwich Cheshire

Presumably you'll block the fresh holes that you've ended up with. Obviously the result will have be leakproof.
None of the holes are water side of any seals, so its all good in that respect i think.

A drive around local business parks (ex farm use buildings) can be fruitful in finding small engineering places that will be able to undertake small one-off challenges for just a tenner or so.
I'll do some digging/investigating.
 

TheBig1

LIFE MEMBER
Nov 27, 2011
17,810
44,257
Dorset
Funster No
19,048
MH
A class
Exp
many many years! since I was a kid
You can buy 2 part metal putty/resin. Like araldite. Fill the hole to restore it's strength and drill and tap a new threaded hole

The vinegar trick dissolves rust and most corrosion. For the limescale, you could use calgon
 
OP
OP
G
Feb 13, 2023
180
59
United Kingdom
Funster No
93,987
MH
Bessacarr E695
Update.....

Managed to redrill both parts (240 element and alloy ring) to create new earth points as close to the originals as poss. Just drove a couple of self tappers in which cut in nicely. Service kit arrived and is all installed. Not filled and pressure tested yet. <fingers crossed>

Next prob is i dont think the reset switch is working correct on the 240 element. The button just moves freely in and out with no sort of spring action. Not sure what its needed for though to be honest. What does it reset, and under what circumstances would you need to reset something? I can see you can get new ones, but the issue being the bracket is held in by a corroded screw, and i dont think it will come out, and if it shears off i dont think there will be away of getting the bracket back on. The temp sensor you can slide out from under the bracket without removing it, but no such luck with the reset switch. Going to see what i can do with it tomorrow. :/

Subscribers  do not see these advertisements

 
Dec 24, 2014
9,615
49,888
Hurstpierpoint. Mid Sussex.
Funster No
34,553
MH
Compass Navigator
Exp
Ever since lighting was by Calor gas.
Good progress so far.

Next prob is i dont think the reset switch is working correct on the 240 element. The button just moves freely in and out with no sort of spring action. Not sure what its needed for though to be honest. What does it reset, and under what circumstances would you need to reset something?

The reset is to protect the 240v element from overheating and burning out, e.g. if it is switched on without any water in the heater.
It's 4 years since I refurbished my Cascade but I think after being reset the button is free to move as you described and you'll feel a little resistance only when it has been tripped.
You can check whether it has reset before filling the heater by checking continuity with a meter set to the Ohms (resistance) position (obviously without the 240v powered up).
 
OP
OP
G
Feb 13, 2023
180
59
United Kingdom
Funster No
93,987
MH
Bessacarr E695
Good progress so far.


The reset is to protect the 240v element from overheating and burning out, e.g. if it is switched on without any water in the heater.
It's 4 years since I refurbished my Cascade but I think after being reset the button is free to move as you described and you'll feel a little resistance only when it has been tripped.
You can check whether it has reset before filling the heater by checking continuity with a meter set to the Ohms (resistance) position (obviously without the 240v powered up).
Ahhh ok that sounds promising. Maybe it's ok after all. I just expected it to have a bit of feeling to it but your explanation makes sense. Cheers. đź‘Ť
 
OP
OP
G
Feb 13, 2023
180
59
United Kingdom
Funster No
93,987
MH
Bessacarr E695
Water heater back together today, and so far under pressure seems to be leak free........ yay!

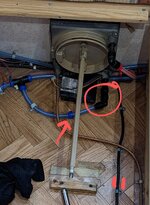
However....... One of the pushfit pipes seem to be leaking underneath it. I did suspect it may be leaking slightly before i started carrying this procedure out, but pulling it all apart must have made it worse and now can def see its that that is another source of water leakage.

Are they prone to failing? I tried pushing the pipe in to make sure it was seated properly and this hasn't made a difference so i can only think something is wrong with the pushfit fitting itself. It's the one circled below......
PXL_20230225_150544034~2.jpg

Do the little blue and red caps serve any purpose or are they just for marking hot cold fittings?

Are these fittings anything special? Can I just get new ones from a motorhome shop?
 
Dec 24, 2014
9,615
49,888
Hurstpierpoint. Mid Sussex.
Funster No
34,553
MH
Compass Navigator
Exp
Ever since lighting was by Calor gas.
I have spigots on mine to which the hoses fit with Jubilee clips. Yours does seem an unnecessarily elaborate way to connect the pipes. See the pics below.
I don't have much experience with push fittings but since the rings are screwed up on all the other fittings why not screw the blue one in place and see it it stops the leak?
They appear to be standard push fittings available from c/van and m/h shops and online.

One of my spigots leaked but snapped off when I attempted to remove it as it was old and brittle so I had to replace it.
Refurbed Cacade.JPG


CIMG1867.JPG


Hot out

1678648981888.png


Cold in

1678649251083.png
 
Last edited:
OP
OP
G
Feb 13, 2023
180
59
United Kingdom
Funster No
93,987
MH
Bessacarr E695
I don't have much experience with push fittings but since the rings are screwed up on all the other fittings why not screw the blue one in place and see it it stops the leak?

I did try pushing it back on, as that what it seems to do (not screw on) but it doesn't seem to clip on with any great force and keeps coming off everytime i go back to it.

I'll get to my local motorhome shop tomorrow and see if they have anything in there and just replace the entire fitting. <Fingers crossed>

Subscribers  do not see these advertisements


Join us or log in to post a reply.

To join in you must be a member of MotorhomeFun

Join MotorhomeFun

Join us, it quick and easy!

Log in

Already a member? Log in here.

Latest journal entries

Funsters who are viewing this thread

Back
Top