Solar panel installed on roof rails

Ridgeway

LIFE MEMBER
Joined
Mar 10, 2012
Posts
4,079
Likes collected
7,880
Location
Lausanne
Funster No
20,102
MH
NiBi Arto 85E
Exp
Since 2012
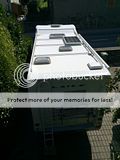
I will install my 100w panel in the coming days and whilst planning the location on the roof I thought that It may be possible to use the existing factory fitted roof rails to mount the panel on to.


The location would be in the top right hand of the picture i.e. up against the side rail and in between the 2 sun roofs.

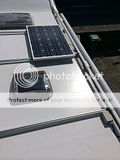
My idea is to use some mate bolts that would slide into the rails (see Alu profile below) and then drill relevant holes on the Alu C profile of the panel, these would be secured with relevant nuts and washers and then some thread lock.


I have seen them used before using ali angle between the cross rails and then the panel fixed to them. make sure you use stainless steel fittings though to prevent rust which will corrode the cross rails very quickly
 
Here is one where I used two sizes of stainless steel U bolts. Just to offer ideas

Broken Link Removed
Broken Link Removed
 
Fitted mine on the Adria and a friends on a Rapido to the roof rails, no problems.
Used alloy box section and stainless screws with nyloc nuts.
 
I like the U bolt idea, will search some out tomorrow.

Subscribers  do not see these advertisements

 
I like the U bolt idea, will search some out tomorrow.

Forget threadlock just use nylock nuts

I doubt either method will work as your rails are too close to the roof for you to get your hand under the panel and fit/tighten the nuts.
Personally I would remove two rails and have free reign
 
Last edited:
Cheers Andy, shame we couldn't have met up for the install at Easter, gives me something to do at the weekend though:Wink:
 
i have done the same , only i have hinges down one edge of the panel so i can prop it up and take full advantage of the low winter sun making the panels useful all year.
 
ok mounted with some U bolts but as Andy had pointed out with the rails beinf so close to the roof i had to make some 25mm spacers so i could get my hand in to tighten the nuts. All is extremely secure and most of the cable is run as well. Like this I can easily add another panel to the left at a later date and still leave space for aircon or a roofbox at the back, plus it's located just behind the luton's bump so hopefully it won't add too much drag
 
job done.

th_fb2bbdc00205b9c64258822d9ea49cf0.jpg


would have been easier with rachet ring 13mm spanner due to that tight access inbetween the panel and the roof but hey then it wouldnt have been as much fun...

th_b595c2fa7ad8a61a289e51a854ac1c8d.jpg


Sunny days ahead:Wink:

Subscribers  do not see these advertisements

 
Would have been easier with rachet ring 13mm spanner due to that tight access inbetween the panel and the roof but hey then it wouldnt have been as much fun...

Sorry I could have told you that :Laughing:
I also made sure the U bolt threads were not overly long

EDIT Nice job matey :thumb:
 
Here is one where I used two sizes of stainless steel U bolts. Just to offer ideas

Broken Link Removed
Broken Link Removed

Hi Andy
I am about to take the plunge and purchase a couple of 100w panels -I intend to fit them to the roof bars which are already on my Sundance, similar to the pictures you show, but down each side of the roof vent
can you please advise how the u bolts fasten to the panels -i cant see any of the threaded U bolt ends or any holes in the panels where they bolt to.
if you have any photos that would be great.How many u bolts were used per panel -any attached midway for example?
:helpsos:

cheers
jim
 
Last edited:
i like this idea

i have done the same , only i have hinges down one edge of the panel so i can prop it up and take full advantage of the low winter sun making the panels useful all year.


make it so it can be tilted to the sun, very cool..
:thumb:
 
Four U bolts
Drill the frame
Shorten the threads so just long enough to take a full nyloc nut
 
job done.

th_fb2bbdc00205b9c64258822d9ea49cf0.jpg


would have been easier with rachet ring 13mm spanner due to that tight access inbetween the panel and the roof but hey then it wouldnt have been as much fun...

th_b595c2fa7ad8a61a289e51a854ac1c8d.jpg


Sunny days ahead:Wink:

Nice job, you could get another 3 up there!
Allan

Subscribers  do not see these advertisements

 
Four U bolts
Drill the frame
Shorten the threads so just long enough to take a full nyloc nut

Same as Andy did. I positioned the panel on the bars and then marked out the locations for the holes. The Alu profile on the panels is a C profile so there is an approx 30mm lip underneath that you don't see on the pictures. Just drill the 8 holes with a slightly oversize bit as it will be easier to locate them afterwards.

My bars are very close to the roof so I fitted some spaces to lift up the panel away from the roof and allow me to get my hand under to tighten the 8 nylon nuts, having said that I realised afterwards that a ratchet ring spanner would have saved me a lot of bother:thumb:
 
Nice job, you could get another 3 up there!
Allan

Been using the 1 for the last few months and it's been great to be able to avoid hook ups on sites. Not done any long stints yet so maybe another 100w panel could go up there soon:Wink:
 
Self install/insurance

I wanted to put solar on my roof myself but thought I'd better check with my insurance company, they said NO as they had to bit fitted professionally with certificate/receipts supplied. Am I with the wrong insurer or should I just not tell them? Annoying when I'm more than capable of fitting them myself. Cheers Shawn
 
Our roof rails slide along the siderails so they can be repositioned anywhere along the roof. They are 'I' section and are exactly the right size to fit the solar panels into. One rail tightened, slot panel in, move 2nd rail along, slot other side of panel in and tighten the bolts that secure crossrails to sidebars - job done. Takes about 4 minutes to fit or remove a panel.

:thumb:
 
We have a puny 30w panel and 2 x 10⁵ah batteries. Even in December we were able to spend 2 weeks travelling around with no EHU. Thinking about upgrading the panel soon. The controller will cope with 120w so I might go for one of those
Allan

Subscribers  do not see these advertisements

 
Four U bolts
Drill the frame
Shorten the threads so just long enough to take a full nyloc nut

Same as Andy did. I positioned the panel on the bars and then marked out the locations for the holes. The Alu profile on the panels is a C profile so there is an approx 30mm lip underneath that you don't see on the pictures. Just drill the 8 holes with a slightly oversize bit as it will be easier to locate them afterwards.

My bars are very close to the roof so I fitted some spaces to lift up the panel away from the roof and allow me to get my hand under to tighten the 8 nylon nuts, having said that I realised afterwards that a ratchet ring spanner would have saved me a lot of bother:thumb:

Thanks for the answers -silly me didn't realise the panels had a C frame. I had cut out some hardboard templates to see what they looked like in position and if i could fit 2 panels :thumb:
 
Last edited:
What an inspiring thread. Many thanks to all contributors.
 

Join us or log in to post a reply.

To join in you must be a member of MotorhomeFun

Join MotorhomeFun

Join us, it quick and easy!

Log in

Already a member? Log in here.

Latest journal entries

Back
Top