haganap
LIFE MEMBER
- Dec 5, 2007
- 12,760
- 26,461
- Funster No
- 974
- MH
- Niesman+Bischoff 79e
- Exp
- I'm an oldbie MH number 10
So having had our Carthago for 4 months now, I was running out of extras to fit to it. Therefore, and because I have learnt to do a "buy extras as soon as" to avoid the normal for me on motorhome number 9, of buying extras 3 months before we sell it I thought I would get in early.
Extras so far in the last 3 months
Inet box (love this bit of kit)
Motorhome Wifi (can't live without it)
MLevel self levelling system
Victron Multiplus inverter 2300 (wired in for complete 230v when off grid)
EFOY power bank/charger (owned for about 8 years and moved from van to van)
And so after some research I opted to buy semi air for the back to include gauges and compressor. I rang A&E Leisure in Northwich who are super helpful and a great company to deal with. They said the earliest they could fit it would be March. Sadly I wanted it for our next big trip at the end of Feb when we go off skiing again.
After looking up a few you tube videos from the normal please have a bath or we've just inveted motorhoming brigade, I managed to find one or two very useful vids that showed quite indepth how to fit. Oddly enough the guy who posted the video literally followed the guy round A&E leisure filming him doing it.
The system
After looking at a few options I opted to go with VB air Suspension as I know the quality, it's a name I trust, it looked slightly easier to fit although the guages were attached to a bit of metal that meant a little modification to the dash board. Total cost was £882 and the cheapest for any system fitted was £1295. Therefore in for a penny and in for a pound I decided to change my driveway to a workshop in the freezing cold and set about giving it a go.
Fitting time is said to be about 3-4 hours. Good job I am not your mechanic because due to a few un-suspecting challenges, mine was about 8-10.
Firstly the kit. The kit is called the comfort kit. it comes with two bellows, a compressor, a loom for wiring, all the tubing you would need for about up to 8 or 9 meter vans and the gauges.
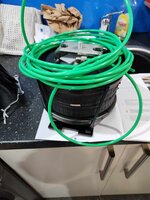
Essentially there is Two tubes for the bellows, one green for back left and one black for the right side.
The first thing to do was to remove the two bump stops (pictured) these can on some occasions be difficult to get off. Fortunately for me, mine were simple and a little tap of the hammer and I had the pair of them sat on my drive waiting to spend the rest of their lives in my garage awaiting a new job role.
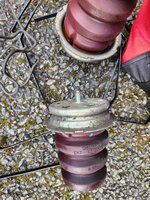
The next job was to install the belows, and line them up. Again quite a simple process that didn't take too long and I thought this would be the toughest of jobs. It wasn't overly complicated but it was a bit fiddly. Done over a work pit I imagine would be much easier, done lying on your back in your 50s, probably not so.
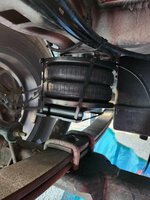
Once situated in place it was really a case of just bolting them down which for me was a game changed in using the VB over other systems. Simply the plate sits over the U clamp connectors that are already there. On other sytems you remove these and replace. However, now on the VB they fit over the top and literally come with two types of u bolts, one for single leaf springs and one for double.
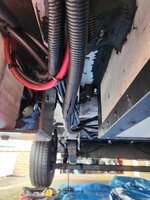
This done it was a job of literally getting the tubing from the rear of the van to the front. At this point it gets interesting as you start to learn and plan where you are going to enter the front of the van with the tubes. My tubes were all placed in a shroud to avoid any danger of them doing anything and the route was quite simple. The Guys at A&E gave me some good tips as to where to enter the vehicle. Some choose the battery box I chose under the step housing.
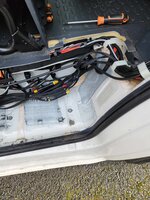
This is where a few of my challenges started. The first challenge was where to put the compressor. It is recommended to go in the foot well. But as you can see from above, the amount of cabling I had in there for the sound system made it quite a challenge and I therefore quickly realised this was not going to be an option. Having assessed thought long and hard about how to keep it easy for myself, I opted to place the compressor under the front drivers seat which again was a nice tip from A&E leisure.
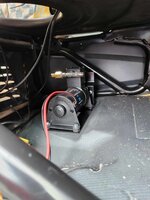
Having now done the job of gaining access to and bringing all the hosing in the time was right to think about installing the gauges. Again problems arose. My van already had the template done for an emergency alarm shut off key and a usb connector. This would therefore mean I would have to remove this and find somewhere else for these to go. Ultimately, I opted to place them on the gauge housing so that I could keep them where they were. This then meant disconnecting the whole alarm system and drilling in to the gauge housing to refit the two components. This was really hard until I nipped to screwfix and increased my tool collection with a hole saw set. Once purchased this proved far more simple to relocate.
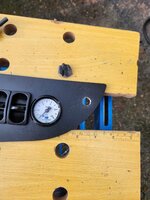
Two new holes drilled and the install could start. There are no instructions of any note or worth with the kit, it's a case of simple guess work and a little bit of "if you are doing it you must be able to work it out yourself" I then placed the gauges in position with the new usb socket and alarm key installed, only to find out it didn't fit and needed "mild" manipulation and the careful work of a little bit of sawing the plastic dash kit. But before to much a do and with Nikki now crying about all the cables everywhere, I put it in to place, reconnected the alarm and boom, in it went and it looked beautiful.

All that was now left was to wire it all up and plumb in the compressor. This was also quite tricky as I wanted the loom to run under the floor so that it would not be seen. It also came with a relay but was pretty simple to work out. The toughest job was getting the floor up to make it fit. Being a decent van, it is quite well insulated under the floor for soundproofing and wintering. However with the help of my long arm van cleaning brush slid between the two floors, a bit of pushing pulling and grunting, the cabling was done.
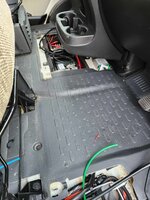
So it was then a case of planting and fixing in the compressor, plugging various plugs in to various places, praying to the local and national gods and revisiting every nut bolt and fastening to make sure it was all completely secure before putting it all back together again.
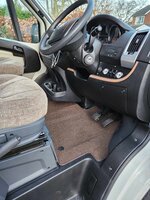
The big test was then carried out. press the button and watch the van increase its ride height, fire it up and take it out for a nice spin around some lovely pothole roads. I have to say the difference was immediately noticeable. The van seems a lot smoother, a lot softer too. It's not really necessary as most of my other vans have been much bigger and therefore it did help with body role too. But this beauty is a dream to drive anyway being low profile.
So there you go, how's your weekend going?
Extras so far in the last 3 months
Inet box (love this bit of kit)
Motorhome Wifi (can't live without it)
MLevel self levelling system
Victron Multiplus inverter 2300 (wired in for complete 230v when off grid)
EFOY power bank/charger (owned for about 8 years and moved from van to van)
And so after some research I opted to buy semi air for the back to include gauges and compressor. I rang A&E Leisure in Northwich who are super helpful and a great company to deal with. They said the earliest they could fit it would be March. Sadly I wanted it for our next big trip at the end of Feb when we go off skiing again.
After looking up a few you tube videos from the normal please have a bath or we've just inveted motorhoming brigade, I managed to find one or two very useful vids that showed quite indepth how to fit. Oddly enough the guy who posted the video literally followed the guy round A&E leisure filming him doing it.
The system
After looking at a few options I opted to go with VB air Suspension as I know the quality, it's a name I trust, it looked slightly easier to fit although the guages were attached to a bit of metal that meant a little modification to the dash board. Total cost was £882 and the cheapest for any system fitted was £1295. Therefore in for a penny and in for a pound I decided to change my driveway to a workshop in the freezing cold and set about giving it a go.
Fitting time is said to be about 3-4 hours. Good job I am not your mechanic because due to a few un-suspecting challenges, mine was about 8-10.
Firstly the kit. The kit is called the comfort kit. it comes with two bellows, a compressor, a loom for wiring, all the tubing you would need for about up to 8 or 9 meter vans and the gauges.

Essentially there is Two tubes for the bellows, one green for back left and one black for the right side.
The first thing to do was to remove the two bump stops (pictured) these can on some occasions be difficult to get off. Fortunately for me, mine were simple and a little tap of the hammer and I had the pair of them sat on my drive waiting to spend the rest of their lives in my garage awaiting a new job role.

The next job was to install the belows, and line them up. Again quite a simple process that didn't take too long and I thought this would be the toughest of jobs. It wasn't overly complicated but it was a bit fiddly. Done over a work pit I imagine would be much easier, done lying on your back in your 50s, probably not so.

Once situated in place it was really a case of just bolting them down which for me was a game changed in using the VB over other systems. Simply the plate sits over the U clamp connectors that are already there. On other sytems you remove these and replace. However, now on the VB they fit over the top and literally come with two types of u bolts, one for single leaf springs and one for double.

This done it was a job of literally getting the tubing from the rear of the van to the front. At this point it gets interesting as you start to learn and plan where you are going to enter the front of the van with the tubes. My tubes were all placed in a shroud to avoid any danger of them doing anything and the route was quite simple. The Guys at A&E gave me some good tips as to where to enter the vehicle. Some choose the battery box I chose under the step housing.

This is where a few of my challenges started. The first challenge was where to put the compressor. It is recommended to go in the foot well. But as you can see from above, the amount of cabling I had in there for the sound system made it quite a challenge and I therefore quickly realised this was not going to be an option. Having assessed thought long and hard about how to keep it easy for myself, I opted to place the compressor under the front drivers seat which again was a nice tip from A&E leisure.

Having now done the job of gaining access to and bringing all the hosing in the time was right to think about installing the gauges. Again problems arose. My van already had the template done for an emergency alarm shut off key and a usb connector. This would therefore mean I would have to remove this and find somewhere else for these to go. Ultimately, I opted to place them on the gauge housing so that I could keep them where they were. This then meant disconnecting the whole alarm system and drilling in to the gauge housing to refit the two components. This was really hard until I nipped to screwfix and increased my tool collection with a hole saw set. Once purchased this proved far more simple to relocate.

Two new holes drilled and the install could start. There are no instructions of any note or worth with the kit, it's a case of simple guess work and a little bit of "if you are doing it you must be able to work it out yourself" I then placed the gauges in position with the new usb socket and alarm key installed, only to find out it didn't fit and needed "mild" manipulation and the careful work of a little bit of sawing the plastic dash kit. But before to much a do and with Nikki now crying about all the cables everywhere, I put it in to place, reconnected the alarm and boom, in it went and it looked beautiful.
All that was now left was to wire it all up and plumb in the compressor. This was also quite tricky as I wanted the loom to run under the floor so that it would not be seen. It also came with a relay but was pretty simple to work out. The toughest job was getting the floor up to make it fit. Being a decent van, it is quite well insulated under the floor for soundproofing and wintering. However with the help of my long arm van cleaning brush slid between the two floors, a bit of pushing pulling and grunting, the cabling was done.

So it was then a case of planting and fixing in the compressor, plugging various plugs in to various places, praying to the local and national gods and revisiting every nut bolt and fastening to make sure it was all completely secure before putting it all back together again.

The big test was then carried out. press the button and watch the van increase its ride height, fire it up and take it out for a nice spin around some lovely pothole roads. I have to say the difference was immediately noticeable. The van seems a lot smoother, a lot softer too. It's not really necessary as most of my other vans have been much bigger and therefore it did help with body role too. But this beauty is a dream to drive anyway being low profile.
So there you go, how's your weekend going?

