Hi.... we have all read the threads relating to cracks, leaks and seals investigating which is the best route to cure it. We have had our motorhome four years now having bought it with hairline cracks around the drain plug in the base. First attempt was two part epoxy marine paint which worked for a short time, then they appeared again, second time glass fibre which also worked for a short time, then finally epoxy putty with two part epoxy paint. Yes, you guessed it, this failed in the end. After our last trip I decided on giving the girl a refit and to cure this issue once and for all.
This is what it looked like at the start after numerous failings.
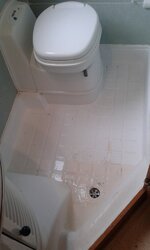 bit of a mess. I commenced by removing all the old attempts which finally revealed the problem.
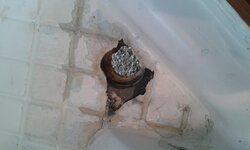
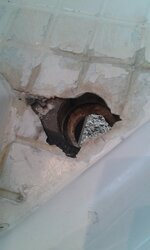 Basically the problem is this. If you have ever installed a ceramic shower tray in your home you will of noticed the drain plug assembly is fully supported by the ceramic tray as you lower the tray on to the fittings, it would appear during the installation of the shower tray in the motorhome they install the drain assembly first then offer the whole tray and drain through the hole going through the chassis plate where the hole is larger than the fitting leaving around 1cm unsupported around the drain hole. As you keep walking in and out of the shower/toilet compartment treading on the plug hole this stresses it which creates the cracks. Why they put the drain beside the door is another issue. Had they back filled the hole underneath the shower tray with expanding foam this would of supported the fibre glass lip around the drain hole, no, they just mastic the pipe as it exits the base plate under the shower tray externally. Fortunately the actual floor surrounding the hole was not rotten or even damp. Taking all this onboard I knew a different approach was required the main objective of course was to make sure the new drain plug assembly was fully supported. Not wanting to rip the whole shower tray out I decided to take this route. I purchased on Ebay a sheet of 40 x40 cm aluminium sheet then made a template of where it was to be positioned then cut it out accordingly and fitted a new drain. The picture is better than the description.
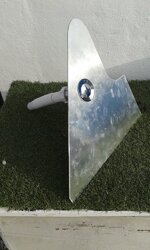
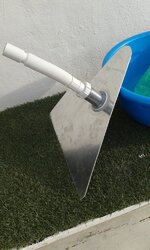 having cleaned up all the previous works I sealed the hole with white silicon paint. I then used a full tube of Sikaflex to stick the new plate down after offering the fitting through the hole.
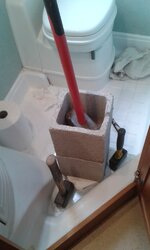 I then left this for two days. After this I left the weights in place whilst I filled the hole from underneath with expanding foam then left it for another day. After tidying everything up it was then a matter of painting. I used roof sealing paint first, three coats then three coats of acrylic paint. This is the end result. Hope you find this informative if you are experiencing the same issues. atb

This is what it looked like at the start after numerous failings.
 bit of a mess. I commenced by removing all the old attempts which finally revealed the problem.
 Basically the problem is this. If you have ever installed a ceramic shower tray in your home you will of noticed the drain plug assembly is fully supported by the ceramic tray as you lower the tray on to the fittings, it would appear during the installation of the shower tray in the motorhome they install the drain assembly first then offer the whole tray and drain through the hole going through the chassis plate where the hole is larger than the fitting leaving around 1cm unsupported around the drain hole. As you keep walking in and out of the shower/toilet compartment treading on the plug hole this stresses it which creates the cracks. Why they put the drain beside the door is another issue. Had they back filled the hole underneath the shower tray with expanding foam this would of supported the fibre glass lip around the drain hole, no, they just mastic the pipe as it exits the base plate under the shower tray externally. Fortunately the actual floor surrounding the hole was not rotten or even damp. Taking all this onboard I knew a different approach was required the main objective of course was to make sure the new drain plug assembly was fully supported. Not wanting to rip the whole shower tray out I decided to take this route. I purchased on Ebay a sheet of 40 x40 cm aluminium sheet then made a template of where it was to be positioned then cut it out accordingly and fitted a new drain. The picture is better than the description.
 having cleaned up all the previous works I sealed the hole with white silicon paint. I then used a full tube of Sikaflex to stick the new plate down after offering the fitting through the hole.
 I then left this for two days. After this I left the weights in place whilst I filled the hole from underneath with expanding foam then left it for another day. After tidying everything up it was then a matter of painting. I used roof sealing paint first, three coats then three coats of acrylic paint. This is the end result. Hope you find this informative if you are experiencing the same issues. atb