OP
OP
That would be fine, but it's not what you've drawn.
I drew it on in the wrong place.

At least I know how now.
Thanks!

Follow along with the video below to see how to install our site as a web app on your home screen.
Note: This feature may not be available in some browsers.
That would be fine, but it's not what you've drawn.
 rehash....
Subscribers do not see these advertisements
I hope you are wrong s there are 100's in our vanI thought similar about wago. They rattle about and disconnect so are not recommended in auto industry. Might be wrong. (Likely).
i think your diagram needs a bit of a
Subscribers do not see these advertisements
I hope you are wrong s there are 100's in our van
Would you just move the switch so the splicing in for the reading lamps is before the puck switch or would you wire it totally differently? How would you do it? I'm very keen to learn from the more experienced!
Subscribers do not see these advertisements
when you say 6mm what do you mean? The cross sectional area of the copper? The diameter of the copper, or the diameter of the whole thing?
Daisychain the other reading lights to the first using the shortest/easiest routes.
cable sizes - 1.4A is the square root of fcuk all. 1.5mm2 cable is overkill
What I normally work with the stated rating. In this case the "6mm" multi-strand is rated at 53 amps (https://tinyurl.com/yyug4szn). Massively oversized so will buy thinner for ease of running them.
Will daisy chain still work it each reading light is switched on the base? These lights: (<Broken link removed>).
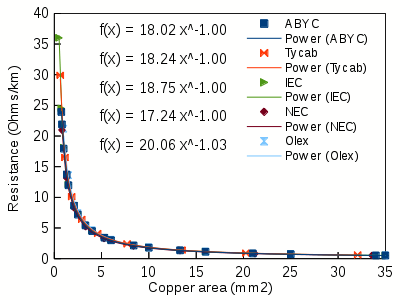
I'm going by this calculator for cable size.
 stephenstuff.wordpress.com
Don't. lol. There are a few things wrong with your entries. It's not 12V we're using. You can accept a much greater loss %age in this situation (possibly even helpful as a lot of LED's are designed for 12V, not the 14. something you might see. It's rubber cable, at 30 degrees C etc.
The table a bit down this page is more useful:
DC cable selection guide
I have recently installed solar and dual bettery systems on two buses, refreshed my own installation and am starting to think like an electrical engineer. After some extensive research, I have prod…
Subscribers do not see these advertisements
I thought similar about wago. They rattle about and disconnect so are not recommended in auto industry. Might be wrong. (Likely).
I can tell you from first hand experience that they Wago blocks may let go of the wires, when we got a previous Globecar Familyscout L van one of the light strips over the bed didn't work which was a bummer. I located the Wago blocks and worked out which was which (Germans like to use blue & brown wires and its not always consistent as to which is live and neutral!), whilst checking the wiring I found that one of the wires for the light was loose so lifted the 'clamp' on the block, reinserted the wire, and clamped it soundly in place, it never came out again. Whether this issue was down to the block itself or that the wire hadn't been fully inserted originally I don't know. One thing to make sure of when using Wago blocks is that the insulation is cut back sufficiently on the wire to allow it to be fully inserted to ensure a good tight fit.Not heard that before. Generally thought safe because of low insertion force and high retention force. Possibly some cheap copies about that are not so well manufactured.
Subscribers do not see these advertisements
Run each bank of lights in a parallel daisy chain using piggyback crimps
buy a decent set of crimping pliers, as they give a good joint without over or under crimping leading to failures.

Subscribers do not see these advertisements
Having re-read the posts the link I gave in my last post gives the size of cables and the length of a cable run before significant voltage drop, up to 250 metres with 32 LED's and 0.75mm2 cable. Note also that it is only the end LED in the chain which is connected to the negative, all others are connected in the chain. The information is very full for creating a chain of LED'sCame across this which will help. Note they state that LED pucks must always be in series, ie daisy chained so the negative goes back to the power source, only the positive goes through the LED's in a chain. the link below explains it all.
Subscribers do not see these advertisements
My initial thought was piggy back crimps
The system is 1.4 amps so 1.4 X 1.25 = 1.75. Round it up to 2 amps.
That’s just above the normal operating conditions and well below the rating of the wire.
Strip the two wires, twist and put into one fully insulated crimp.
Like, but with the correct crimp:
View attachment 441944
Nothing extra to fall apart, short out etc.

So you wouldn’t use piggy back?
Subscribers do not see these advertisements
No. They are a weak point, have a lot of un-insulated area and are 2 crimps when you could just do one.
This has far less chance of anything going wrong if crimped correctly:
Amazon product ASIN B00XWDMHC6