Show us your 3d printed bits!

Joined
Sep 17, 2017
Posts
6,629
Likes collected
12,825
Location
Birmingham, UK
Funster No
50,575
MH
A-Class
Exp
2017
I know a few of us are nerdy enough to have a 3d printer. And a few more have probably bought or ordered parts.

Show us your 3d printed (motorhome related) bits! ...and provide links to to part if you have it.

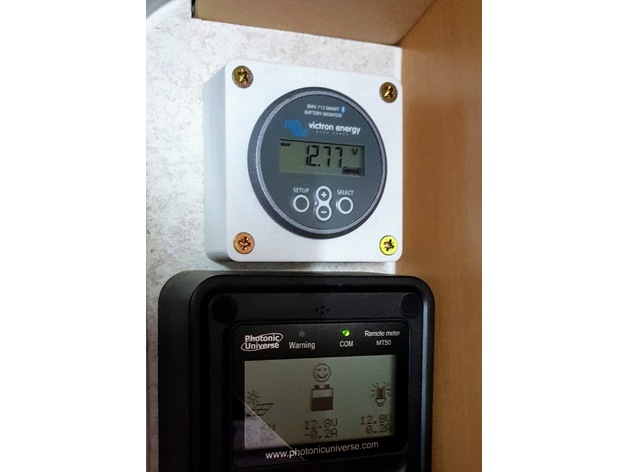
I'll start. In my last van, I bought a Victron BMV 712 battery monitor. But I didn't want to shell out £30 for the wall mount. So I designed and printed my own:

564d7709b94f92c6d18b4c289a0da40f_preview_featured.jpg


I wanted a rear view monitor that wasn't mounted to the dash, but the existing mirror mount and the mount that came with the camera got in the way of the Remis cab blinds. So I designed and printed my own. I used PETG plastic so it wouldn't melt in the sun. It took a few attempts to get the angle and length right so it cleared the blinds, wasn't too low to interfere with my view, and didn't vibrate itself to death. Final design was still siliconed on 2 years and 20,000 miles later, including through 38C heat in Germany with no AC... Don't worry, I cleaned the old silicone off...!
20190412_102819.jpg

I'm not actually sure if this was the final attempt.... I think it angled up slightly so the monitor mounting point was higher? I've got the original design for this one somewhere... need to dig it out.
 
My other half was out this morning, so I've done some more work on the holder for the awning winder and rafter pole. Revision 3 of the design now holds the poles nice and tight.
PXL_20210724_124337240.jpg


So now I'm designing a base for them to sit in... My current design is for a large flat plate that sits in the nook next to the door frame, with slots for the end of the rafter pole and the awning winder. Problem is that it's going to be one of the largest areas I've printed and it's common for stuff this big to warp and lift off the printer base while it's printing. Lets give it a go!
PXL_20210724_130447949.jpg

PXL_20210724_130908467.jpg

It's in 'draft' mode, which means it squirts the plastic out a bit faster in thicker layers, so is a bit less accurate. It'll take 90 mins.
 
You clever sods all I've made is some pipe adaptors for when I converted my SOG to a roof vent.
I'm currently playing with Fusion360 to make the designs, but I really don't know what I'm doing. It's all trial and error. I frequently try to make minor changes to the design and end up with a squiggle of random lines. So I undo or redraw whole bits again. Maybe I'll figure it out eventually.

I've had more success with OpenSCAD where you write a simple commands like BASIC for the shapes you want in 3d. But it gets hard very quickly if you want anything that's not geometric.
I'm no clever sod, as I think simple thoughts, and Fusion 360 is ideal for people like me! I threw out my memories of 2D tech drawing - an O level from long ago- and just embraced the new world opened up by this fabulous programme.

To prove it's not difficult, I designed and printed this wheelhouse for my MTB model after just a few days of playing with the thing!

MTB wheelhouse.jpg


A much more simple job was these sinkpots to fill the gap behind the Hymer sink.
sinkpot.jpg
 
I'm no clever sod, as I think simple thoughts, and Fusion 360 is ideal for people like me! I threw out my memories of 2D tech drawing - an O level from long ago- and just embraced the new world opened up by this fabulous programme.

To prove it's not difficult, I designed and printed this wheelhouse for my MTB model after just a few days of playing with the thing!

View attachment 519513
Nope. You CLEARLY know what you're doing. :p
 
I'm currently playing with Fusion360 to make the designs, but I really don't know what I'm doing. It's all trial and error. I frequently try to make minor changes to the design and end up with a squiggle of random lines. So I undo or redraw whole bits again. Maybe I'll figure it out eventually.

I've had more success with OpenSCAD where you write a simple commands like BASIC for the shapes you want in 3d. But it gets hard very quickly if you want anything that's not geometric.
I used to use Autodesk Inventor at work, but wanted to learn Fusion 360. I came across a series of tutorials by Brad Tallis. He is a Microsoft employee, and very competent. I like his slow, methodical teaching method. Just checked and he now has 92 one hour tutorials! Start at the beginning though to avoid getting into bad habits! :giggle:
 
Are you taking orders ? I have the same issue I need to put up my rear view camera monitor.

Subscribers  do not see these advertisements

 
Are you taking orders ? I have the same issue I need to put up my rear view camera monitor.
I'll need to see if I can dig out the files... I've had a PC die on my since then, but I think I had everything on Google Drive...
 
I like Sketchup Make (not sure if it is still available for free). I've tried a few different 3D design programs and found Sketchup was intuitive (other brains will differ) and there are quite a few add ons that will check for continuity of design and other errors.
 
3d prints installed! I tidied up the base piece as it still had some brimming attached. The base piece is the draft version, I didn't expect it to fit first time. It could do with some refinement (the screw hole was in the wrong place) and I'll print it in dark grey next time. But it'll do for now. I need to road test it and make sure the poles don't rattle out on potholes.
PXL_20210724_145420497.jpg

PXL_20210724_145427806.jpg


Next project is to make a mount for a USB socket point. At the moment, there's no charging points at the cab end, except for the ones on the dashboard which aren't accessible with the bed down and turn off with the ignition (at the moment). I'm planning on hanging something off of the bottom of one of the overhead lockers with just some 3M adhesive strip, no drilling required. And there's a convenient air ventilation gap up the back where I can tap into some wiring...
 
I'll need to see if I can dig out the files... I've had a PC die on my since then, but I think I had everything on Google Drive...
Yes please. I’ve tried Velcro, glue and just wedging the monitor and non worked. 👍🏻

Subscribers  do not see these advertisements

 
Yes please. I’ve tried Velcro, glue and just wedging the monitor and non worked. 👍🏻
I've had a look and I can't find the CAD designs. I'd expect them to be in Fusion360, but they aren't there...

However, I've found the shape files, so I can print it. It's about 5.5 hours on my printer (number below is without supports). On my windscreen, there was a trapezium shaped metal nub that the mirror would mount to. I designed this to clamp on to it. However, the clip it fell off after a couple of weeks, so I just directly siliconed the whole arm it to the screen and it worked for the next 20k miles. The design does also assume your screen has the same mounts the same way?
Rear view print.jpg
 
Here is a photo of the windscreen, and the Monitor. The monitor is designed to fit over an existing mirror with the black rubber bands.
7B462C4D-FF35-4204-9969-36047AA6B911.jpeg8C883151-6C89-4CCF-9F78-46610609227E.jpeg3BAC8C54-1DBD-41B3-98BC-2E56A8C8B617.jpegIs it going to be expensive? I have no idea what these things cost.
thanks in anticipation
 
The design does also assume your screen has the same mounts the same way?
The mirror mount on the facelift Ducato windscreen is different to the older ones…..(pre 2014 I think)

Subscribers  do not see these advertisements

 
My design uses 60g of plastic. A 1kg spool is about £30. The material costs in 3d printing are very low. It's the time it takes.

The design I had, the monitor had a hinge pin with a thumb screw, and it could adjust for height to. Your monitor assumes the articulation of an existing mirror. Might it be easier to get a mirror from eBay and then rubber-band it to that?
 
I am in awe at your capabilities.
Are the materials you use to make these various gadgets expensive? I ask because I am totally ignorant about these things.
 
My design uses 60g of plastic. A 1kg spool is about £30. The material costs in 3d printing are very low. It's the time it takes.

The design I had, the monitor had a hinge pin with a thumb screw, and it could adjust for height to. Your monitor assumes the articulation of an existing mirror. Might it be easier to get a mirror from eBay and then rubber-band it to that?
How weird - you must have been typing at exactly the same time as I was asking! Thanks.
 
It amazes me too.

I was looking in awe at the gas adapter holder I got off PaulandChrissy earlier today. Excel drives me nuts let lone trying to do this stuff.
 
My design uses 60g of plastic. A 1kg spool is about £30. The material costs in 3d printing are very low. It's the time it takes.

The design I had, the monitor had a hinge pin with a thumb screw, and it could adjust for height to. Your monitor assumes the articulation of an existing mirror. Might it be easier to get a mirror from eBay and then rubber-band it to that?
Ok nice try though shame 👍🏻

Subscribers  do not see these advertisements

 
I have bought several bits off PaulandChrissy :
Holder for my lpg European adapters, water filler cup/funnel and a can holder with space for token/coin to sit in the existing holder which is too shallow. All great bits of kit.
 

Attachments

  • 5D6197B4-8F10-43A1-8564-F15DFB287C52.jpeg
    5D6197B4-8F10-43A1-8564-F15DFB287C52.jpeg
    499.8 KB · Views: 232
I have had a few bits 3d printed, from pipe adapters to allow me to fit a motorised drain down valve on the water tank, covers for locks and a bracket to attach a huawei B535 router on the wall in the van
2021-05-19 16.31.19.jpg
 
Anyone printing the little hinge parts of the telescopic guide for the Ducato Remis side window blinds?

 
My son has been looking at 3d printers, what sort would you recommend. Hes only going to be doing hobby stuff and PC related parts for his friends etc.
 
A few bits I’ve made on my 3D printer for the Motorhome. Clock with country's we have been to in Europe. Temperature panel for outside/bedroom/living room. Remote holders on the background wall.
Constantly making things for the van. Just making some new hinges for the toilet, as the originals have just broken.

Stay Safe everyone. PaulandChrissy.

677DEC32-C5F4-45F4-9CC8-3BDAE2CF936C.jpeg

Subscribers  do not see these advertisements


Join us or log in to post a reply.

To join in you must be a member of MotorhomeFun

Join MotorhomeFun

Join us, it quick and easy!

Log in

Already a member? Log in here.

Latest journal entries

Back
Top