Dethleffs T6611 shower tray

minesapint

Free Member
Joined
Sep 2, 2014
Posts
553
Likes collected
718
Location
Near Colchester, Essex
Funster No
33,147
MH
Burstner Nexxo
Exp
12 years
We have a Dethleffs T6611 and back end of last year we noticed that around the not used outlet in the shower tray that the plastic seemed soft as if there was nothing underneath it.
So this spring I decided to remove the interior of the shower room and toilet and lift the shower tray out and have a look as if I did not I was worried a hole may appear in the tray.
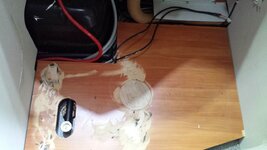
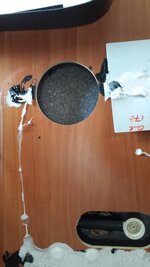
What I found astonished me as I allways thought of the Dethleffs as a well built motorhome, under the second not used out let was a 6" hole with just a very thin piece of aluminum over it which allowed the base of the shower tray to flex badly, not what you would expect from an expensive M/H.
I took out the tray and the false floor filled the hole in the floor with a plywood disk on top of a floor bearer which I fitted as Dethleffs had cut away the original.
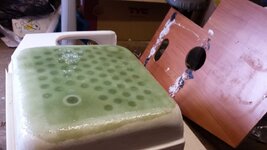
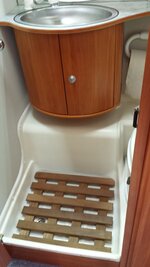
I covered the underneath of the tray with two layers of fibreglass, and when dry, sanded to a flat finish, cut a hole through the new fibreglass for the outlet. I then replaced the floor the shower tray, the toilet and all cupboards and towel rails etc and made a new teak grating for the shower.
In all this took 3 days to do, all because the factory left a big hole where there was not one needed and then tried to cover up with a very thin piece of aluminum. I have attached pics.
 

Attachments

  • 20150411_174859.jpg
    20150411_174859.jpg
    51.8 KB · Views: 246
  • 20150412_170955.jpg
    20150412_170955.jpg
    102.9 KB · Views: 241
  • 20150413_144618.jpg
    20150413_144618.jpg
    120.8 KB · Views: 242
  • 20150414_151106.jpg
    20150414_151106.jpg
    48.9 KB · Views: 243
We have a Dethleffs T6611 and back end of last year we noticed that around the not used outlet in the shower tray that the plastic seemed soft as if there was nothing underneath it.
So this spring I decided to remove the interior of the shower room and toilet and lift the shower tray out and have a look as if I did not I was worried a hole may appear in the tray.
What I found astonished me as I allways thought of the Dethleffs as a well built motorhome, under the second not used out let was a 6" hole with just a very thin piece of aluminum over it which allowed the base of the shower tray to flex badly, not what you would expect from an expensive M/H.
I took out the tray and the false floor filled the hole in the floor with a plywood disk on top of a floor bearer which I fitted as Dethleffs had cut away the original.
I covered the underneath of the tray with two layers of fibreglass, and when dry, sanded to a flat finish, cut a hole through the new fibreglass for the outlet. I then replaced the floor the shower tray, the toilet and all cupboards and towel rails etc and made a new teak grating for the shower.
In all this took 3 days to do, all because the factory left a big hole where there was not one needed and then tried to cover up with a very thin piece of aluminum. I have attached pics.
grate job can you come and do my one (y)
your the sort of funster we need at the fix it meet
bill
 
Your post has given me hope of finding my water leak. I left water in the system on the coldest night of the year. I think the water supply from the tank beneath the seat to the pump must have frozen and burst the plastic pipe. Possibly behind the toilet. I don’t want to dismantle the shower, as you have, but your photo 859 does show part of a black tray which I think sits below the toilet. I think I can reach the pipe I need to if I can remove that black tray through the outside toilet door. Do you have any more photos? Do you think I am right about the tray and do you think it will fit through the outside door if the toilet is removed from the inside?
 
Hi from memory I think the black material under the tray was insulation mat. It is not a hard job on a well built MoHo like a dethleff T6611 to remove the shower lower tray.
Sorry I cannot be of much more help to you, it was along time ago, and I do not have the picture set any more to do a bit more research. But the good news is you can get out the shower and have a look underneath.

Subscribers  do not see these advertisements

 
Thank you for replying.
I think you slightly misunderstood my description.
In your photo ...859 the top left corner is white and there is a black band from the left sweeping up to the top. The rest of the photo is of the brown floorboard cut outs and label.
I think the black band in your photo is my black tray sitting beneath the toilet.

I think I can reach the pipe I need to from outside of the van, if I can remove that black tray through the outside cassette door but its looking like I may have to remove the toilet first.

No need to reply to this post my next step is to deal with what I actually find.
 
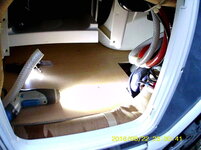
Hi, Ok I understand now. The toilet in the picture is totally removed. If you look to the right of the picture yo can see the outline of it in the floor and the four screw holes. The black with the red pipe going over it is the wheel arch cover and the grey board is where the cassette slides. Best of Luck.
 
Fixed it!
I did remove the toilet cassette tray but in doing so I found the leak which I could have reached from outside the cassette door. Just as well I did so though because the floor beneath the tray was wet.
The hot and cold supply pipes to the shower/wash basin hang down in a loop, just to the right of the cassette door. They have joined the pipes with straight pipe connectors. Unfortunately though, at the bottom of the loop, both pipes are pulling sideways on the straight connectors. The cold pipe had twisted sideways and prised out of the connector. The drop in pressure causes the pump to turn on and empty the tank through the leaky joint. Anyhow it’s fixed now.

Fortunately I do not have a large hole in the floor as you did because the Globebus Integral has two shower outlets.
Hi, so pleased you have found the problem and sorted it out. Another one off the list. Lets hope we can all get back on the road soon.
 
FYI
The connectors on the right.
SUNP0007.JPG

Subscribers  do not see these advertisements


Attachments

  • SUNP0001.JPG
    SUNP0001.JPG
    203.7 KB · Views: 44

Join us or log in to post a reply.

To join in you must be a member of MotorhomeFun

Join MotorhomeFun

Join us, it quick and easy!

Log in

Already a member? Log in here.

Latest journal entries

Back
Top