votronic connection to vehicle battery

Compactliner

Free Member
Joined
May 30, 2020
Posts
204
Likes collected
184
Funster No
71,224
MH
Carthago Compact 138
Exp
11 yrs
  • Reply with quote
  • I am looking at changing my current solar controller (simple dual charge 10A PWM unit) for a Votronic...i have a single 100w panel and may add another so will go large enough to cope.
however, my question concerns wiring....should be simple...
my current system has +/- wiring pairs from panel to controller, from controller to leisure battery and from the controller to the vehicle batt.
all connections are suitably fused.
looking at the wiring diagram for the Votronic, the panel to controller connections are fine.
the controller to leisure batteries (BORD I) is also fine...positive goes to "+BORD I" and negative goes to "- I+II"
the diagram also shows the leisure batteries having its own normal earth plus the negative returning to the controller.
However, despite the Votronic having the above negative slot marked "- I+II" the diagram doesn't show a negative for the vehicle battery returning here, just a chassis negative.
obviously, with a new install, (possibly) only the positive would be fitted...however, i have a pair from the vehicle battery and would have to 'do something' with the negative wire.
looking at the markings on the Votronic unit, why wouldn't this go into the "- I+II' connector?
i spoke to Roadpro about this and they said to 'tape off' the vehicle negative as this battery already has a chassis earth and that a failure here might then use 'my negative' as the earth which not be of sufficient size....but why is the negative socket marked for "I+II" if only the leisure battery (BORD I) should be connected?
i posted on another forum and the resonse was 'do as roadpro' (and the votronic schematic) says...
ive also looked at the Epever Duo Racer but this shows both positive AND negative connected to the cab battery.....
however, it has a 'grounding terminal' and this description in the manual..


Step3:Grounding❹

DR N series is a common-negative controller, where all the negative terminals of PV array and battery can be grounded simultaneously or any one of the negative will be grounded. However, according to the practical application, all the negative terminals of PV array and battery needn’t to be grounded, but the grounding terminal on controller’s shell must be grounded, which may effectively shield the electromagnetic interference from the outside, and prevent some electric shock to the human body due to the electrification of the shell.
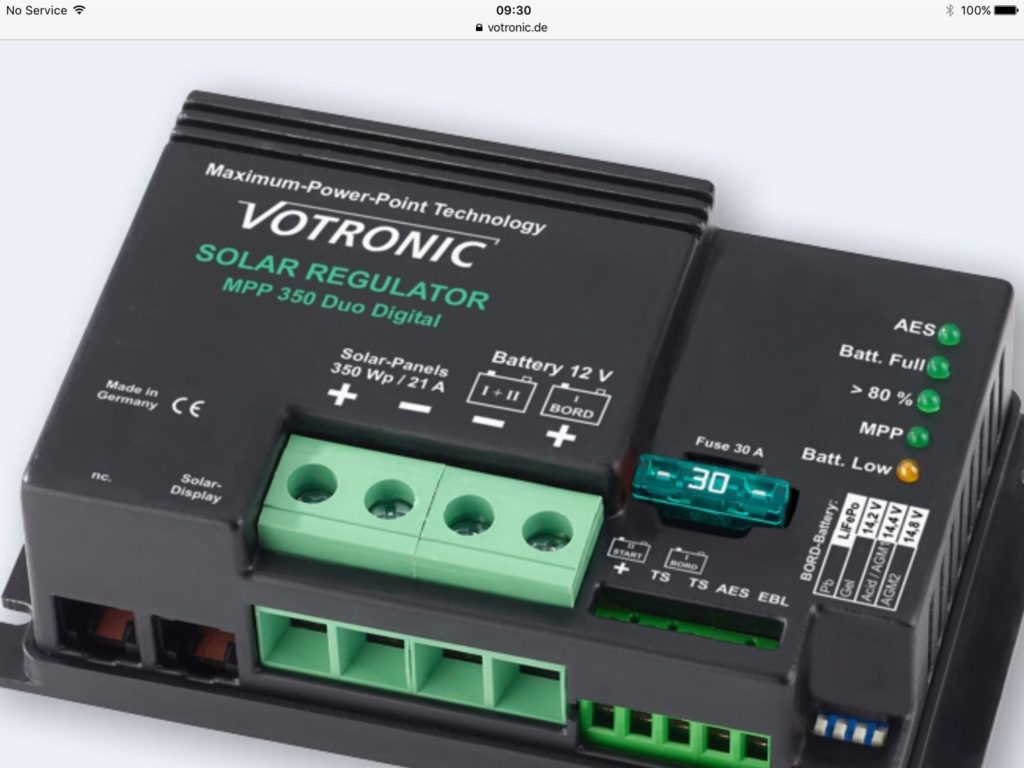


Votronic MPPT Duo Dig   Image20


Last edited by bolero boy on Mon Dec 14, 2020 6:41 pm; edited 1 time in total

_________________
Chris.
Carthago C-Compactline i138
bolero boy
bolero boyMember
Member


Male


Posts : 1512
Joined : 2017-10-28
Location : somerset
Auto-Sleeper : Carthago Compactline
Vehicle Year : 2017

View user profile Send private message

LIKE


I have bought exactly the same mppt controller,recommended by Lenny HB some time ago, to replace the originally controller fitted,and have the same dilemma as you.
Hopefully Lenny HB will be along soon to help you!
 
Solar panel - self explanatory. Two negatives from Hab and Cab Batteries to - 1+2, Hab positive to 1 Bord and Cab positive to II start + (smaller terminal because only 1 amp trickle charge). I'm not sure what Roadpro think are the circumstances where the thin (by comparison) negative wire to the cab battery might take over from chassis ground. I suppose you could have an inline fuse on the negative to prevent that happening but your vehicle constructor would have considered that possibility.

Subscribers  do not see these advertisements

 
Solar panel - self explanatory. Two negatives from Hab and Cab Batteries to - 1+2, Hab positive to 1 Bord and Cab positive to II start + (smaller terminal because only 1 amp trickle charge). I'm not sure what Roadpro think are the circumstances where the thin (by comparison) negative wire to the cab battery might take over from chassis ground. I suppose you could have an inline fuse on the negative to prevent that happening but your vehicle constructor would have considered that possibility.
If the starter battery -ve fell off for whatever reason the system would be looking for the next best -ve feed and that would/could be the single wire connecting back to the controller, obviously this would not be sufficient to start the engine and would burn out.

I can't look at ours to see what they have done but I have a feeling that there is only the one battery -ve into the controller and that would be good enough for me, I would be happy to follow the recommendations of RoadPro and just loose the direct to starter battery -ve and use the chassis -ve as the diagram, as the -ve is common it doesn't matter where it comes from.
 
These are our Votronics, and only one -ve which I am pretty sure will go to the common -ve collection "star point" or "stern punkt" on ours is identified.

IMG_3540.jpeg


And yes Lenny I tidied up the cabling for the bluetooth after that photo.
 
On my MPP350 I connected from ‘start’ on the controller to + battery input on the rear of the EBL.
Why not in the socket in the front?
I didn't use the starter output as I had a CBE CBS2 lying around that gives a better charge rate up to 4 amps and continues charging until the leisure batteries drop to 12.6v.

Subscribers  do not see these advertisements

 
Why not in the socket in the front?
I didn't use the starter output as I had a CBE CBS2 lying around that gives a better charge rate up to 4 amps and continues charging until the leisure batteries drop to 12.6v.
Much more simple, no need for the correct plug to fit the front, directly attached to the battery cable and removed any doubt regarding the connection between front and rear of the EBL.
 
I connected both positive and negative.

It uses 2.5mm cable. My rationale was I wanted the best possible connection between the controller and engine battery.

If the main negative fails, then it might burn out, but then it might not.
 
I connected both positive and negative.

It uses 2.5mm cable. My rationale was I wanted the best possible connection between the controller and engine battery.

If the main negative fails, then it might burn out, but then it might not.
If worried just put a inline 20/30amp (depending in the output capacity of your Votronic) fuse inline on the negative.
 

Join us or log in to post a reply.

To join in you must be a member of MotorhomeFun

Join MotorhomeFun

Join us, it quick and easy!

Log in

Already a member? Log in here.

Latest journal entries

Back
Top