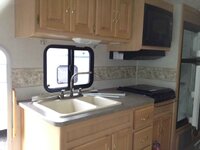
Have started tiling the kitchen area in our RV and thought I would share some info.
I contacted Thor Motor Coach (The RV builder) as I was unsure if the wall covering needed to come off first. No was the answer. The wall covering in most motorhomes is not the same as wallpaper in the home and the adhesive used to attach it is much stronger. The only wall prep I have done is to remove the border paper, sugar soap the wall to remove any grease and lightly score with a Stanley Knife.
I have used mosaic tiles as they seem more suited to flexible walls and are a lot thinner than standard tiles making them lighter. Also, they do not stick out too far at the edge of the wall and around the thin window casing.
Normal ceramic tile adhesive is out (Even tile on wood adhesive) so have gone for a flexible grab adhesive (Sikaflex EBT).
I have used a Dremel tool with a standard cutting disc to cut the tiles with (See photo).
I have applied the adhesive to the tile rather than the wall as this makes sure each individual tile will have adhesive on it.
Once the tile sheet is pressed on the wall with the palm of the hand, each individual tile has been pressed in the centre to make sure it in place.
I removed the extractor (6 screws) but went around the outline first to show where to tile up to.
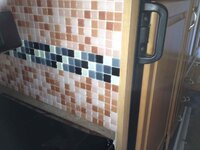
I have used a brown tile sheet to match the wood work and a contrasting border to match the appliances (See photo). The border has been made by cutting a large sheet of mosaic into strips of three rows.
Tiles - Brown - TOPPS Tiles - £2.38 per sheet
Black/ grey - Wickes - £6.90 per sheet (Only two sheets needed)
Sikaflex EBT - Screwfix Direct - £7.99 each
Total cost for the job - £35 approx
I will take more pictures when the job is grouted and complete
I contacted Thor Motor Coach (The RV builder) as I was unsure if the wall covering needed to come off first. No was the answer. The wall covering in most motorhomes is not the same as wallpaper in the home and the adhesive used to attach it is much stronger. The only wall prep I have done is to remove the border paper, sugar soap the wall to remove any grease and lightly score with a Stanley Knife.
I have used mosaic tiles as they seem more suited to flexible walls and are a lot thinner than standard tiles making them lighter. Also, they do not stick out too far at the edge of the wall and around the thin window casing.
Normal ceramic tile adhesive is out (Even tile on wood adhesive) so have gone for a flexible grab adhesive (Sikaflex EBT).
I have used a Dremel tool with a standard cutting disc to cut the tiles with (See photo).
I have applied the adhesive to the tile rather than the wall as this makes sure each individual tile will have adhesive on it.
Once the tile sheet is pressed on the wall with the palm of the hand, each individual tile has been pressed in the centre to make sure it in place.
I removed the extractor (6 screws) but went around the outline first to show where to tile up to.
I have used a brown tile sheet to match the wood work and a contrasting border to match the appliances (See photo). The border has been made by cutting a large sheet of mosaic into strips of three rows.
Tiles - Brown - TOPPS Tiles - £2.38 per sheet
Black/ grey - Wickes - £6.90 per sheet (Only two sheets needed)
Sikaflex EBT - Screwfix Direct - £7.99 each
Total cost for the job - £35 approx
I will take more pictures when the job is grouted and complete