Hi all, I am just replacing the old bedboard in my Peugeot boxer PVC and I really just want to smarten it up, the old central filling bedboard is just not suitable for purpose anymore. I think I’ve got my head around how to fix it but I’m just wondering what sort of board to use. I know I can get a piece of 15 mm light weight board fibreboard but it seems expensive for something that’s only going to be under the mattress and I’m wondering whether it’s best to use ply and what thickness, or is it marine ply that I need to use? The weight is not an issue , I’ll be using two pieces cut to size to fill the gap, both about 1m by 50 cm , helpful to hear your opinions

-
Rallies
New events -
Resources
Latest reviews
Navigation
Install the app
How to install the app on iOS
Follow along with the video below to see how to install our site as a web app on your home screen.
Note: This feature may not be available in some browsers.
More options
You are using an out of date browser. It may not display this or other websites correctly.
You should upgrade or use an alternative browser.
You should upgrade or use an alternative browser.
What type of board to use for bed panel? (1 Viewer)
- Thread starter uzsnowdrop
- Start date
Jamesh
Free Member
- Jun 28, 2020
- 2,200
- 3,839
- Funster No
- 72,388
- MH
- Van conversion
- Exp
- Caravaning since 2010
I'd just use 12mm exterior ply.
I brought a couple of sheets from Wickes and although undoubtably popular cored it did have a nice finish to it.
Birch ply would be the obvious suggestion but it's more expensive.
Cheers James
I brought a couple of sheets from Wickes and although undoubtably popular cored it did have a nice finish to it.
Birch ply would be the obvious suggestion but it's more expensive.
Cheers James
OP
OP
Thanks James , does birch ply have any extra advantages? No idea..I'd just use 12mm exterior ply.
I brought a couple of sheets from Wickes and although undoubtably popular cored it did have a nice finish to it.
Birch ply would be the obvious suggestion but it's more expensive.
Cheers James
Subscribers do not see these advertisements
A weeny bit off topic, sorry, but I can’t help thinking a nice job has been made of your curtain runners, did you fit them yourself ?
OP
OP
Thanks. Yes I did. I bought them online from shore vans and they cost about 35 quid. Pretty good value for what they are. Not too bad to fit but I wish I’d taken advantage of the advice on here first, as it’s much easier to fit the end stops to the grey sliders and have the curtains in situ whilst you are fitting the frames rather than try and fit them on afterwards, so the first one was a pig and the second was so easy, as is often the case. We actually have blinds on the side windows which were provided by our local blind company and they did a lovely job but I don’t think that they would be able to fit them to the rear window frames , so just went with curtains on the back windows. I should say we just slide a piece of Thermo silver behind the curtains at night and it seems to stop any condensation at all. Hope this helps, attached a couple photosA weeny bit off topic, sorry, but I can’t help thinking a nice job has been made of your curtain runners, did you fit them yourself ?
The end stops are very tight in the runners so you just need a Sharp knife to trim them to get them in.
Attachments


Ahh, when I did mine I used Van-x and the rails came as one long straight length so I had to cut them and bend them to fit my ‘van myself, thus such a neat result wasn’t easy to achieve. I will now know for next time to get bespoke ones that are already cut and bent accordingly, thank you.Thanks. Yes I did. I bought them online from shore vans and they cost about 35 quid. Pretty good value for what they are. Not too bad to fit but I wish I’d taken advantage of the advice on here first, as it’s much easier to fit the end stops to the grey sliders and have the curtains in situ whilst you are fitting the frames rather than try and fit them on afterwards, so the first one was a pig and the second was so easy, as is often the case. We actually have blinds on the side windows which were provided by our local blind company and they did a lovely job but I don’t think that they would be able to fit them to the rear window frames , so just went with curtains on the back windows. I should say we just slide a piece of Thermo silver behind the curtains at night and it seems to stop any condensation at all. Hope this helps, attached a couple photos
The end stops are very tight in the runners so you just need a Sharp knife to trim them to get them in.
When I purchased my curtains they came with a press stud mid-way so I used a self-tapping screw to secure the other half of a press-stud to the frame. This not only holds them back off the glass more to widen the view out of the window when held open but when closed avoids annoying gaping at the sides which would allow shafts of light through. I have detached the press stud for the picture to show what I mean but it usually stays attached. Being fixed also means I don’t misplace the tie-back tabs overnight !
Yes the end caps were quite fiddly for mine too and the instructions for my curtains suggested they could easily be removed to be washed, although I dispute that when the fitting of end caps was such a faff (and I confess to never having washed mine, although they have never looked like they needed washing anyway). I did deliberate about paying so much for tiny sets of curtains but for anybody wondering I believe they were well worth the investment. The fabric is thermal and shows absolutely no sign of decaying or fading nor of any sun damage at all.
PS sorry I am of no help re your bed boards
Subscribers do not see these advertisements
OP
OP
They look good. I thought 35 quid was not too bad and they’ll do for now, good to hear no fading on the curtains. A fiddly job but worth the money. No sweat on the bedboards , already have some helpful advice here.Ahh, when I did mine I used Van-x and the rails came as one long straight length so I had to cut them and bend them to fit my ‘van myself, thus such a neat result wasn’t easy to achieve. I will now know for next time to get bespoke ones that are already cut and bent accordingly, thank you.
When I purchased my curtains they came with a press stud mid-way so I used a self-tapping screw to secure the other half of a press-stud to the frame. This not only holds them back off the glass more to widen the view out of the window when held open but when closed avoids annoying gaping at the sides which would allow shafts of light through. I have detached the press stud for the picture to show what I mean but it usually stays attached. Being fixed also means I don’t misplace the tie-back tabs overnight !
Yes the end caps were quite fiddly for mine too and the instructions for my curtains suggested they could easily be removed to be washed, although I dispute that when the fitting of end caps was such a faff (and I confess to never having washed mine, although they have never looked like they needed washing anyway). I did deliberate about paying so much for tiny sets of curtains but for anybody wondering I believe they were well worth the investment. The fabric is thermal and shows absolutely no sign of decaying or fading nor of any sun damage at all.
PS sorry I am of no help re your bed boards
View attachment 483717View attachment 483718View attachment 483719
Your blinds look great but yes only any good on standard shape windows. This is how I resolved the issue on my side windows. Secured together centrally I don’t find my visibility is impaired and they don’t flap around or get caught up at all when opening the door. Although closed they don’t look a great fit, they do the job well.They look good. I thought 35 quid was not too bad and they’ll do for now, good to hear no fading on the curtains. A fiddly job but worth the money. No sweat on the bedboards , already have some helpful advice here.
OP
OP
Looks good, what van is that?
Subscribers do not see these advertisements
Thanks. Renault TraficLooks good, what van is that?
OP
OP
Nice, my current one will have to stsy for a while but I was looking at the Trafic, goid van
OP
OP
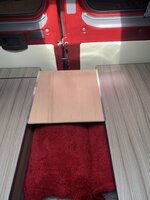
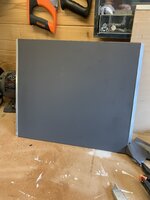
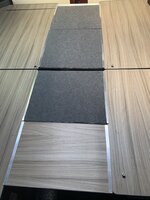
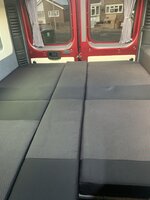
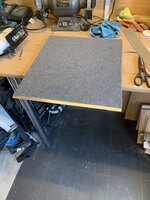
Results just in, well pleased ... two days work, 12 mm ply as suggested, grey vinyl plastic covering underneath, carpet on top , angle aluminium on sides , the odd one out we use as a coffee table . Cheers all
Subscribers do not see these advertisements
Attachments
-
 E9D5399E-F100-4C94-BAC3-B5FD114918F4.jpeg474.8 KB · Views: 15
 -
 FAC5BBA6-94D6-4F8E-950C-195EA16CF483.jpeg511.6 KB · Views: 12
 -
 5B00973E-6B75-49A8-ABE4-A565EF1A1522.jpeg359.4 KB · Views: 14
 -
 6EDBE16A-A4EB-4584-9FF9-FF99D1F97DDE.jpeg601.3 KB · Views: 13
 -
 037EE787-E567-4521-89F1-17FE760D8DE1.jpeg634.8 KB · Views: 14
 -
 6D68CD2B-84A5-47B3-870A-C39A50DF7556.jpeg627.4 KB · Views: 13
Funsters who are viewing this thread
Total: 2 (members: 0, guests: 2)