What have you fixed on your motorhome this week? (3 Viewers)

Jul 2, 2021
44
213
Brighton, UK
Funster No
82,346
MH
Autosleeper Nuevo EK
Exp
We’re a couple of newbies 😊
We've just come back from our first trip out in the van !! Very excited and wishing we had discovered you guys YEARS ago :giggle: It's been brilliant - we did really well apart from trying to fill our water tank whilst having the stop cock open:rolleyes::rolleyes: Now back on message - we are fitting our TV this week - got holes in the cabinet wall but as yet haven't progressed as not got the cables!! Cynics amongst you may well say - out on the road with telly ?? I know ..............but what about strictly ???
 

RM_Marine

LIFE MEMBER
Apr 29, 2021
674
1,157
Poole, UK
Funster No
80,786
MH
Autotrail Apache 700
Exp
Since 2021
I'm very tired as it's take me a very long time

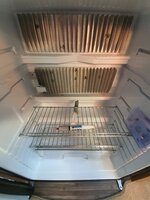
Added more thermal grease to the back fridge freezer fins

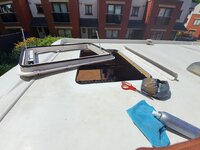
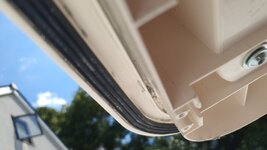
And took this bloody thing out, cleaned, bedding tape and refitted with sika flex

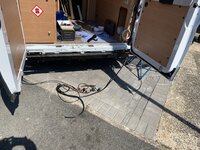
I'm very very tired and I now know why they charge £450plus to do it as its a stinking job to do but very achievable to do yourself
 

Attachments

  • 20210719_141859.jpg
    20210719_141859.jpg
    397.5 KB · Views: 104
  • Screenshot_20210719-142758_Signal.jpg
    Screenshot_20210719-142758_Signal.jpg
    97.2 KB · Views: 105
  • IMG-20210719-WA0013.jpeg
    IMG-20210719-WA0013.jpeg
    181.1 KB · Views: 109
  • 20210719_185031.jpg
    20210719_185031.jpg
    385.1 KB · Views: 107
Mar 16, 2017
272
452
Telford
Funster No
47,773
MH
Carthago Malibu T460
Exp
Feb 2017
After the Main Rooflight decided to shear the teeth of the gears in the winding gearbox i had to order a replacement set (i ordered 2 sets)
I only fitted this REMIS Vario 2 18 months ago after the original rooflight packed up on us in Germany.
So i was delighted (not) when after bringing it home from storage to clean the Green from the roof etc and trying to open the main rooflight, all the teeth sheered.
Stripped it down, replaced gears and packed with grease.
Working fine now, but, i will in future give it a hand while winding up with the other.
The replacement gear kit was £16 inc postage from Leisure Shop Direct. It came pretty quick to.

Never used the van in the UK, prefer Europe, never used the shower or hot water either, preferring to wash up the dishes and shower etc in the on site facilities.
So while it was sitting on the drive i wanted to check that everything works as it should do, so after faffing with the Fridge, Gas and Electric are all fine.
Hot water, even more faffing now, discovered the Gas isolators in the cupboard next to the cooker, took off the Flu vents and gave that a good clean and now hot water streaming from all taps, all powered by GAS.
How to get hot water via electric ehu, 3 days later after asking on various forums my wife sorts it out after looking up on google and U Tube, we finaly find out that there IS an isolator switch for the boiler in the Pan Cupboard underneath the cooker, really!!! what brain dead technician decided to "Hide" it there.
Heating, another round of asking questions everywhere and e'mailing Truma, we strip down the front of the heater and replace the batteries, fires up great now.
Took the front grill of the van, rubbed down all the stone chipped paint, took it up to my old mates body shop and now it looks like new.
Get out the Maxview and set it up on the drive on a modified photo tripod (due to it being blown over and buggering the winding mechanisn and the internals), the Sat finder inside the plastic was faulty so spoke to Maxview who sent out a set of replacement cables and the electronic bits.
I made from a airtight tupperware box a housing for all the bits, connected everything up to the van and bingo, everything works fine.
Listening to Mr Johnson today i dont think were going anywhere soon.
That was my workload over the past few days.

Subscribers  do not see these advertisements


RM_Marine

LIFE MEMBER
Apr 29, 2021
674
1,157
Poole, UK
Funster No
80,786
MH
Autotrail Apache 700
Exp
Since 2021
I'm very tired as it's take me a very long time

Added more thermal grease to the back fridge freezer fins

And took this bloody thing out, cleaned, bedding tape and refitted with sika flex

I'm very very tired and I now know why they charge £450plus to do it as its a stinking job to do but very achievable to do yourself

After the Main Rooflight decided to shear the teeth of the gears in the winding gearbox i had to order a replacement set (i ordered 2 sets)
I only fitted this REMIS Vario 2 18 months ago after the original rooflight packed up on us in Germany.
So i was delighted (not) when after bringing it home from storage to clean the Green from the roof etc and trying to open the main rooflight, all the teeth sheered.
Stripped it down, replaced gears and packed with grease.
Working fine now, but, i will in future give it a hand while winding up with the other.
The replacement gear kit was £16 inc postage from Leisure Shop Direct. It came pretty quick to.

Never used the van in the UK, prefer Europe, never used the shower or hot water either, preferring to wash up the dishes and shower etc in the on site facilities.
So while it was sitting on the drive i wanted to check that everything works as it should do, so after faffing with the Fridge, Gas and Electric are all fine.
Hot water, even more faffing now, discovered the Gas isolators in the cupboard next to the cooker, took off the Flu vents and gave that a good clean and now hot water streaming from all taps, all powered by GAS.
How to get hot water via electric ehu, 3 days later after asking on various forums my wife sorts it out after looking up on google and U Tube, we finaly find out that there IS an isolator switch for the boiler in the Pan Cupboard underneath the cooker, really!!! what brain dead technician decided to "Hide" it there.
Heating, another round of asking questions everywhere and e'mailing Truma, we strip down the front of the heater and replace the batteries, fires up great now.
Took the front grill of the van, rubbed down all the stone chipped paint, took it up to my old mates body shop and now it looks like new.
Get out the Maxview and set it up on the drive on a modified photo tripod (due to it being blown over and buggering the winding mechanisn and the internals), the Sat finder inside the plastic was faulty so spoke to Maxview who sent out a set of replacement cables and the electronic bits.
I made from a airtight tupperware box a housing for all the bits, connected everything up to the van and bingo, everything works fine.
Listening to Mr Johnson today i dont think were going anywhere soon.
That was my workload over the past few days.
I always assist it up when opening as the winding mech ust doesn't feel like it's up to the job

It's been OK and it's good to know that I can get replacement winding gears
 
Jan 27, 2018
2,672
2,125
Northampton
Funster No
52,151
MH
Rapido & Bongone
Since the hab service the pump has been making a racket, and all my anti vibration insulation moved, the pump had also been screwed down
1st tranche
Losen pump on anti vibration mount
Add insulation on all obvious vibration sites
Remove shower cover and add insulation to all pipe work i could get to.
Try to remove possible air locks
No better
Today
2nd tranche
1 switch off 12v
2 open shower, sink, kitchen taps (midway on mixers)
3 open drain valves 20l, main, boiler
4 wait
5 close drain valves
6 fill tank with water
7 close taps
8 switch on 12v
9 switch on pump
10 shower open tap to cold .when good flow no spulttering r wait 30s close tap
11 sink repeat 10
12 kitchen repeat 10
13 back to shower repeat 10 with hot tap
14 repeat 10 with other taps set to hot
15 be amazed by how quiet it is.

Sorry for diatribe, but i needed to write it down for next time it makes a racket, no fiddling of end screws required
 
Mar 15, 2019
518
933
Funster No
59,148
MH
AutoCruise Stardream
Exp
Newbie April 2019
Lots of snag list bits

Fix surround for blinds that is hanging down
Take fridge heatsink off and apply new thermal paste
Fit isolation switch to fridge fan controller
Silicone sink worktop
Convert awning light to led
Remove old mouldy sealant on sides of bodywork and apply new RV61
Mot
New hab batteries as both were 7yr old and popped their clogs the other week
Sterilise the aquaroll and tanks

The list grows daily

Subscribers  do not see these advertisements

 
Jul 11, 2009
330
764
Basingstoke
Funster No
7,443
MH
Concorde Compact
Exp
Since I was 18.... 1996....
Thie weekend I Added a solar panel and VictronConnect mppt solar charger , CBE relay to charge cab battery ,adding trunking to the wiring for extra leisure batteries to tidy that up fixed a leaking water sensor that was not installed correctly, tow bar wiring kit and added more bling …

waiting for some slotted trunking to tidy up the electrical cupboard a bit …


02FB4254-D30C-4300-8DB8-F67B5D116475.jpeg
5E95C8B2-E041-4029-BD2E-72923F7A69EF.jpeg
63380E74-8092-497C-9432-66E5F8BB1EE5.jpeg
BAD37989-3476-4BEA-8FC3-0C95DF44AD84.jpeg
126C0BD3-428B-448B-B8DB-D97EC5CE65B6.jpeg
 

Attachments

  • FF57E67B-A2E5-42A3-9A0E-8EE454FBC07F.jpeg
    FF57E67B-A2E5-42A3-9A0E-8EE454FBC07F.jpeg
    928.3 KB · Views: 49

Riverbankannie

LIFE MEMBER
Mar 11, 2016
10,529
61,520
Bristol
Funster No
41,967
MH
IH 630 RL PVC
Exp
12
Thie weekend I Added a solar panel and VictronConnect mppt solar charger , CBE relay to charge cab battery ,adding trunking to the wiring for extra leisure batteries to tidy that up fixed a leaking water sensor that was not installed correctly, tow bar wiring kit and added more bling …

waiting for some slotted trunking to tidy up the electrical cupboard a bit …


View attachment 518514View attachment 518515View attachment 518516View attachment 518517View attachment 518518
Love the bling! Looks especially good on the white van.
 

I2C

Feb 2, 2015
257
610
Northamptonshire
Funster No
34,984
MH
Low Profile
Exp
Since 2000
Removed the tow bar today we don't use any more, we now store our Brompton's inside the MH - a saving of 28Kg, didn't realise they were so heavy otherwise I'd have taken it off before!

Also connected the trickle charge from our Votronic MPP 250 to the starter battery.

Subscribers  do not see these advertisements

 
May 10, 2021
162
203
Funster No
81,078
MH
Autotrail Cheyenne
Treated a small section of rust at bottom of Ducato chasis (under driver door), yet to paint it but probably tonight before weather breaks. This weekend change the diesel fuel filter, luckily one of the old screw on can types.
 
Apr 12, 2020
1,024
1,039
South Lincs....
Funster No
69,935
MH
Rapido 7095DF
Exp
20+ years. Previously Hymer B654 and Hymer S660 both c/w tow-bars.
Had a strikeback alarm fitted and a tow bar fitted {by me and my friend dummer and dummer} and by the way the towbar on my pvc fiat ducato 2021 didnt need drilling as insulation tape covered the hole i thought i needed to drill (y) (y) (y)
Since type approval of towbars was introduced (1998), it’s not unusual to find vehicles that are homologated for towing to have the mounting points already there. Some will have knock out blanking plugs others, as you’ve said, will have the holes taped over. It might not be immediately obvious as they are taped before any under seal/body protection is added! 👍
 
Apr 12, 2020
1,024
1,039
South Lincs....
Funster No
69,935
MH
Rapido 7095DF
Exp
20+ years. Previously Hymer B654 and Hymer S660 both c/w tow-bars.
Removed the tow bar today we don't use any more, we now store our Brompton's inside the MH - a saving of 28Kg, didn't realise they were so heavy otherwise I'd have taken it off before!

Also connected the trickle charge from our Votronic MPP 250 to the starter battery.
I removed and renovated my Towbar this year, (new bolts, rust treatment, hollow sections flushed with engine oil) and I weighed it…. 45kgs complete with towball! 🙄

Subscribers  do not see these advertisements

 
Jul 11, 2009
330
764
Basingstoke
Funster No
7,443
MH
Concorde Compact
Exp
Since I was 18.... 1996....
While messing around with the wardrobe looking to put shelves in , noticed how hot it was in there with the fridge on. The compressor is under the floor of the wardrobe.
Fridge was keeping temperature even in a shut up van this week but the trapped heat can’t be good.
There was some kind of chimney effect with vents in floor draw Air up and behind wardrobe and then to nowhere.
There is a fan already on the unit …. But it just stirred the hot air around.
Added a couple of small pc fans in one of the floor vents and blocked the chimney.

Result- lots of hot air exhausted from one vent and cold drawn in the other.

Plus I fixed that the compressor was
Not screwed to the floor …


36244792-EC81-4FD6-903C-B230E218B66B.jpeg
D1ED495E-F22D-417A-A492-3DEC73D725C3.jpeg
5EB0F949-1ED8-4066-B074-09CAFAC315A5.jpeg
FC99C08D-2D07-4946-8291-096227C964DD.jpeg
 
Jul 11, 2009
330
764
Basingstoke
Funster No
7,443
MH
Concorde Compact
Exp
Since I was 18.... 1996....
The fan on the unit is to cool the condenser down. Similar to your veicle radiator. It requires cold air in & a means of exhausting it to work correctly which hopefully yo have now provided.
As an update.

The fridge has been on all night in a closed van, the wardrobe is this morning nowhere near as hot as it was yesterday.

My unscientific temperature measurement this morning says the wardrobe is 15 degrees centigrade cooler that it was yesterday morning at the same time.

Subscribers  do not see these advertisements


Bustup15

LIFE MEMBER
Jun 25, 2018
1,486
3,730
Durham
Funster No
54,597
MH
Dethleffs I 7820-2
Exp
New to motorhomes 2019
Fitted automatic, thermostatic fridge cooling fans... bought them last year and thought it was now time to fit them.
Any links as ours is struggling in this heat! This app must be like Google, I just talked about it 5 minutes ago 😳
 

icantremember

LIFE MEMBER
Sep 2, 2010
8,333
17,545
Near to Watton in Norfolk
Funster No
13,512
MH
Hymer T-SL668
Exp
since 2005
Jul 5, 2013
11,723
13,702
Tunbridge Wells, Tunbridge Wells, UK
Funster No
26,797
MH
A class
Exp
Since 2013
Apr 19, 2014
75
83
West Sussex
Funster No
31,035
MH
C Class
Exp
Since 2014
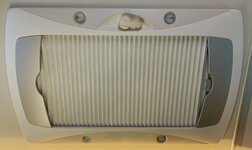
Remis Rooflight on 2014 Hymer

The black cord that supports the concertina blackout blind broke. Inside the frame, the cords on each side pass over the fly screen roller which rubs on the cords every time it is deployed and retracted. One side wore through after eight years and the other side had been weakened.

The original non-elastic cord 1.2mm was in diameter. I replaced it with a Kevlar cord from another blind project. The cord is effectively static and purely support the weight of the blind; is does not run through pulleys. The apparent elasticity of the cord comes from a metal spring at the end of each.

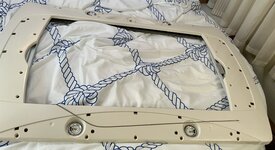
Removing the blind requires removal of the four LED lights (or the covers at least), the two end inset panels, the two side inset panels and the twelve screws hidden beneath them. The window winder also needs to be unscrewed.

It is a two person job to remove the skylight from the roof, although I managed it single handed by lying on the bed and using my feet to support the frame.

Starting with the end inset panels (without lights), pull down the inside edge to unclip the five round clips. Then pull the panel inwards toward the opposite end of the frame to unclip the five tabs. I broke one tab but the other are sufficient to hold it on reassembly.

The LED light covers twist anti-clockwise 10mm to release. All of mine stuck and would not turn. I applied silicone spray on reassembly to assist in future.

The side panels unclip first at the outside edge (five round clips) and then pull outwards (five tabs) but the LED light covers prevent this. It is possible that one is supposed to spring the lights out of the frame (two metal clips at 1:30 and 7:30 positions) but I could not achieve this and resorted to “popping” the rotatable covers off by force. I broke a locating tab on one ring and damaged another one ring in the process.

I could not source replacements LEDs online in the UK and stockists led-power shop.de (lights described as “12V Dometic LED recessed light frosted glass St.Verbinder Bl.Feder nickel matt”) are emphatic that “We no ship to the United Kingdom”. I called a friend in Germany and they kindly agreed to order and forward them. It was able to superglue the broken ring and reassemble all the lights.

Unscrew the winder. Remove 12 screws holding the frame to the roof. Lower carefully and unplug the bullet connectors on the 12v colour coded wires.

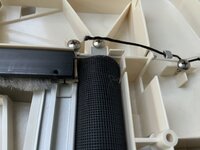
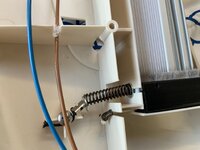
The end of the black cords are held in place with self tapping screws but this is just for tidiness. The tension on the cords is maintained by a crimp at one end and a hollow connector with a grub screw at the other. Three small washers on each cord prevent the crimp and tension spring from pulling through the frame slots. The order of parts is: self tapping screw, crimp, washer, right-angle metal guide, cord through blind, washer, spring, washer, connector with grub screw, self tapping screw. When viewed from the mechanism side, the cord passes over the fly screen roller and through the lowest of the two holes in the right-angle guide.

I found it easiest to thread the new cord from the spring end/ blackout material anchoring end. Getting the new cord through the supporting holes in the blackout material and the handle guide slot was tricky. I applied thin superglue to 5cm of the cord end and, when set, trimmed an acute angle into it to allow me to guide the cord as if it were needle. I found the crimps could be reused by opening with pliers and squeezing onto the new cord with an electrical crimping tool. Correct tension in the cord is set with the grub screw and allows the cord to deflect by a couple of centimetres in the middle.

The LEDS lights have an internal metal heat sink, loosely bonded with white thermal paste. One of mine came adrift. I though about buying paste to reattach but decided to apply a dab of zinc oxide based Sudocrem (rash medicine!) over the existing, dried out paste. I’ve read it can be used as a substitute and, frankly, these over-bed lights get very little use and will be replaced when my package arrives from Germany.

Unclip the lights from the frame so they hang loose before reassembly.

Reassembly requires reattaching the colour coded wires and then the 12 screws. Pull the light fitting through the side panels, clip the panels in, add a small amount of silicone spray to the light cover ring to help next time, attach the cover ring with a clockwise twist, push the light through the side panel and into the frame. Clip the end panels in.

Subscribers  do not see these advertisements


Attachments

  • 3A058859-A82F-4190-8642-D529860AB155.jpeg
    3A058859-A82F-4190-8642-D529860AB155.jpeg
    1.3 MB · Views: 38
  • DE33C403-FA86-4BE5-8911-9895C6998132.jpeg
    DE33C403-FA86-4BE5-8911-9895C6998132.jpeg
    312.6 KB · Views: 37
  • 6662CC87-6C10-4BF5-A572-3FA4C1708037.jpeg
    6662CC87-6C10-4BF5-A572-3FA4C1708037.jpeg
    328.1 KB · Views: 37
  • 503D2BC5-80E1-457B-B2AC-71AC8BFF1AC3.jpeg
    503D2BC5-80E1-457B-B2AC-71AC8BFF1AC3.jpeg
    309.7 KB · Views: 40
  • 9F942E73-0850-422B-81E6-78B67237ECB6.jpeg
    9F942E73-0850-422B-81E6-78B67237ECB6.jpeg
    253.8 KB · Views: 38
Mar 15, 2019
518
933
Funster No
59,148
MH
AutoCruise Stardream
Exp
Newbie April 2019
Any links as ours is struggling in this heat! This app must be like Google, I just talked about it 5 minutes ago 😳
Just as an example of how they can help, I fitted a similar home made version that runs off an LCD controller.

Ran the fridge on mains the other day to test it as had replaced the thermal paste, the temp was reading 44c at the back of the fridge before I turned them on. Temps after 30mins were down to 27c so that can only improve the fridges performance.

I made ours from some PC case fans, a bit of ally plate and a thermal controller that was about £8 off ebay.

Cheap worthwhile upgrade
 
May 7, 2016
7,248
11,731
West Sussex
Funster No
42,951
MH
Carthago Compactline
Exp
Since 2003
Just as an example of how they can help, I fitted a similar home made version that runs off an LCD controller.

Ran the fridge on mains the other day to test it as had replaced the thermal paste, the temp was reading 44c at the back of the fridge before I turned them on. Temps after 30mins were down to 27c so that can only improve the fridges performance.

I made ours from some PC case fans, a bit of ally plate and a thermal controller that was about £8 off ebay.

Cheap worthwhile upgrade
I also made up my own fans (see #2194). Does anyone know the optimum temperature at the back of the fridge? I know it can get too cold as well as too hot, at present I have set my temperature control so the fans cut in at 23C.

Subscribers  do not see these advertisements

 
Jun 27, 2021
326
1,068
Lincolnshire, UK
Funster No
82,232
MH
PVC
Exp
Twelve months and still learning.
Don't know if this counts but the three screws on my Ducato driver's step were horribly rusty so I replaced them with good old brainless. It infuriates me that more fasteners are not stainless from new as the extra cost nowadays is minimal. OK some stress bearing fasteners need to be high tensile, bit trim screws?
 
Sep 28, 2015
2,017
2,610
Kingston upon Hull, East Yorkshire.
Funster No
38,946
MH
Hymer B544
Exp
2001 Caravans 2011 Motorhomes
On the way to the Norfolk show last Monday, stopped at Sandringham first, we had a little coming together with an articulated lorry wing mirror on a roundabout (A16/A17)
A 50/50 incident, in that I got in the wrong lane and the trucker could have given way but chose to make a point of sounding his horn repeatedly rather than braking and avoiding.
Anyway the Truck company boss agreed 50/50 after viewing their dash cam footage, no insurance involved.
So today I examined the damage, thinking I may need a new window and some paint work, instead a tube of T cut and a cloth sorted it out.
One very tiny dent to the left of the window is all there is to show.
C0433C0C-4769-4F07-A709-FC5E73AC10FC.jpeg
928945C2-A8A8-4A29-B40A-509318F9B49A.jpeg
 

Join us or log in to post a reply.

To join in you must be a member of MotorhomeFun

Join MotorhomeFun

Join us, it quick and easy!

Log in

Already a member? Log in here.

Latest journal entries

Funsters who are viewing this thread

Back
Top