Reversing camera (1 Viewer)

leeboy

Free Member
Sep 24, 2013
136
61
Sheffield
Funster No
28,262
MH
Coachbuilt
Exp
newbie
Hi all,
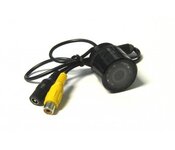
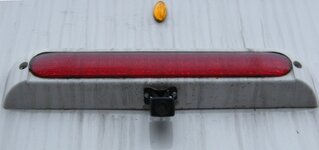
does anyone have any tips regarding the hiding of cables when fitting a reversing camera? My motorhome will be a Chausson best of 10 when I get it and there are cabinets where the cables would come through.
As an alternative, are the cameras which are incorporated in the number plate fitting any good?
your responses will be gratefully received.
Thanks,Lee.
 
Dec 6, 2011
11,578
25,390
South Wales
Funster No
19,136
MH
Coach built Adria
Exp
Since 2007
i have one of these fitted in the rear skirt, 120' angled vission, night sighted, full colour single hole outside the van body.

power supplied from reversing light ( close by ) and you could run the video cable under floor up into engine bay and into rear of the dash.
mine had the cables pre installed so it was easy for me. but i am happy with the camera view, some prefer to have a view from above.
 

Attachments

  • sr20_bumper.jpg
    sr20_bumper.jpg
    12 KB · Views: 27

aba

Free Member
Oct 27, 2009
2,775
1,112
yorkshire
Funster No
9,066
MH
coachbuilt
Exp
dec 2009
white self adhesive conduit up the rear corner externally from above the rear light cluster up to the trim at the top and run across under the trim strip to the centre.

no holes drilled into the bodywork except the camera fixing screws:thumb:

Subscribers  do not see these advertisements


Minxy

LIFE MEMBER
Aug 22, 2007
32,629
66,498
E Yorks
Funster No
149
MH
Carthago Compactline
Exp
Since 1996, had Elddis/Swift/Rapido/Rimor/Chausson MHs. Autocruise/Globecar PVCs/Compactline i-138
If it were my van, I'd do what we did when we had a Chausson Flash 04 (2010).

Mounted a small camera underneath the high level brake light (HLBL) and ran the cables through to the front of the MH:

  • Remove the HLBL casing and within the area that the casing covers drill a hole through the rear wall into the inner upper cupboard (check carefully where it will come out inside!)
  • Attached the camera to the underneath of the casing using non-rusting screws and then lift the casing up to it's original position.
  • Fed the cables behind the casing via the cut-out at the bottom of it (it is the water drain away slot) and through the hole in the rear wall so they go into the cupboard.
  • Refit the HLBL casing temporarily
  • Locate the cables in the cupboard and feed them along the rear bottom of it to the off side corner (ie into the external 'locker') - you may have to drill more holes within the cupboard/locker to do so, or find suitable orifices to pass them through!).
  • Take the cable down through the locker and through the floor (drill a hole or use a suitable vent if there is one), then along under the MH and up into the cab (we brought ours up where the handbrake is located).
  • Attach the AV cable to the rear view monitor and attach the power leads (the one for the camera and the monitor) to whatever you are using to power them (we had a cigarette lighter end on our power cables and just plugged it in when we wanted to use it (all the time!), we used the power socket located in the storage area immediately in front of the steering wheel which meant we could use it as a rear view monitor when travelling, not just when reversing).
  • Turn on the monitor and check that everything works, if not go back and check all of you connections (don't worry if the camera angle isn't right at this point as you can adjust it later).
  • Once it all works as it should you can then secure all the cables in place - hide them where necessary (we hid the ones in the cab by putting them behind the inside of the driver's door rubber then up through some of the cab plastic coverings along the top of the windscreen to the rear view mirror mounted monitor; the power cables were fed along under the steering wheel housing, under the drop down centre laptop locker and up out of the other side near the cigarette lighter points).
  • Now take off the HLBL casing and use sealant to block up the gap round the cables where they go through the hole in the MH and then re-attach the casing; fill any other holes to the outside too (bottom of locker?) to prevent any water ingress.
  • Adjust the camera angle until you are happy with it.
 

Attachments

  • 12 - Camera.JPG
    12 - Camera.JPG
    57.3 KB · Views: 56
  • 13 - Camera Monitor.JPG
    13 - Camera Monitor.JPG
    50.9 KB · Views: 57
Oct 5, 2012
4,283
9,569
Ayrshire
Funster No
23,166
MH
Carado T132
Exp
5 years, feel free to ask me about the Carado!!
I ran the video and permanent power cable underneath my boxer chassis with cable ties following the existing cabling and up through the battery box then behind the facia to the screen. The idea of drilling through the van body and running cabling all through the habitation did not appeal to me.

I positioned the cameras on the GRP bumper one as a permanent rear view mirror one as a ground camera. Many of the cheap ebay camera screens offer a switchable view.

It is surprising how many (especially Johnny foreigner) tit heads tailgate right up you and are therefore are often invisible even with WA mirrors, the permanent camera solves this problem.
 

Ed Excel

Free Member
Nov 27, 2012
870
547
Ribble Valley
Funster No
23,815
MH
Coach built
Exp
Started 2007
I would mount a wide angle camera at low level. If you are only going to use it for reversing then headlight glare shouldn't be an issue.

I clipped my cables to structural members under the MH using tie-wraps.

I would try and rise up in the cab before the engine bulkhead. I found it impossible to get through any existing holes in the bulkhead.

Some parts of the plastic coverings of the cab steps should be removable to pass the cables horizontally to the dashboard area and the up the door frame.

If you have cab blinds you'll find them useful for routing cable to an interior mirror mounted screen.

Subscribers  do not see these advertisements


peter marshall

Free Member
Mar 5, 2009
2,466
1,704
Cleveleys,Lancashire
Funster No
5,822
MH
Low Line
Exp
9 Years
Hi
I fitted a wired Camera to my last van a Chausson Welcome 76, I mounted under the top brake light took the cable through the top cupboards to the screen which I mounted on the defunct interior mirror, bit of a tussle in places but I managed it ok, remember the length of cable with the plug in on is 10 metre so not a lot of spare cable for fancy routes, I took the power supply from the cab interior light with a toggle switch to kill the Camera when not in use. Pete

Ps There are some wireless ones about but I don't know how good they are.
 
Last edited:
OP
OP
L

leeboy

Free Member
Sep 24, 2013
136
61
Sheffield
Funster No
28,262
MH
Coachbuilt
Exp
newbie
Thankyou

Thanks all for your really useful feedback, I'll now proceed with confidence::bigsmile:
Lee.
 

Join us or log in to post a reply.

To join in you must be a member of MotorhomeFun

Join MotorhomeFun

Join us, it quick and easy!

Log in

Already a member? Log in here.

Latest journal entries

Funsters who are viewing this thread

Back
Top