
As many of you know i bought my 1991 RMB Motorhome in Palma, Majorca the van was on German numberplates and owned by a German couple who had basically used the van to travel around europe so that they could find a holiday home to buy. This is my story, as to what has been done, over the last month, and may be of interest to anybody with an older motorhome, or anybody thinking of buying an older motorhome. I have been given some great advice, and have picked up some good tips.
After the deal was done, I travelled from Palma to Barcelona with the ferry company Balearia in a truly massive storm, we were supposed to get into Barcelona at 1800 we arrived at 0230 the next morning.
The beast in France

Then had a lovely drive back up through Spain and France, good calm sunny weather, then Dieppe to Newhaven and home
On the way back home i had a good week to think about what upgrades needed to be done, so i contacted Viable Logistics in Bordon Hampshire. Viable provide storage for motorhomes, it is actually in an old tank workshop within the working Bordon Army camp, dry and centrally heated, i asked Rod the owner if i could work on the van, his reply no problems at all, so i booked for one month and got to work.
The work that needed doing was
1 The roof was already about 50% checker plated, and had very slight de-lamination in the area that was not checker plated, so i decided i would checker plate the whole roof area. The RMB is a one piece monocoque construction in Glassfibre. You actually have a layer of glassfibre, then plywood, then about 3 inches of closed cell foam, then another layer of plywood, and then a layer of 1.5mm aluminium, which the carpet roof lining is attached too. To say that this is a very strong construction is a huge under statement.
2 While up on the roof i was going to remove, the old Oyster Analogue Satelite Dish, and my damaged 12V roof air conditioning unit. the problem was that the outer cover was badly cracked and actually holed, i suspect tree branches were to blame. I was then going to cut the roof to fit another new 500mm X 500mm hatch at the point where the old AC unit was removed.
3 Reseal the existing 5 roof hatches
3 Remove the old Solar panels and controller they were well past there sell by date and were producing virtually no amps at all !!!!!! Fit a new 100Watt Solar Panel, and MPPT Controller.
4 Fit a new Leisure battery, the two old ones fitted were also well past there sell by date, Fit LED interior lights, and some 12V sockets.
5 Fit some soundproofing to the engine bay
5 Huge clean inside and out, TCut wax and polish
The checker plating of the roof was quite easy, i really cleaned the roof thoroughly and degreased with methylated Spirits, after cutting out the checker plate panels, you need to do this accurately and really maximise your cuts to avoid waste as checker plate is expensive and you need quite a lot of it, a motorhome is big !!!!. I then glued the checker plate down using Sikaflex 512
Removing the Old Air Conditioning Unit, Solar System and Sat Antennae
Removing the Oyster sat dish was also easy enough, but the air conditioning unit was really stuck down with Sikaflex 512 and took a lot of work to remove, that Sikaflex really sticks down hard, fantastic stuff.
When the AC unit was finally removed the hole through the roof was about 350mm X 350MM and i needed to enlarge this out to 500mm X 500mm. I marked it all out very carefully, and enlarged the hole using a jigsaw and angle grinder. i used the angle grinder to grind big grooves in the checker plate that the AC Unit was fixed to so that it would be easier work for the Jigsaw, this idea worked very well. The hatch fitted perfectly.
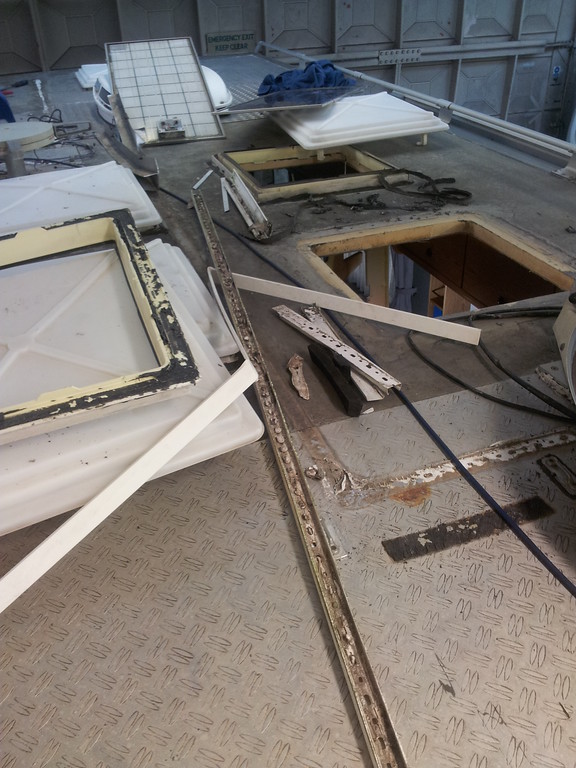
Trial fitting the some of the new checker plate, you can see the hole where the old AC unit used to be, this needs to be enlarged, and the Sat dish at the rear which is about to be removed
The new hatch was bought from Germany for 77 Euros, and is identical to the existing 5 hatches. I sealed all the hatches using 19mm W4 Mastic tape. On my hatches you have a flat area which is about 19mm wide, then on the outside of this you have a small groove, and then the outer edge of the hatch. I also used IDL 99 Sealant in this groove. resealing the hatches is an easy job to do, however i recommend THAT YOU DO NOT use Sikaflex 512, this provides too strong an adhesive, and you would have a really big job to ever remove the hatches again. without tearing up the roof or cracking the hatches. Do not underestimate just how strong the Sikaflex is.
With the Solar System i simply used the existing wiring connected to my new 100w Panel, i then removed the old controller and wired in my new MPPT Controller.
Link Removed
It all works fine. the only problem that i had was connectors. The Germans when the old panels were fitted did not use MC4 connectors. So i bought an IP65 waterproof Junction box and joined the new solar panel to the existing wiring using a standard large block connector. Sikaflexed the IP65 box to the roof and sealed up the cable entrances
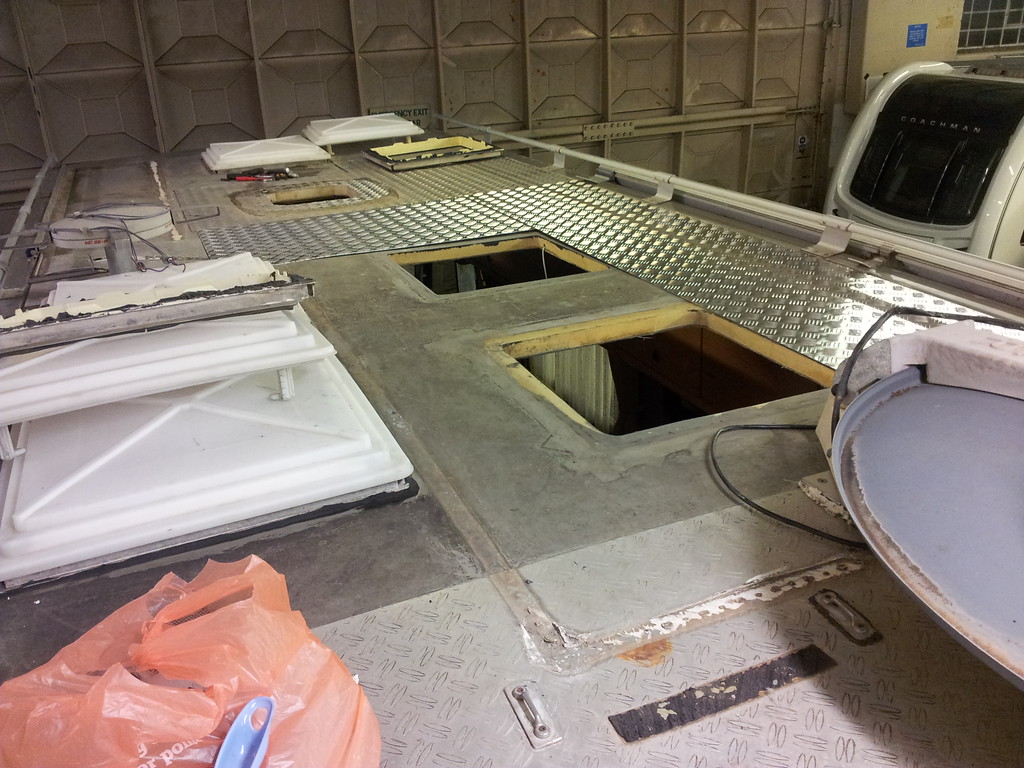
Lots more checker plate now fitted, although far from finished, notice i left some drainage gaps and new solar panel trial fitted.
The new Leisure battery is a Varta LPD 90 Ah, i then wired in these LED Light panels to my existing light units.
Link Removed
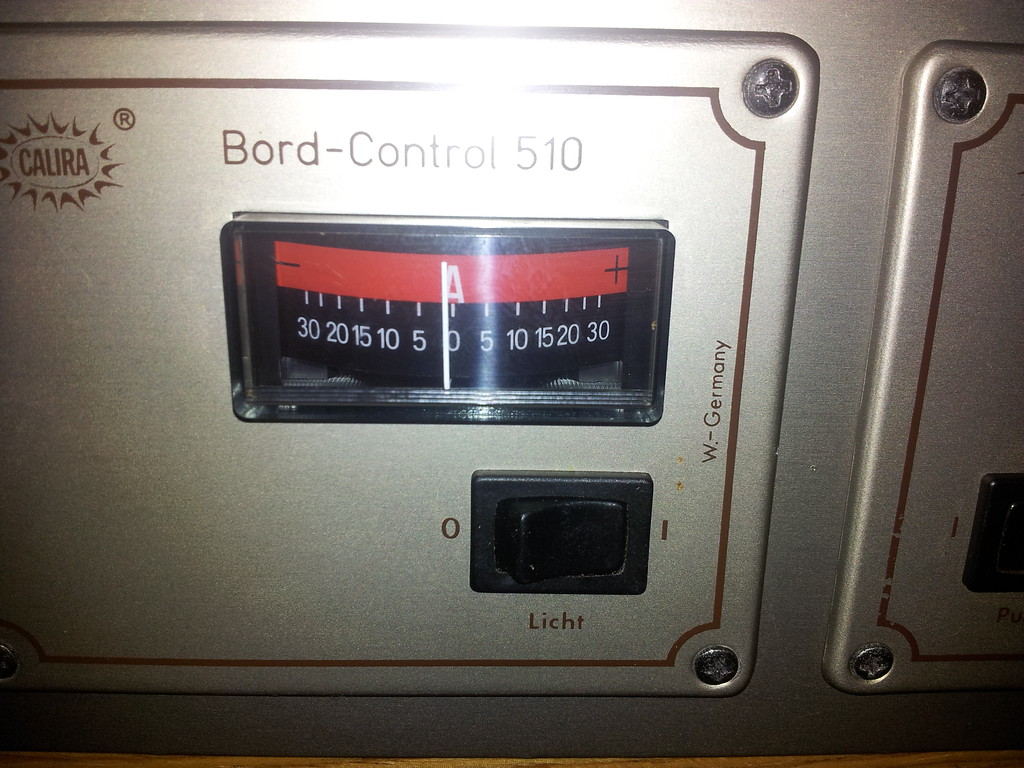
I have 3 Light Units which were fluorescent units and i wired in 2 of these panels per light unit. It is very easy to do, just a bit of time with the soldering iron. in my opinion the LED gives a nicer light and seems to use a lot less power. Today i switched on all 3 lights units, my mobile phone and Ipad were charging and i seemed to be using just over 1 amp, even though i am in a garage i am directly under a big skylight, so the solar panel was probably contributing about 0.5 amp. So use, in the region of 1 to 2 amps. We only really need lights, and mobile phone, ipad charger, so i am hoping that with the Solar Panel we should be self sufficient most days so no need for EHU
Amp draw with 3 lights on, mobile phone and Ipad charger ON !!!!
i am trying to make as much of the charging 12V as possible, the van is fitted with 2 Hella/DIN 12V sockets so i bought 2 adapters for these so that i have another 2 standard 12V sockets. I also fitted 2 more 12V sockets, obviously all feeding off the leisure battery.
On Ebay i bought a Griffin 12V USB so that i can charge both our smartphones and i also bought a 12V USB with a 2amp output to charge the Ipads. For some reason Ipods and Iphones use a 5W Charge, but an Ipad needs a 10w Charge. If you try and use the Ipad with the Ipod 5W charger you get a message that it is not charging, it is charging But very slowly. If we bring our laptops then i already have a 12V laptop charger.
On the road, i use the Vodafone Euro Traveller you pay £3 a day, but then basically all the countries in Europe as far as Vodafone is concerned become the UK, so you can use your Minutes, Texts and Data in Europe. With our Samsung Galaxy S2 you can then tether your phone to the Ipad, so you get to internet browse on the Ipad or Laptop via the phone. If you simply receieve calls and texts you are not charged the £3. It is only when you make a call or send a text, or use data that this £3 is activated.
i used this system on the way back from Spain and it was faultless, If you have an Ipad or Iphone a superb App i recommend is called AIRES CC. It shows all the Aires in France, it is in French but very easy to use.
to be continued .......
After the deal was done, I travelled from Palma to Barcelona with the ferry company Balearia in a truly massive storm, we were supposed to get into Barcelona at 1800 we arrived at 0230 the next morning.
The beast in France
Then had a lovely drive back up through Spain and France, good calm sunny weather, then Dieppe to Newhaven and home
On the way back home i had a good week to think about what upgrades needed to be done, so i contacted Viable Logistics in Bordon Hampshire. Viable provide storage for motorhomes, it is actually in an old tank workshop within the working Bordon Army camp, dry and centrally heated, i asked Rod the owner if i could work on the van, his reply no problems at all, so i booked for one month and got to work.
The work that needed doing was
1 The roof was already about 50% checker plated, and had very slight de-lamination in the area that was not checker plated, so i decided i would checker plate the whole roof area. The RMB is a one piece monocoque construction in Glassfibre. You actually have a layer of glassfibre, then plywood, then about 3 inches of closed cell foam, then another layer of plywood, and then a layer of 1.5mm aluminium, which the carpet roof lining is attached too. To say that this is a very strong construction is a huge under statement.
2 While up on the roof i was going to remove, the old Oyster Analogue Satelite Dish, and my damaged 12V roof air conditioning unit. the problem was that the outer cover was badly cracked and actually holed, i suspect tree branches were to blame. I was then going to cut the roof to fit another new 500mm X 500mm hatch at the point where the old AC unit was removed.
3 Reseal the existing 5 roof hatches
3 Remove the old Solar panels and controller they were well past there sell by date and were producing virtually no amps at all !!!!!! Fit a new 100Watt Solar Panel, and MPPT Controller.
4 Fit a new Leisure battery, the two old ones fitted were also well past there sell by date, Fit LED interior lights, and some 12V sockets.
5 Fit some soundproofing to the engine bay
5 Huge clean inside and out, TCut wax and polish
The checker plating of the roof was quite easy, i really cleaned the roof thoroughly and degreased with methylated Spirits, after cutting out the checker plate panels, you need to do this accurately and really maximise your cuts to avoid waste as checker plate is expensive and you need quite a lot of it, a motorhome is big !!!!. I then glued the checker plate down using Sikaflex 512
Removing the Old Air Conditioning Unit, Solar System and Sat Antennae
Removing the Oyster sat dish was also easy enough, but the air conditioning unit was really stuck down with Sikaflex 512 and took a lot of work to remove, that Sikaflex really sticks down hard, fantastic stuff.
When the AC unit was finally removed the hole through the roof was about 350mm X 350MM and i needed to enlarge this out to 500mm X 500mm. I marked it all out very carefully, and enlarged the hole using a jigsaw and angle grinder. i used the angle grinder to grind big grooves in the checker plate that the AC Unit was fixed to so that it would be easier work for the Jigsaw, this idea worked very well. The hatch fitted perfectly.
Trial fitting the some of the new checker plate, you can see the hole where the old AC unit used to be, this needs to be enlarged, and the Sat dish at the rear which is about to be removed
The new hatch was bought from Germany for 77 Euros, and is identical to the existing 5 hatches. I sealed all the hatches using 19mm W4 Mastic tape. On my hatches you have a flat area which is about 19mm wide, then on the outside of this you have a small groove, and then the outer edge of the hatch. I also used IDL 99 Sealant in this groove. resealing the hatches is an easy job to do, however i recommend THAT YOU DO NOT use Sikaflex 512, this provides too strong an adhesive, and you would have a really big job to ever remove the hatches again. without tearing up the roof or cracking the hatches. Do not underestimate just how strong the Sikaflex is.
With the Solar System i simply used the existing wiring connected to my new 100w Panel, i then removed the old controller and wired in my new MPPT Controller.
Link Removed
It all works fine. the only problem that i had was connectors. The Germans when the old panels were fitted did not use MC4 connectors. So i bought an IP65 waterproof Junction box and joined the new solar panel to the existing wiring using a standard large block connector. Sikaflexed the IP65 box to the roof and sealed up the cable entrances
Lots more checker plate now fitted, although far from finished, notice i left some drainage gaps and new solar panel trial fitted.
The new Leisure battery is a Varta LPD 90 Ah, i then wired in these LED Light panels to my existing light units.
Link Removed
I have 3 Light Units which were fluorescent units and i wired in 2 of these panels per light unit. It is very easy to do, just a bit of time with the soldering iron. in my opinion the LED gives a nicer light and seems to use a lot less power. Today i switched on all 3 lights units, my mobile phone and Ipad were charging and i seemed to be using just over 1 amp, even though i am in a garage i am directly under a big skylight, so the solar panel was probably contributing about 0.5 amp. So use, in the region of 1 to 2 amps. We only really need lights, and mobile phone, ipad charger, so i am hoping that with the Solar Panel we should be self sufficient most days so no need for EHU
Amp draw with 3 lights on, mobile phone and Ipad charger ON !!!!
i am trying to make as much of the charging 12V as possible, the van is fitted with 2 Hella/DIN 12V sockets so i bought 2 adapters for these so that i have another 2 standard 12V sockets. I also fitted 2 more 12V sockets, obviously all feeding off the leisure battery.
On Ebay i bought a Griffin 12V USB so that i can charge both our smartphones and i also bought a 12V USB with a 2amp output to charge the Ipads. For some reason Ipods and Iphones use a 5W Charge, but an Ipad needs a 10w Charge. If you try and use the Ipad with the Ipod 5W charger you get a message that it is not charging, it is charging But very slowly. If we bring our laptops then i already have a 12V laptop charger.
On the road, i use the Vodafone Euro Traveller you pay £3 a day, but then basically all the countries in Europe as far as Vodafone is concerned become the UK, so you can use your Minutes, Texts and Data in Europe. With our Samsung Galaxy S2 you can then tether your phone to the Ipad, so you get to internet browse on the Ipad or Laptop via the phone. If you simply receieve calls and texts you are not charged the £3. It is only when you make a call or send a text, or use data that this £3 is activated.
i used this system on the way back from Spain and it was faultless, If you have an Ipad or Iphone a superb App i recommend is called AIRES CC. It shows all the Aires in France, it is in French but very easy to use.
to be continued .......
Last edited:

") any interior pics please?
any interior pics please? ) We are really looking for something that has either a fixed bed or and rear lounge that can be left as a bed. Looks like it is all on hold until after Christmas now anyway but I think and RMB Arnold RM40 - maybe something like this: