- Jul 5, 2013
- 11,722
- 13,698
- Funster No
- 26,797
- MH
- A class
- Exp
- Since 2013
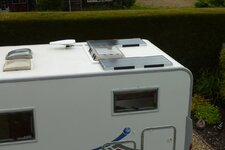
Over the last month I have been constantly asking stupid questions and getting clever answers about a DIY Solar panel project. Many thanks to all of you who had the patience to keep answering (politely) and especially to Techno100, who has helped me so much.
Anyway the job is now finished and I am very pleased with it. I used 2 x 100W panels from Broken Link Removed. I paid £185 including delivery for both panels plus 10m of cable and 2 pairs of connectors. Good value and looks a good product. I got this [ame="http://cgi.ebay.co.uk/ws/eBayISAPI.dll?ViewItem&item=111352186792"]roof gland[/ame], because I thought it was better engineered than the normal ones that are available, and the thing that made me most nervous was the thought of that hole through the roof.
I used the Schaudt Solar controller so it works through my existing Electrobloc and display panel. Wiring was easy because it had been factory pre-wired between the electrobloc and the wardrobe that I brought the cables into. Just a case of crimping new connectors fitting the controller and plugging in the Schaudt prewired connection cables.
Decided to add this Broken Link Removed. Quadruple heavy duty cables between it and the batteries came as a bit of a surprise, but it was easy peasy to fit it in the same locker as the Electrobloc and batteries. Tried it using wife's hairdryer (the main reason for getting it ) and it worked a treat. Looks very well built, but only time will tell how well it lasts.
A very grey day today and yet charging at 3 or 4 watts when needed, so should be good for what I want. Attached are a couple of pictures. When I first got the motorhome the locker with the electrbloc in was used for other things as well. Now I have replaced one smallish battery with 2 large ones plus added the inverter (the big red thing on the left of the picky) and the solar regulator there is not much room for anything else.
To all of those who are not sure about DIY fitting I would just say that it was easier than I thought. As long as you have reasonable DIY skills, and do plenty of research it should be no problem.