flooring job complete (1 Viewer)

kex66

Free Member
Jan 29, 2012
166
203
cheshire
Funster No
19,628
MH
A Class
Exp
I'm a newbie
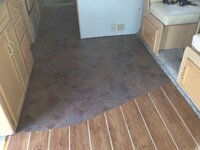
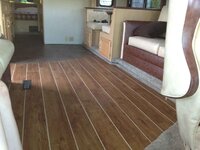
Posted this on RVOC as well. Finished putting the new flooring down. Only took a few hours on Sunday to take out the original carpet and fit the new covering. I've used Polyflor Camaro vinyl flooring - Vintage timber plank in the lounge with a 3mm cream feature strip in between and Serpentine tile in the kitchen and through into the bathroom with a gold 3mm feature strip.

I've also used F46 pressure sensitive adhesive to bond the vinyl to the sub floor. Everything fairly straight forward. I did create a lot of work though in deciding to have a diamond pattern for the tiles.

Photo's were taken using my phone so a bit rubbish and the detail in the kitchen does not show through.
 

Attachments

  • damon daybreak9.jpg
    damon daybreak9.jpg
    41.9 KB · Views: 98
  • floor finished.jpg
    floor finished.jpg
    85.5 KB · Views: 101
  • floor finished2.jpg
    floor finished2.jpg
    85.1 KB · Views: 98
  • floor finished3.jpg
    floor finished3.jpg
    97.5 KB · Views: 97
  • floor finished4.jpg
    floor finished4.jpg
    85.8 KB · Views: 101
Nov 30, 2009
6,547
148,954
Pickering
Funster No
9,521
MH
PVC the PUG
Exp
Since 2009 with motorhomes several caravans then tents before that.
What a transformation. Looks fantastic:thumb:
 

Mikey RV

LIFE MEMBER
Mar 7, 2010
4,901
24,228
Devon
Funster No
10,532
MH
Burstner Elegance I821G
Exp
Since 1977
That looks fantastic. We hate the carpet in our RV thought about going the wood route. Now we will when funds allow.:thumb:

Subscribers  do not see these advertisements

 
OP
OP
K

kex66

Free Member
Jan 29, 2012
166
203
cheshire
Funster No
19,628
MH
A Class
Exp
I'm a newbie
That looks fantastic. We hate the carpet in our RV thought about going the wood route. Now we will when funds allow.:thumb:

I complicated the job by going for a tile in a diamond pattern as well as the wood effect. Although the tile doesn't come out very well on the camera phone, it does look very good in the flesh. However, If I did the job again I would stick to the wood effect right through.

On your size of RV Mikey, if you leave the carpet around the driver/ passenger seat area and in the bedroom I think 2 x pack of Camaro vintage wood vinyl planking, 1 x tub adhesive and 1 x tube 3mm cream feature strip will be more than enough - £140.

The only tools you will need is a stanley knife with spare blades, an adhesive spreader with a fine tooth blade, an electic staple gun with 50mm staples, a heat gun to soften the vinyl plank when cutting around corners and a wallpaper border roller to press down the seams (A small rolling pin will do as well).

Prepare your floor well - no staples or raised screws etc and the floor is clean and dust free. make sure the RV is nice and warm and the vinyl has been stored in the RV for a couple of days, it makes it easier to work with. Tip a small amount of adhesive onto the floor and spread thinly (There are videos on you tube). work with an area of about 2m square at a time if this is the first time you have tried it.

Wait for the adhesive to go from a milky colour to almost clear (test with your finger - it should be tacky and not wet). then simply lay the floor - plank then feature strip then plank etc. Press down as you go and use the roller on joins and at the edge of the plank. Just make sure that the plank and feature strip are butted up to each other with no gaps and any cuts are against the wall and not butted up to another plank.

Don't use the plank on vertical surfaces it doesn't look right. leave the carpet in the entrance step area or replace with new carpet, again the planking doesn't look right.

Cut the existing carpet 75mm longer than you need and fold under to create an edge. Use the staple gun to secure every 50mm.

Buy from a contract flooring stockist or your budget will double. I bought from a company called Lee Floorstok in Manchester and they were happy to sell to non trade (Times are tough at the moment so most don't care anymore).

Good luck and let me know how you go on. If you need any more help then PM me and I will get back ASAP.
 
OP
OP
K

kex66

Free Member
Jan 29, 2012
166
203
cheshire
Funster No
19,628
MH
A Class
Exp
I'm a newbie
I complicated the job by going for a tile in a diamond pattern as well as the wood effect. Although the tile doesn't come out very well on the camera phone, it does look very good in the flesh. However, If I did the job again I would stick to the wood effect right through.

On your size of RV Mikey, if you leave the carpet around the driver/ passenger seat area and in the bedroom I think 2 x pack of Camaro vintage wood vinyl planking, 1 x tub adhesive and 1 x tube 3mm cream feature strip will be more than enough - £140.

The only tools you will need is a stanley knife with spare blades, an adhesive spreader with a fine tooth blade, an electic staple gun with 50mm staples, a heat gun to soften the vinyl plank when cutting around corners and a wallpaper border roller to press down the seams (A small rolling pin will do as well).

Prepare your floor well - no staples or raised screws etc and the floor is clean and dust free. make sure the RV is nice and warm and the vinyl has been stored in the RV for a couple of days, it makes it easier to work with. Tip a small amount of adhesive onto the floor and spread thinly (There are videos on you tube). work with an area of about 2m square at a time if this is the first time you have tried it.

Wait for the adhesive to go from a milky colour to almost clear (test with your finger - it should be tacky and not wet). then simply lay the floor - plank then feature strip then plank etc. Press down as you go and use the roller on joins and at the edge of the plank. Just make sure that the plank and feature strip are butted up to each other with no gaps and any cuts are against the wall and not butted up to another plank.

Don't use the plank on vertical surfaces it doesn't look right. leave the carpet in the entrance step area or replace with new carpet, again the planking doesn't look right.

Cut the existing carpet 75mm longer than you need and fold under to create an edge. Use the staple gun to secure every 50mm.

Buy from a contract flooring stockist or your budget will double. I bought from a company called Lee Floorstok in Manchester and they were happy to sell to non trade (Times are tough at the moment so most don't care anymore).

Good luck and let me know how you go on. If you need any more help then PM me and I will get back ASAP.

Forgot to mention, you will need a straight edge as well. You can see from the photo's I introduced an angle to the cut. If you are using two different types of vinyl then lay the first roughly past the line you require the second style to start and place your straight edge over the top. Cut with a stanley knife (BE CAREFUL!) and peel off the off cuts.:thumb: You now have a straight cut to work with for your second style of vinyl.
 

callumwa

Free Member
Jan 16, 2011
4,110
4,480
Tyne & Wear, sometimes..
Funster No
14,968
MH
Coachbuilt
Exp
4 yrs +, 30+ yrs motorbike touring
Nice job, it's like a new van now.....:thumb:

Callum

Subscribers  do not see these advertisements


Join us or log in to post a reply.

To join in you must be a member of MotorhomeFun

Join MotorhomeFun

Join us, it quick and easy!

Log in

Already a member? Log in here.

Latest journal entries

Funsters who are viewing this thread

Back
Top