Damp motorhome project - Rear repair

Argar

Free Member
Joined
Sep 21, 2020
Posts
83
Likes collected
117
Funster No
76,147
MH
A Class
Having nearly completed the roof repair and only cleanup jobs left (Roof Repair), I've started the 2nd project which is sorting the rear wall (Motorhome damp repairs a project that keeps on giving).

The rear wall of my Eura Mobil Integra has suffered the same as the roof so again replacing beams and wallboard. Having been digging out rotten wood yesterday I'm trying to work out what material runs along the bottom of the van - seems to be a non expanded polystyrene - does anybody recognise this from the picture below?

The build here was GRP inside and outside with a wooden structure.

20210531_114526.jpg
 
More removing of furniture and damp wall board - this wall is not as bad - a few beams not great and the join completely gone

20210607_161409.jpg


20210607_161443.jpg
 
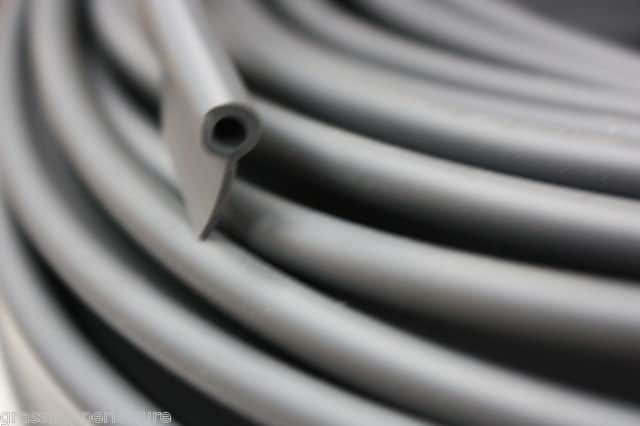
Just wondering does anybody know what this sealing strip used inside the van at corners is called and where you can get it in white and beige?

20210608_184528.jpg


20210608_184511.jpg
 
I can't help with your questions but hope you manage to get it sorted(y)
 
If its the bit shown in the photo I belive its called tadpole rubber due to its shape
 
If you have a building plastics company near you, have a mooch around, they tend to have all sorts of mouldings for edge covering. I would be too fussed about matching the original, might be easier to replace all the edge coverings to keep it looking the same throughout.

Great work so far .... Will be perfect when it's finished. Are you replacing the interior or refitting? Could give you chance to redesign the interior and window layout to suit your personal needs?
 
Thanks to those who've responded - as always your help is appreciated. You're correct it's called Tadpole seal, I've checked and still can't find anybody that sells it off the shelf - only places that make to order and that's silly money for 10m! If I can't source anything likely I'll run a bead of sealant down it!

Regarding the interior, I'll probably refit as it was originally designed - don't fancy trying to do that as well, but totally agree would be a good opportunity to do it.

I've read many posts on resealing windows and mastic vs sealant. Is Sikaflex 522 considered a good sealant for the job?
 
What about a nice piece of quadrant with sealant behind.
 
Thanks to those who've responded - as always your help is appreciated. You're correct it's called Tadpole seal, I've checked and still can't find anybody that sells it off the shelf - only places that make to order and that's silly money for 10m! If I can't source anything likely I'll run a bead of sealant down it!

Regarding the interior, I'll probably refit as it was originally designed - don't fancy trying to do that as well, but totally agree would be a good opportunity to do it.

I've read many posts on resealing windows and mastic vs sealant. Is Sikaflex 522 considered a good sealant for the job?
 
Thanks to those who've responded - as always your help is appreciated. You're correct it's called Tadpole seal, I've checked and still can't find anybody that sells it off the shelf - only places that make to order and that's silly money for 10m! If I can't source anything likely I'll run a bead of sealant down it!

LOADS on ebay. PS: Search for tadpole trim not tadpole seal.

Just one example.

Subscribers  do not see these advertisements

 
This site contains affiliate links for which MHF may be compensated.
Rebuilt the corners today the van is now a lot stronger :-) Felt like a real move forward.

In these pictures you'll still some rotten wood on the read wall, now the corners are built can now sort this!

20210628_163851.jpg
20210628_163854.jpg
 
20210628_163900.jpg


Just shows how far water gets though this is the lower beam it's like a sponge! Needs to come out and means now I will have to investigate the bathroom, I expect the door on the gas cupboard is leaking as well!
 
You’re doing a Sterling job. Your motor home will be better than when it was new when you’re finished with it!

Subscribers  do not see these advertisements

 
Can anybody help with pointing me in the correct direction to find replacements for the part shown in the image - no idea even what to search for. They're used to hold the frame for the doors to the wooden structure on our motorhome - we have no other mechanical fixing.

20210720_075921.jpg
 
Slow progress recently!

Managed to get the first board onto the side, and starting to get the damp beams of the rear wall. Trying to get a final push on getting through this but enthusiasm is now waning!

20210816_200522.jpg

20210816_200526.jpg
 
Can anybody help with pointing me in the correct direction to find replacements for the part shown in the image - no idea even what to search for. They're used to hold the frame for the doors to the wooden structure on our motorhome - we have no other mechanical fixing.

View attachment 518174
I saw this post and had no idea but thought that someone would be along to help out.
Don’t lose heart, it will be worth it and you can take pride in a job well done.
 
I saw this post and had no idea but thought that someone would be along to help out.
Don’t lose heart, it will be worth it and you can take pride in a job well done.
Hi, I found more information on that part - it's made by a company called Mekuwa but is no longer stocker or available - will have to clean up what I've managed to salvage!
 
Can anybody help with pointing me in the correct direction to find replacements for the part shown in the image - no idea even what to search for. They're used to hold the frame for the doors to the wooden structure on our motorhome - we have no other mechanical fixing.

View attachment 518174
Window frame brackets from a DIY store would probably suit if you need them? Cut off the end with the mortar holes in and you have a simalar bracket.

Cheers James

Subscribers  do not see these advertisements

 
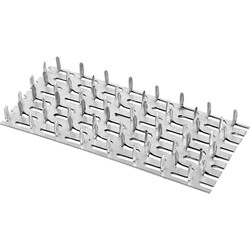
You could fashion new brackets from timber 'tooth plate' connectors or flat connecting joining plates. I've added a couple of links below.


Maybe this is of some help and I must say you seem to be doing a cracking job.
 
How’s the project coming along? It looks like you and I both have leaky vans, I have just started on my third project at the rear of my van so interested to see how you are getting on (y)
 
DJL220 Can't believe you've found more damp and now starting project 3 - fortunately, I'm replacing so much can't see any being left 🤞I reckon I'll have reboarded 2/3 of the wallboard, half the ceiling boards and all the plywood on the roof!

Plodding through the work both sides now have the wallboard at the top level and working on the back. Unfortunately found damp in the bathroom now so have stripped some wallboard (to allow the structure to go in back) and have to move furniture in there at some point. Found out the wood around the wheel arches is sodden so need to remove wheel arches to do that. Finally need to look at the very bottom all the way around 😭

Some pictures:
off side wall board replaced
20210826_151530.jpg

Near side wall board replaced
20210907_120511.jpg


Structure on rear being spliced in
20210907_120459.jpg


Bathroom wall boards removed to allow structure to be added
20210826_151542.jpg


Supporting outside of van to glue wallboards
WhatsApp Image 2021-09-04 at 7.54.00 PM.jpeg
 
Wow I thought my MH was bad, looks like you are in a similar boat. Good luck with the repairs n keep posting updates 👍
 
Wow I thought my MH was bad, looks like you are in a similar boat. Good luck with the repairs n keep posting updates 👍
Feels like a boat at times!

Subscribers  do not see these advertisements


Join us or log in to post a reply.

To join in you must be a member of MotorhomeFun

Join MotorhomeFun

Join us, it quick and easy!

Log in

Already a member? Log in here.

Latest journal entries

Back
Top