
-
Rallies
New events -
Resources
Latest reviews
Navigation
Install the app
How to install the app on iOS
Follow along with the video below to see how to install our site as a web app on your home screen.
Note: This feature may not be available in some browsers.
More options
You are using an out of date browser. It may not display this or other websites correctly.
You should upgrade or use an alternative browser.
You should upgrade or use an alternative browser.
Burstner TL680G incoming (1 Viewer)
- Thread starter BishBosh
- Start date
Thanks Mark, just wondering where to fit my inverter, do you have one? I’m thinking of putting it to the left of the battery locker under the hab seat.. this allows me to run a plug into the EHU socket so if I’m on site hook up or inverter only one can be plugged in at the same time.
The layout of ours looks very similar to yours and you may have a larger inverter than the one we have but we have a lift out flap on top of the batteries immediately behind the passenger seat and it sits nicely there on 2 long strips of double sided tape. Compromise between being fully accessible and too visible but its only for occasional use. We also fitted an additional double USB charging point in the front panel connected directly to the batteries with an inline fuse. Managed to source matching fittings from
BishBosh
Free Member
- Sep 1, 2019
- 138
- 268
- Funster No
- 63,727
- MH
- None
- Exp
- Upgrades!!! of course
Thanks GMLS, that’s a handy link. My inverter is a little on the large side, however I’ve now fitted it in a similar place to yours.
Subscribers do not see these advertisements
BishBosh
Free Member
- Sep 1, 2019
- 138
- 268
- Funster No
- 63,727
- MH
- None
- Exp
- Upgrades!!! of course
Just for information for anyone interested in the detail.... I’ve installed my new inverter next to the batteries, it’s just too big to go in the same compartment, it may have been better to get a thinner version and install it directly above the batteries so worth thinking about for anyone else.
We ran a flexible 240v 13amp cable from the inverter to the rear locker behind the breaker fuse box (consumer unit). This is where everything is joined/connected.
We separated out the mains power to the fridge, Truma heater and battery charger and connected the various parts to a NDS priority switch (see pic). This auto switches between EHU and inverter whilst keeping the three mains powered items (fridge,heater and charger) separated from the inverter. We also put a 300amp breaker on the positive battery to inverter. The inverter has a remote control so I can switch it on /off without groping around under the seat.
I’ll maybe put a plug in led light to the other socket on the inverter to warn me it’s on.
Secondly managed to get a clever extendable tv wall bracket so I can move the tv further out and around for better viewing.
A few other modifications left to do (stronger magnets for the rear sliding cupboards for one) can’t think of anything else yet. Will give it a try out over the weekend and check all works as it should.

Inverter location...

All the wiring connectors behind this panel, no fuses here only consumer unit on the front

TV bracket...


We ran a flexible 240v 13amp cable from the inverter to the rear locker behind the breaker fuse box (consumer unit). This is where everything is joined/connected.
We separated out the mains power to the fridge, Truma heater and battery charger and connected the various parts to a NDS priority switch (see pic). This auto switches between EHU and inverter whilst keeping the three mains powered items (fridge,heater and charger) separated from the inverter. We also put a 300amp breaker on the positive battery to inverter. The inverter has a remote control so I can switch it on /off without groping around under the seat.
I’ll maybe put a plug in led light to the other socket on the inverter to warn me it’s on.
Secondly managed to get a clever extendable tv wall bracket so I can move the tv further out and around for better viewing.
A few other modifications left to do (stronger magnets for the rear sliding cupboards for one) can’t think of anything else yet. Will give it a try out over the weekend and check all works as it should.
Inverter location...
All the wiring connectors behind this panel, no fuses here only consumer unit on the front
TV bracket...
BishBosh
Free Member
- Sep 1, 2019
- 138
- 268
- Funster No
- 63,727
- MH
- None
- Exp
- Upgrades!!! of course
Thought I would update this a little today. Now have a self levelling system installed by LNB of Bristol. ~Very pleased with the set up so had a go at practicing this weekend on the drive. As you may observe there are a few other additions recently procured ready for the year ahead should we be able to travel.

BishBosh
Free Member
- Sep 1, 2019
- 138
- 268
- Funster No
- 63,727
- MH
- None
- Exp
- Upgrades!!! of course
Next on my list is a dual reversing camera to replace the existing single lens item.
Subscribers do not see these advertisements
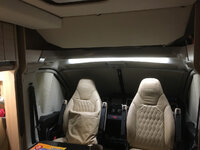
Replacing the very poor rear camera is now at the top of my list - let me know what you choose to do. Looking for a neat position for the screen! One thing I did that males a big difference on an evening is add LED edge lit tape around the cab and also under the cabinet where you have your tv. It evens out the lighting across the space on an evening. also added USB sockets and switches on either side so both can charge phones and control lights when bed is lowered.
Attachments
Last edited:
BishBosh
Free Member
- Sep 1, 2019
- 138
- 268
- Funster No
- 63,727
- MH
- None
- Exp
- Upgrades!!! of course
Very nice Mark, I like that. I too have added the USB sockets as well as a small folding make shelf/ ledge on the side of the bed when lowered. I can put my watch and phone on this to charge overnight.
I have ordered a new camera through Amazon. Hopefully this will plug and play through my existing wiring with an adapter lead.
I have a Dometic Cam45 that feeds to the installed Pioneer head unit and was looking at the Cam44 unit. After much searching I came across the Carmedien CM-DSKRFK Premium Double Shutter Camera at around £200 cheaper than I could find the Cam44 including the adapter cable set. Seems to do the same thing. I wanted a single entry wire that can split into two at the head unit. It is expensive but will save fitting costs as I'll install it. Hopefully get this by end of the week and will update on quality etc...
Amazon product ASIN B005DR1YPA
Hi, looks great. Please do keep me posted - it seems to be exactly what I am looking for. We probably have the same Bürstner provided pioneer head unit and I hope the poor picture is down to the camera.
Subscribers do not see these advertisements
- Jan 8, 2013
- 8,490
- 11,526
- Funster No
- 24,202
- MH
- Burstner Lyseo 690G
- Exp
- Happy FLT since 2011
hanks Mark, just wondering where to fit my inverter, do you have one? I’m thinking of putting it to the left of the battery locker under the hab seat.. this allows me to run a plug into the EHU socket so if I’m on site hook up or inverter only one can be plugged in at the same time.
My 690G has a single seat behind the driver and everything fits in there -- Just.
Be careful mounting that heavy inverter as the internal walls of my seat locker (left side) are only a sandwich of thin ply and polystyrene - not solid ply.
I have run a separate 3 core 2.5mm cable directly next to the sockets by the door and fitted an extra twin socket vertically.
I have left EHU circuits totally alone
https://rover.ebay.com/rover/1/710-...0001&campid=5338547443&icep_item=131846776089
BishBosh
Free Member
- Sep 1, 2019
- 138
- 268
- Funster No
- 63,727
- MH
- None
- Exp
- Upgrades!!! of course
Have now fitted the new reversing camera...
Old One Off..

I managed to use the same hole to feed the new wire through..


Used the two adapter cables (separate order) so I didn't have to run a new cable from front to back.


Some messing around with the wiring. Also fed a rear view mirror mounted screen AV cable and power to the radio unit.

Tested for water ingress...all seems ok.

Now have a permanent rear camera view when driving. The parking camera comes on when reverse is selected. I have also installed a small toggle switch to view the reversing camera when not in reverse as well.
I am very happy with the quality of the pictures and screens and it does exactly what I wanted.

Old One Off..
I managed to use the same hole to feed the new wire through..
Used the two adapter cables (separate order) so I didn't have to run a new cable from front to back.
Some messing around with the wiring. Also fed a rear view mirror mounted screen AV cable and power to the radio unit.
Tested for water ingress...all seems ok.
Now have a permanent rear camera view when driving. The parking camera comes on when reverse is selected. I have also installed a small toggle switch to view the reversing camera when not in reverse as well.
I am very happy with the quality of the pictures and screens and it does exactly what I wanted.
- Jan 21, 2020
- 257
- 163
- Funster No
- 68,224
- MH
- Burstner
- Exp
- Newbie
This is exactly what I want but unfortunately there is no way on earth I can do this myself! ?
but well done indeed.
but well done indeed.
Subscribers do not see these advertisements
BishBosh
Free Member
- Sep 1, 2019
- 138
- 268
- Funster No
- 63,727
- MH
- None
- Exp
- Upgrades!!! of course
Thanks, yes it was a little more of a mission than first thought.This is exactly what I want but unfortunately there is no way on earth I can do this myself! ?
but well done indeed.
Hi. Thanks for the excellent and informative update! So you see that the quality of the image has improved over the factory fitted version? Got to love the spaghetti of cable behind the radio!!!
BishBosh
Free Member
- Sep 1, 2019
- 138
- 268
- Funster No
- 63,727
- MH
- None
- Exp
- Upgrades!!! of course
Hi Mark, the Cam 45 originally installed was pretty good to be honest. There is a difference from that to what I now have but not much...
I did pay more than I really wanted for the dual camera but it was quite a lot cheaper than the Cam 44 and I decided to get the rear view mirror mounted display after trying to set it up on the head unit so I could have two displays on at once. Again the mirror mounted display was twice the price as similar units but screen resolution on this one is very good at 800x400.
Fishing my way through the spaghetti wiring wasn’t too difficult once you know what goes where and the plug and play nature of the cam was easy enough as it’s all already there. The issue I had that really worried me was after install I kept getting a check engine warning and check gearbox warning which took me ages to fathom out, even after a sleepless night and Un installing everything I couldn’t make it go away.
Luckily I have a Bluetooth OBD scanner which would clear any warnings which it did but they immediately came back so I knew it was something I’d done. The code/error I got was that the gearbox neutral was grounding so each time I put it into drive there was no power.
I went through every fuse including the engine bay ones (blimey, they’re hard to get to...) to see if one had blow.
After several hours....found it. The piggy back secondary fuse on my newly installed levelling system had blown, this is linked into the handbrake, gearbox and battery which stops the motorhome moving if the rams are down. I think it is linked into the power source for the radio and I must’ve shorted it...doh!!
Anyway. All working now.
Subscribers do not see these advertisements
BishBosh
Free Member
- Sep 1, 2019
- 138
- 268
- Funster No
- 63,727
- MH
- None
- Exp
- Upgrades!!! of course
Last big job now completed. A few minor tidy up jobs left but have now completed the semi air suspension install to the rear, installed a new rear shelf in the garage to help with storage and can now pack everything needed to get away for a week or more.
Installed the air suspension myself, purchased from eBay for £300 and very pleased with how easy it went. Looks good too.
Before air....

After air....


Installed the air suspension myself, purchased from eBay for £300 and very pleased with how easy it went. Looks good too.
Before air....
After air....
Hi Bishbosh, Did you find the original rear suspension iffy? The reason I ask is because I have just purchased a Lyseo 680g... waiting for registration to complete. There are Orange rubber bumpstops that look a bit like like cone shaped bellows fitted. Did you have those on your van and/or, did you have to remove them to fit the air ones? Cheers.
Last big job now completed. A few minor tidy up jobs left but have now completed the semi air suspension install to the rear, installed a new rear shelf in the garage to help with storage and can now pack everything needed to get away for a week or more.
Installed the air suspension myself, purchased from eBay for £300 and very pleased with how easy it went. Looks good too.
Before air....
View attachment 374198
After air....
View attachment 374200
View attachment 374202
View attachment 374203
View attachment 374204
BishBosh
Free Member
- Sep 1, 2019
- 138
- 268
- Funster No
- 63,727
- MH
- None
- Exp
- Upgrades!!! of course
Hi Rodneyplonker.
There wasn’t any issue with the standard suspension at all. In fact it seemed to cope very well and didn’t really need to upgrade to air. However for the cost and time taken to fit compared to all the other things I’ve done this seems to be a good value upgrade. My better half can’t really tell the difference but as a driver it’s about 30% improved. I feel a smoother ride, less crashy and it seems to ride the bumps/pot holes that bit better. A little more stable if you like.
If you look at the after install picture you can see one of the discarded orange bump stops so yes, these are taken out and replaced with the bellows.
Fortunately I had the levelling rams installed which lifts the back of the van Quite high, put some axle stands under for backup and I could get about under the van quite easily. Everything thing came off and went on with ease too.
In summary your van will be lovely to drive without it as was mine, if you want a slightly smoother more stable ride this is an easy upgrade.
I bet you can’t wait to get your hands on it.....they are a cracking home with a brilliant layout. Very happy with ours for size and what you can fit in.
Subscribers do not see these advertisements
Thanks Bishbosh... a very informative answer! Yes, can't wait to get it now. We'll see how it feels and make a decision then. As you say, it's quite a cheap upgrade - if doing it yourself!
We went yesterday to have another good look around and to get other ideas. We can't wait to try the new 9 speed auto box. We drove an auto Merc in New Zealand in Jan/Feb this year which made our minds up about having auto. Roll on........
We went yesterday to have another good look around and to get other ideas. We can't wait to try the new 9 speed auto box. We drove an auto Merc in New Zealand in Jan/Feb this year which made our minds up about having auto. Roll on........
Hi, Thinking about purchasing one (2020 automatic model) are you able to give me any idea about mpg please.
Thanks - regards
John
Thanks - regards
John
BishBosh
Free Member
- Sep 1, 2019
- 138
- 268
- Funster No
- 63,727
- MH
- None
- Exp
- Upgrades!!! of course
I no longer have mine but looking back I was getting around 26/27 mpg with the auto.Hi, Thinking about purchasing one (2020 automatic model) are you able to give me any idea about mpg please.
Thanks - regards
John
Subscribers do not see these advertisements
Many thanks for your reply. How did you enjoy the Burstner - note that you don't have it any more? We are new to motorhome life!
BishBosh
Free Member
- Sep 1, 2019
- 138
- 268
- Funster No
- 63,727
- MH
- None
- Exp
- Upgrades!!! of course
Couldn't fault it. For what we used it for it was great van.Many thanks for your reply. How did you enjoy the Burstner - note that you don't have it any more? We are new to motorhome life!
Subscribers do not see these advertisements
Funsters who are viewing this thread
Total: 2 (members: 0, guests: 2)