Alde fluid change, Carthago E line. (1 Viewer)

Nov 11, 2021
35
33
Hilton Road, Fenstanton, Huntingdon, UK
Funster No
85,387
MH
Carthago E line 50
Exp
Since 2009.
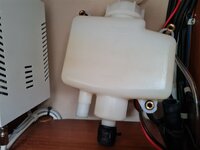
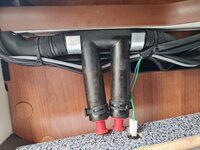
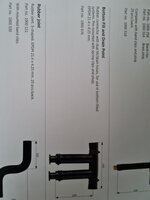
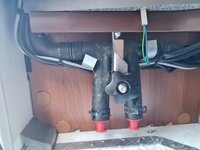
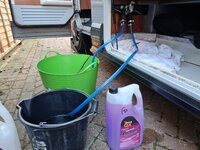
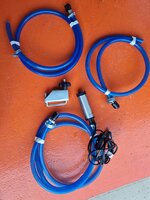
The system on this vehicle has only one pipe connected to the header tank. One connection is blanked off. I was going to fill and drain with hoses and pump had it been the normal two pipe system to the tank. There is the alde fill and drain point in the passenger side locker. Alde claim the fluid change can now be completed in minutes using this. But you need expensive equipment to do this. Has anyone changed the fluid on this system layout. ?
 

Attachments

  • 20211111_132245.jpg
    20211111_132245.jpg
    275.3 KB · Views: 128
  • 20211110_104914.jpg
    20211110_104914.jpg
    452.9 KB · Views: 124
Sep 29, 2019
3,057
7,065
Funster No
64,846
MH
Hymer Exsis
Exp
20 years
Do they use a one way valve in between the inlet and outlet? That looks the only way to use that system.

It will just be a pump in a bucket of fresh fluid to change it. Alde may be able to help you, they are known to be a very good company and helpful to people with their system installed. They may tell you exactly how it is done.

I used a cheap submersible pump when I did mine. It worked a treat.
 
Upvote 1
OP
OP
M
Nov 11, 2021
35
33
Hilton Road, Fenstanton, Huntingdon, UK
Funster No
85,387
MH
Carthago E line 50
Exp
Since 2009.
Thanks yes I had the submersible pump ready with hoses and adapters. Only to find one connection hose at the tank. I don't know how the fitted drain and fill point would work. I cannot feel any non return valve on this, just rubber hose ?
I will contact Alde for advice on this and post the reply

Subscribers  do not see these advertisements


Attachments

  • 20211111_155805.jpg
    20211111_155805.jpg
    172.2 KB · Views: 57
Upvote 0
OP
OP
M
Nov 11, 2021
35
33
Hilton Road, Fenstanton, Huntingdon, UK
Funster No
85,387
MH
Carthago E line 50
Exp
Since 2009.
Good idea, that may be correct. I can flaten the pipe easily, so a g clamp would work. If that is the case, I can cap off the pipe to the expansion tap. Flush and fill from this point in the outside locker. Then remove the cap from the expansion tank pipe to flush and fill that section. I will confirm this with Alde first.

Subscribers  do not see these advertisements

 
Upvote 0

canopus

LIFE MEMBER
Nov 27, 2010
6,139
10,255
rural Lincolnshire
Funster No
14,552
MH
Carado CV640 Pro
Exp
Since 2010
I know Alde will do this for a price and I was told £200. But with this new system (fill and drain from the outside locker). With the correct equipment Alde claim this can be carried out in minutes. So why £200. ?
If you want it doing right first time, and you dont want to be buggering about getting the airlocks out, and you dont want to invest in the expensive kit then Id say its £200 well spent. Furthermore Alde have been known to spot badly fitted systems by the Motorhome Manufacturer.

Subscribers  do not see these advertisements

 
Upvote 0
Jul 18, 2009
11,183
17,820
Manchester UK + Javea/Xabia Spain + Abu Dhabi
Funster No
7,543
MH
HYMER B644
Exp
2004
I know Alde will do this for a price and I was told £200. But with this new system (fill and drain from the outside locker). With the correct equipment Alde claim this can be carried out in minutes. So why £200. ?
It’s one of those questions.

It’s called cost of sales.

Let’s say a plumber needs to change a pump for you on you central heating. £200

Pumps only £50 !?

If he’s VAT registered, £33.33 of that he has to collect and pass to the TAXMAN. Leaves him with £166.67

Take off the cost of pump, £50, leaves £116.67

He’s got to cover cost of advertising, liability insurance, public liability insurance, motoring costs, telephone, etc etc.

If he’s lucky, taking into consideration cost to and from your home, maybe going to collect a non van stocked parts. He might just make a profit.

Take from the profit, employers NI, employees NI and income tax. Even if he draws income as corporation tax.

He might gain £15-£20 an hour in his pocket.

ALDE will have huge overheads and payroll to stump up.
 
Upvote 0
Oct 30, 2010
4,256
20,707
Suffolk or France or ........
Funster No
14,290
MH
A Class Carthago Chic
Exp
Since 2008
If you want it doing right first time, and you dont want to be buggering about getting the airlocks out, and you dont want to invest in the expensive kit then Id say its £200 well spent. Furthermore Alde have been known to spot badly fitted systems by the Motorhome Manufacturer.
They also spot things that might have wear and so a shortened life.
Better to replace a component there than it let’s go when your miles from anywhere in the middle of winter.

Subscribers  do not see these advertisements

 
Upvote 0

pappajohn

LIFE MEMBER
Aug 26, 2007
43,321
49,407
Dark side of the moon
Funster No
172
Exp
Since 2005
That must be just a header/expansion tank as it can't possible be the circulator pump with just one hose..
There must be an in-line pump elsewhere.
Disconnecting the two pump hoses and fitting the bleed kit there would be my best guess
 
Upvote 0
Sep 29, 2019
3,057
7,065
Funster No
64,846
MH
Hymer Exsis
Exp
20 years
The fluid and water will be in the region of £70 so £200 isn’t as bad as it first seems.

I had all the kit however so was worth it.
 
Upvote 0
Mar 21, 2015
478
689
notts
Funster No
35,523
MH
A class
Exp
since 2010
Dealer where we bought our e-line charged well in excess of £200.!!

After running the system for a few days I discovered the pump had been left on 5 (max) and I've had to add nearly 1lrr of fluid and a while of my time to finish bleeding...

Go to ALDE would be my advice!
 
Upvote 0

tkk

Jun 9, 2014
357
274
notts
Funster No
31,911
MH
Frankia i640
Exp
newbie but learning fast
Thanks yes I had the submersible pump ready with hoses and adapters. Only to find one connection hose at the tank. I don't know how the fitted drain and fill point would work. I cannot feel any non return valve on this, just rubber hose ?
I will contact Alde for advice on this and post the reply
Hi,
did Alde reply?. I asked the question on their help section and haven’t heard back. I have a similar arrangement on a Frankia
tk
 
Upvote 0
OP
OP
M
Nov 11, 2021
35
33
Hilton Road, Fenstanton, Huntingdon, UK
Funster No
85,387
MH
Carthago E line 50
Exp
Since 2009.
Thanks for the advice received and yes I did get a reply from Alde. They said that as the motorhome manufacturers fitting there equipment did not use the same layout. They would have to inspect the motorhome to figure out the pipework, direction of flow and valves etc. They offered to do the fluid change for £419 as it is an A class ! However they did confirm that they clamp the bottom fill and drain point between the ports. I will post pictures of this being carried out later today.

Subscribers  do not see these advertisements

 
Upvote 0
Jun 30, 2011
7,234
20,094
Barnard Castle, UK
Funster No
17,128
MH
Concorde Concerto
Exp
Since 2007
Thanks for the advice received and yes I did get a reply from Alde. They said that as the motorhome manufacturers fitting there equipment did not use the same layout. They would have to inspect the motorhome to figure out the pipework, direction of flow and valves etc. They offered to do the fluid change for £419 as it is an A class ! However they did confirm that they clamp the bottom fill and drain point between the ports. I will post pictures of this being carried out later today.
Wow that gone up a fortune ours is an A class and was less than half of that less than 3 years ago
 
Upvote 1
OP
OP
M
Nov 11, 2021
35
33
Hilton Road, Fenstanton, Huntingdon, UK
Funster No
85,387
MH
Carthago E line 50
Exp
Since 2009.
If your motorhome, has only one connection to the expansion tank. It may have the bottom fill and drain point, Alde part no 1900 876. On the Carthago E line this is in the front lower locker on the passenger side. After fitting a clamp between the ports, I connected a submersible pump to the one expansion tank pipe. This flushed the system. It also indicated the flow direction at the drain/fill point. I then connected the pump to the fill point to pump in the new G13 fluid mix. As in the following photos.
 

Attachments

  • 20211121_110136.jpg
    20211121_110136.jpg
    271.9 KB · Views: 119
  • 20211115_143941.jpg
    20211115_143941.jpg
    616.6 KB · Views: 128
  • Like
Reactions: tkk
Upvote 0
OP
OP
M
Nov 11, 2021
35
33
Hilton Road, Fenstanton, Huntingdon, UK
Funster No
85,387
MH
Carthago E line 50
Exp
Since 2009.
I also pumped new fluid mix in from the header tank. After removing the clamp and replacing the header tank. I topped the tank up and checked bleed points. My drive is on a slope, so had to turn the motorhome around to clear air locks. Tools used shown in photo.

Subscribers  do not see these advertisements


Attachments

  • 20211121_124321.jpg
    20211121_124321.jpg
    509.7 KB · Views: 68
Upvote 0

tkk

Jun 9, 2014
357
274
notts
Funster No
31,911
MH
Frankia i640
Exp
newbie but learning fast
I also pumped new fluid mix in from the header tank. After removing the clamp and replacing the header tank. I topped the tank up and checked bleed points. My drive is on a slope, so had to turn the motorhome around to clear air locks. Tools used shown in photo.
Thank you for info. A bit late but have been out of circulation. What is the diameter of connectors to drain/fill point please?
tk
 
Upvote 0

tkk

Jun 9, 2014
357
274
notts
Funster No
31,911
MH
Frankia i640
Exp
newbie but learning fast
Hi,
aprox what volume of coolant is involved. I know it varies with Moho size but upper/lower range will help with ordering fluid,
thanks
t k

Subscribers  do not see these advertisements

 
Upvote 0

tkk

Jun 9, 2014
357
274
notts
Funster No
31,911
MH
Frankia i640
Exp
newbie but learning fast
hi,
have finally got around to it.
modification to earlier posts reduces airlocks and need to do anything with header tank other than top-up.
First issue; direction of flow (ie inlet and outlet sides) My method; put pinch clamp on section between tubes and fully clamp. Prime a metre or so of 16 mm int diameter of clear hose with Deionized water (if you insert a 22mm/16 mm “fitting” copper connector into each end it will fit the rubber tubing.) a wine cork will help to seal each end until you connect. Pinch clamp each rubber tube and remove stoppers. Attach primed tube to each tube to form a “bypass” . Get a helper to stand by the Alde on off switch and get them to switch on when you have unclamped the two down-pointing tubes (not the central clamp) Watch the bypass tube carefully. On switch on the direction of flow is obvious as the coloured antifreeze mix flows. Note the direction And switch off.
You will only ever need to do this once if you mark them.
Put the clamps back on and disconnect bypass tube from ”inlet side” and use it as waste hose into container.
With your helper watching the header tank let a controlled leak bring the level in tank down to bottom of tank.(not lower) Top up tank with new mix to above Max or at least 350 mls depending on system. If you want to be precise work out the volume in your header tube itself. Allow a leak of this vol so now your header system should be purged.
Prime a suitable length of 16 mm hose with new AF mix and attach to Pump (see earlier post) and Inlet side. A pinch clamp on this tube will stop back flow thro pump before you switch in. Use corks as temporary measure as you connect. Drop pump into new mix container. Slip off inlet rubber clamp and start pump as you unclamp the pump hose. Then promptly unclamp waste side before your header tank fills up! Doing it like this with care should avoid air in system. Colour in waste will change when system purged. Clamp and disconnect. If you have over filled your header release a bit before d/c but allow some overfill for any de-airing.
All the kit is covered in Mad Adventurers posts except the 22/16 fitting connector (York solder one) and I use clear hose for obvious reason. Photo attached. I use tray (paint stains optional) under the tubes to catc any dribbles
If you have a towel radiator make sure its on before pumping.
It’s sounds like a faff but it costs £100 ish incl AF, Comma G40)and you still have the pump n bits Left over. It’s easier than I made it sound. It’s easier if you know flow direction already

6524D99D-BF62-40A6-A5ED-5A1A8C3442C7.jpeg
 
Upvote 0
Jul 18, 2009
11,183
17,820
Manchester UK + Javea/Xabia Spain + Abu Dhabi
Funster No
7,543
MH
HYMER B644
Exp
2004
hi,
have finally got around to it.
modification to earlier posts reduces airlocks and need to do anything with header tank other than top-up.
First issue; direction of flow (ie inlet and outlet sides) My method; put pinch clamp on section between tubes and fully clamp. Prime a metre or so of 16 mm int diameter of clear hose with Deionized water (if you insert a 22mm/16 mm “fitting” copper connector into each end it will fit the rubber tubing.) a wine cork will help to seal each end until you connect. Pinch clamp each rubber tube and remove stoppers. Attach primed tube to each tube to form a “bypass” . Get a helper to stand by the Alde on off switch and get them to switch on when you have unclamped the two down-pointing tubes (not the central clamp) Watch the bypass tube carefully. On switch on the direction of flow is obvious as the coloured antifreeze mix flows. Note the direction And switch off.
You will only ever need to do this once if you mark them.
Put the clamps back on and disconnect bypass tube from ”inlet side” and use it as waste hose into container.
With your helper watching the header tank let a controlled leak bring the level in tank down to bottom of tank.(not lower) Top up tank with new mix to above Max or at least 350 mls depending on system. If you want to be precise work out the volume in your header tube itself. Allow a leak of this vol so now your header system should be purged.
Prime a suitable length of 16 mm hose with new AF mix and attach to Pump (see earlier post) and Inlet side. A pinch clamp on this tube will stop back flow thro pump before you switch in. Use corks as temporary measure as you connect. Drop pump into new mix container. Slip off inlet rubber clamp and start pump as you unclamp the pump hose. Then promptly unclamp waste side before your header tank fills up! Doing it like this with care should avoid air in system. Colour in waste will change when system purged. Clamp and disconnect. If you have over filled your header release a bit before d/c but allow some overfill for any de-airing.
All the kit is covered in Mad Adventurers posts except the 22/16 fitting connector (York solder one) and I use clear hose for obvious reason. Photo attached. I use tray (paint stains optional) under the tubes to catc any dribbles
If you have a towel radiator make sure its on before pumping.
It’s sounds like a faff but it costs £100 ish incl AF, Comma G40)and you still have the pump n bits Left over. It’s easier than I made it sound. It’s easier if you know flow direction already

View attachment 712387
I was going to say, you took your time. But your not the OP which is what I first thought
 
Upvote 0

tkk

Jun 9, 2014
357
274
notts
Funster No
31,911
MH
Frankia i640
Exp
newbie but learning fast
Yes I suppose I could have started new thread but OP had done the core work. Ive just fine tuned a bit
 
Upvote 0

Join us or log in to post a reply.

To join in you must be a member of MotorhomeFun

Join MotorhomeFun

Join us, it quick and easy!

Log in

Already a member? Log in here.

Funsters who are viewing this thread

Back
Top