LED light fitting in cab (1 Viewer)

Jul 1, 2010
3,198
33,468
SW Northumberland
Funster No
12,394
MH
Hymer B 588 DL
Exp
Since September 2010
The following describes how I fitted LED strip-lights in the cab of my Auto Trail Frontier Mohawk mine is a high line model but looking at AT brochure the same procedure can probably be used on both Low-line and Super Low-line models.

For anyone thinking of going this route it is surprisingly straightforward and takes a couple of hours or so to complete.

Due to photo upload restrictions its necessary to spread this over a series of postings. In the final one I will supply links to the items purchased for this project.

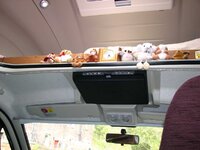
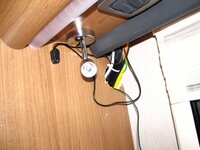
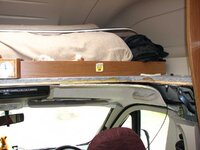
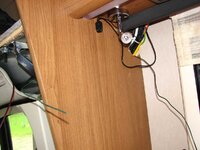
It is firstly necessary to remove the plastic decor nosing and end covers, remove the thin black (different colour in other year models) strip running from side to side that covers the fixing screws (photo 1) This strip is held in place with double sided tape and in my case was impossible to remove without pulling off a lot of the adhesive surface so it would be wise to purchase some tape for the reassembly.

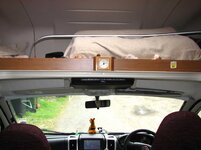
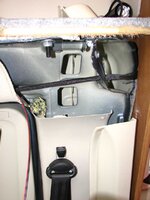
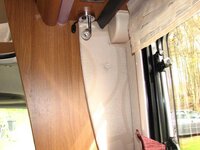
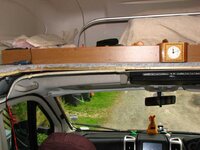
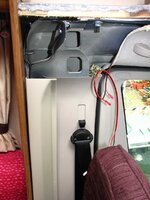
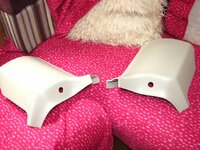
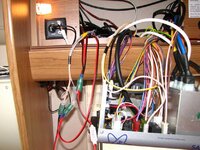
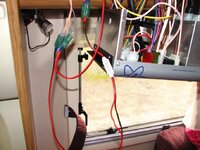
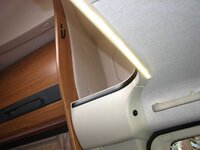
The long nosing is fixed by 3 screws (photo 2) remove and gently pull nosing toward you and off. The 2 end sections are held by 2 visible screws and 1 hidden one. To access the latter take out the small black screws holding the vertical plastic trim in place, in my case I had to remove the top second and third screws down to allow sufficient movement of this strip for access to remove the screw fixing bottom of end sections Photo 3 shows drivers side with end section removed fixing screw-holes are visible in vertical section of plastic trim.

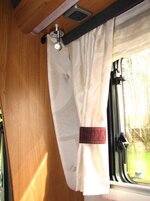
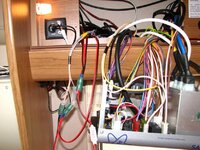
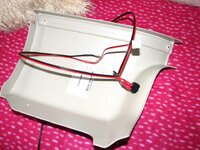
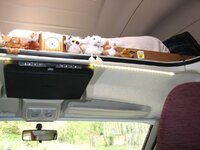
Next it is necessary to remove the fabric covered panel on bulkhead behind drivers seat photo 4.
 

Attachments

  • 01.jpg
    01.jpg
    77.4 KB · Views: 79
  • 02.jpg
    02.jpg
    91.1 KB · Views: 70
  • 03.jpg
    03.jpg
    84.6 KB · Views: 73
  • 04.jpg
    04.jpg
    92.6 KB · Views: 65
OP
OP
Stewart J
Jul 1, 2010
3,198
33,468
SW Northumberland
Funster No
12,394
MH
Hymer B 588 DL
Exp
Since September 2010
Carefully lever out the 2 fabric covered pins I use a blunt table knife for this, these pins cover the fixing screws (2 off photo 5) securing panel in place, remove and lift away panel. This allows access to the 2 screws which secure the plastic cable cover, remove screws and cover (photo 6) this allows access for cables into the base of overhead locker housing charger unit and all cabling.

Ensure all power is now turned off and mains disconnected, remove the 4 screws holding the Sargent psu unit in place, gently pull it toward you, there is enough cable and they are substantial enough to support the relatively light psu unit whilst you work around it. Photo 7.
To make life easy I elected to use the supply from the under-locker spotlight on the drivers side and run cables across to passenger side, at this stage wife and I had agreed 2 short led strips would be better than one long continuous unit right across cab and we wanted both switchable and dimmable.

At this stage I made up the supply cables (2 off) for each led strip. I purchased the clip on connectors for electrical connection to the strip, these come with a short length of very fine cable attached. I find it almost impossible to guarantee a good permanent connection trying to crimp on connectors on such thin cable so tinned and soldered them to the thicker supply cable completing the electrical insulation using shrink wrap.

Subscribers  do not see these advertisements


Attachments

  • 06.jpg
    06.jpg
    90.7 KB · Views: 56
  • 05.jpg
    05.jpg
    94.4 KB · Views: 57
  • 07.jpg
    07.jpg
    97.4 KB · Views: 52
OP
OP
Stewart J
Jul 1, 2010
3,198
33,468
SW Northumberland
Funster No
12,394
MH
Hymer B 588 DL
Exp
Since September 2010
[FONT=&quot]There is a good sized void just in front of flip down monitor, I fed heavy duty green garden wire across the front, taped it to my made up supply cable and pulled it through photo’s 8 & 9. Photo 10 shows passenger side cable in place and ready to accept replacement of end cover. (The small white object just behind seat and in front of seatbelt is the connector for the led strip.) Photo 11 shows drivers side. The braided existing cable are the cables for flip down monitor. The red and black cable hanging down to left side is my fitted supply for the passenger side led.[/FONT]
 

Attachments

  • 08.jpg
    08.jpg
    92.2 KB · Views: 38
  • 09.jpg
    09.jpg
    84 KB · Views: 40
  • 11.jpg
    11.jpg
    84.6 KB · Views: 38
  • 10.jpg
    10.jpg
    91.5 KB · Views: 36
OP
OP
Stewart J
Jul 1, 2010
3,198
33,468
SW Northumberland
Funster No
12,394
MH
Hymer B 588 DL
Exp
Since September 2010
Photo 12 shows the end covers drilled out 20mm to accommodate the on/off rocker switches. 13 the drivers side cover with switch and cabling in place ready to be fitted. Photo 14 again using green garden wire to guide and pull through supply cables and then push up into the bottom of the psu locker.
 

Attachments

  • 12.jpg
    12.jpg
    94.3 KB · Views: 36
  • 13.jpg
    13.jpg
    89.8 KB · Views: 34
  • 14.jpg
    14.jpg
    97.7 KB · Views: 37

hilldweller

LIFE MEMBER
Dec 5, 2008
605
36,109
Macclesfield
Funster No
5,089
MH
Zilch Mk1
Exp
From Aug 2007
It's fascinating when you pull the covers off, isn't it, you begin to see how much work goes into building one of these things.

And you see whether it's a "quality" or "bodge" vehicle.

Subscribers  do not see these advertisements

 
OP
OP
Stewart J
Jul 1, 2010
3,198
33,468
SW Northumberland
Funster No
12,394
MH
Hymer B 588 DL
Exp
Since September 2010
For ease I decided on tapping into the supply for the under locker reading spotlight (immediately behind driver seat), not wishing to modify or cut into the existing wiring I made up a double twin core 20 inch harness, I disconnected the short thin wires from the spot (male spade connectors) the heavier twin supply cables I connected to my harness and reconnected the spot to one pair of cables. At this stage I fitted the dimmer unit, unlike a TV remote this is an rf unit so does not require line of sight and I secreted it in the space behind and below the psu. This dimmer can be seen attached to my made up harness at bottom of photo 15 bottom just left of centre resting against psu casing. I then connected up the supply cables for led’s to the output side of the dimmer using crimp connectors ensuring insulation integrity of all. Photo 16 shows a better view of the dimmer. At this stage I powered up the system and checked all was working correctly before reassembly of all the fittings.


Photo 17 the finished project and 18 the discreetly placed rocker switch on passenger side and yes I did turn it through 180 degrees to its correct position (senior moment!) It should be pointed out if using this type of rocker switch you will need 4.8 mm female crimps slightly smaller than the standard type. We went for warm white led strip, the dimmer unit which comes with a small remote works very effectively and can be used to switch on and off the strips only when rocker switches are in the on position.


Links to items purchased for this project (all on Ebay) I had a good selection of crimps male and female will be required.


Broken Link Removed
Broken Link Removed
Broken Link Removed
Broken Link Removed
Broken Link Removed
Broken Link Removed


I’ll be at the Peterborough show give me knock if you want further advice or to see the finished article.
 

Attachments

  • 15.jpg
    15.jpg
    97.5 KB · Views: 38
  • 16.jpg
    16.jpg
    93.1 KB · Views: 34
  • 17.jpg
    17.jpg
    80 KB · Views: 38
  • 18.jpg
    18.jpg
    53.1 KB · Views: 43
OP
OP
Stewart J
Jul 1, 2010
3,198
33,468
SW Northumberland
Funster No
12,394
MH
Hymer B 588 DL
Exp
Since September 2010
It's fascinating when you pull the covers off, isn't it, you begin to see how much work goes into building one of these things.

And you see whether it's a "quality" or "bodge" vehicle.

Its an eye opener Brian to see behind the scenes at it were and some of the workmanship (sic) :whatthe:
 

Join us or log in to post a reply.

To join in you must be a member of MotorhomeFun

Join MotorhomeFun

Join us, it quick and easy!

Log in

Already a member? Log in here.

Latest journal entries

Funsters who are viewing this thread

Back
Top