

PP Bear
LIFE MEMBER
It's a bit of a long one I'm afraid ")
I've been given the task of closing a number of "departments" within our Garrison, as part of the drawdown and move of the REME from both Arborfield and Bordon. We're off to an old RAF base in Lyneham which is nowhere near as good as the facilities we once had, but that's all another story.
Im staying onsite throughout the close down. I shut the officers mess at the beginning of October, so I'm now into my 4th week of living in the motorhome and loving every minute of it. I say living, I mean 5 nights and home for the the Friday and Saturday, before heading back to camp on the Sunday evening to start my 5 day cycle again.
So all this "wild" camping on a remote car park inside the Garrison, had me thinking about maintenance, the winter ahead, leisure batteries and insulation of the pipes around the chassis and how the wiring is holding up etc. I also wanted to adjust the handbreak and take a good look at the discs and pads to see how they're holding up.
With the motor nearly 10 years old but only 25000 miles on the clock meant I didn't have an accurate state of the pads. Sure, I could just see the outer ones by looking through the wheels, but I wanted a full inspection, so I managed to find one of the doors open in the Garrison Workshop. Excellent!! I spent hours here tinkering on car servicing, but the place is now empty and my civilian friend who ran it, made redundant, which is all very sad for the many civilians this move to Lyneham effected, and were also made redundant.
First job was to jack up one side of the rear and remove the wheel for a closer inspection. Now I carry a trolly jack that's rated at 2000kg. The vehicle jack that came with it, is rated at 1750kgs, so you would think that the trolly jack would be more than capable of lifting a corner to remove the wheel. It did it....just and only about high enough to squeeze an axle stand under. Not sure if you've ever tried to remove any of your wheels, either in anger or in practice, but it ain't an easy operation. I'd recommend everyone who would attempt such a task on a real breakdown, to try it first at home and see just how difficult the task can be. Factor in say the rain, at night, in a dark road and the task becomes so much harder. Think most would wait for the breakdown man to arrive to change the wheel, but if you're the type that would do it yourself like I am, then the practice is well worth the time. Just removing the wheel nuts with the issued leaver is near impossible. I used my socket set and a long extension to get the leverage, or I'd have never got them undone. I also needed to use the rubber mallet to force the wheel of the stud retainers as they were stuck fast.
Did both a rear and a front wheel and copper slipped the bolts back home again. Pads and discs are fine.
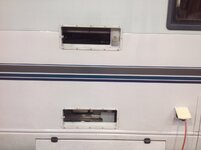
Next I removed the fridge vents and cleaned them in soapy water, including the mounts, hoovered out the back of the fridge and cleaned the green moss from around the edges of the mounts.
Then out came the leisure batteries for their annual check up. All good there too.
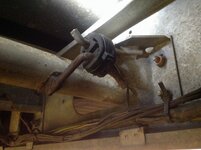
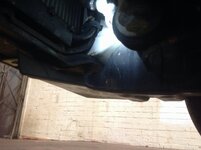
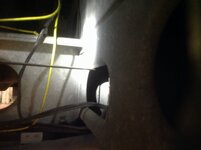
Then I put it over the pit and took a look underneath. The first thing I notice is the weeping sump gasket. Nothing so bad just yet, but now on my list of jobs to do. Also noticed the first signs of corrosion on the front chassis members, so there's another job on the list to underseal.
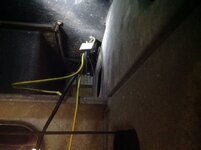
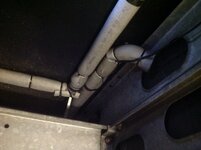
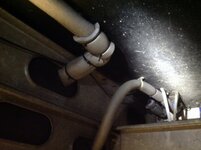
I examined the many looms and wiring and was quite disappointed at how badly they were insulated. I found wires without any insulation, running across potential knife edges on the chassis, just waiting to be exposed and then shorting out at some point. I also examined the waste water pipes that ran across the upper floor without any form of insulation.
I soon sourced some old pipe insulation and began to insulate all the water pipes, both fresh and waste. I also used it to insulate and secure much of the wiring and made an excellent job of ensuring it runs well clear of any sharp edges, or has the potential to short out at any stage. Also put large tie wraps around the exhaust rubbers. It an old bit of advice from one of the old MOT chappies I've been too. Good advice too, see picture.
Last job was to check the spare wheel. Not an easy task on my Autotrail, as it involves lifting the cycle carrier and removing the large wheel cover at the rear. The tyre is brand new and in excellent condition, but down on pressure. Mine run at 80psi, so I had the chance to use my recently sourced Lidl mini compressor tyre inflator. However I was very disappointed, as it states that it's good for 10 Bar(145psi approx), but I only managed to get it to blow to 60psi, before it had a small hissy fit and simply wouldn't puff above that. So I guess it'll be ok in an emergency, or to blow up an air bed, or my beachball, but useless at maintaining my tyres at 80psi should the need arise.
So that's it. Took me 6 happy hours to tinker around. I've also decided to stay inside the workshop tonight, so I can stay on EHU. Means I can save on some gas and have an electric kettle for faster brews.
Ahhhh, life's sweet and the joys of owning a motorhome. Apologies that it's a long one, but lots to get in...
I've been given the task of closing a number of "departments" within our Garrison, as part of the drawdown and move of the REME from both Arborfield and Bordon. We're off to an old RAF base in Lyneham which is nowhere near as good as the facilities we once had, but that's all another story.
Im staying onsite throughout the close down. I shut the officers mess at the beginning of October, so I'm now into my 4th week of living in the motorhome and loving every minute of it. I say living, I mean 5 nights and home for the the Friday and Saturday, before heading back to camp on the Sunday evening to start my 5 day cycle again.
So all this "wild" camping on a remote car park inside the Garrison, had me thinking about maintenance, the winter ahead, leisure batteries and insulation of the pipes around the chassis and how the wiring is holding up etc. I also wanted to adjust the handbreak and take a good look at the discs and pads to see how they're holding up.
With the motor nearly 10 years old but only 25000 miles on the clock meant I didn't have an accurate state of the pads. Sure, I could just see the outer ones by looking through the wheels, but I wanted a full inspection, so I managed to find one of the doors open in the Garrison Workshop. Excellent!! I spent hours here tinkering on car servicing, but the place is now empty and my civilian friend who ran it, made redundant, which is all very sad for the many civilians this move to Lyneham effected, and were also made redundant.
First job was to jack up one side of the rear and remove the wheel for a closer inspection. Now I carry a trolly jack that's rated at 2000kg. The vehicle jack that came with it, is rated at 1750kgs, so you would think that the trolly jack would be more than capable of lifting a corner to remove the wheel. It did it....just and only about high enough to squeeze an axle stand under. Not sure if you've ever tried to remove any of your wheels, either in anger or in practice, but it ain't an easy operation. I'd recommend everyone who would attempt such a task on a real breakdown, to try it first at home and see just how difficult the task can be. Factor in say the rain, at night, in a dark road and the task becomes so much harder. Think most would wait for the breakdown man to arrive to change the wheel, but if you're the type that would do it yourself like I am, then the practice is well worth the time. Just removing the wheel nuts with the issued leaver is near impossible. I used my socket set and a long extension to get the leverage, or I'd have never got them undone. I also needed to use the rubber mallet to force the wheel of the stud retainers as they were stuck fast.
Did both a rear and a front wheel and copper slipped the bolts back home again. Pads and discs are fine.
Next I removed the fridge vents and cleaned them in soapy water, including the mounts, hoovered out the back of the fridge and cleaned the green moss from around the edges of the mounts.
Then out came the leisure batteries for their annual check up. All good there too.
Then I put it over the pit and took a look underneath. The first thing I notice is the weeping sump gasket. Nothing so bad just yet, but now on my list of jobs to do. Also noticed the first signs of corrosion on the front chassis members, so there's another job on the list to underseal.
I examined the many looms and wiring and was quite disappointed at how badly they were insulated. I found wires without any insulation, running across potential knife edges on the chassis, just waiting to be exposed and then shorting out at some point. I also examined the waste water pipes that ran across the upper floor without any form of insulation.
I soon sourced some old pipe insulation and began to insulate all the water pipes, both fresh and waste. I also used it to insulate and secure much of the wiring and made an excellent job of ensuring it runs well clear of any sharp edges, or has the potential to short out at any stage. Also put large tie wraps around the exhaust rubbers. It an old bit of advice from one of the old MOT chappies I've been too. Good advice too, see picture.
Last job was to check the spare wheel. Not an easy task on my Autotrail, as it involves lifting the cycle carrier and removing the large wheel cover at the rear. The tyre is brand new and in excellent condition, but down on pressure. Mine run at 80psi, so I had the chance to use my recently sourced Lidl mini compressor tyre inflator. However I was very disappointed, as it states that it's good for 10 Bar(145psi approx), but I only managed to get it to blow to 60psi, before it had a small hissy fit and simply wouldn't puff above that. So I guess it'll be ok in an emergency, or to blow up an air bed, or my beachball, but useless at maintaining my tyres at 80psi should the need arise.
So that's it. Took me 6 happy hours to tinker around. I've also decided to stay inside the workshop tonight, so I can stay on EHU. Means I can save on some gas and have an electric kettle for faster brews.
Ahhhh, life's sweet and the joys of owning a motorhome. Apologies that it's a long one, but lots to get in...


 Hopefully I'll die before I actually have to buy some.


