@MinxyGirl I like the sound of that. What material did you use and where did you get it please?
-
Rallies
New events -
Resources
Latest reviews
Navigation
Install the app
How to install the app on iOS
Follow along with the video below to see how to install our site as a web app on your home screen.
Note: This feature may not be available in some browsers.
More options
You are using an out of date browser. It may not display this or other websites correctly.
You should upgrade or use an alternative browser.
You should upgrade or use an alternative browser.
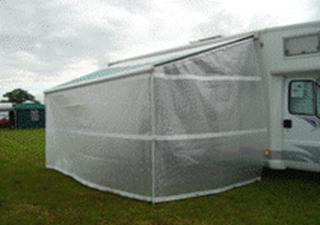
Wind Blocker or Privacy Room (1 Viewer)
- Thread starter John Rowe
- Start date
O
Old Soldier
Deleted User
Thanks for that !! They do look very good.
Will try to get to the Malvern show and have a look .
Are they expensive ?
I think they cost about £ 100 for two sides and the front, complete with the expanding side poles but it was about 5 years ago so best check prices on line, or better still, at the show.

Minxy
LIFE MEMBER
- Aug 22, 2007
- 32,623
- 66,459
- Funster No
- 149
- MH
- Carthago Compactline
- Exp
- Since 1996, had Elddis/Swift/Rapido/Rimor/Chausson MHs. Autocruise/Globecar PVCs/Compactline i-138
@MinxyGirl I like the sound of that. What material did you use and where did you get it please?
I picked up the material, a fine type of net curtain but not quite a fine as voile, from a car boot sale - there was loads of it and I think I only paid £6! I did a 'how to' sheet for someone a while back which I have updated below ... I think it makes sense - let me know if you need clarification!
Note that the instructions below are for screens that are secured at the front corners with Velcro and do NOT wrap round, if you want to make ones that wrap round make sure you allow extra material width to do this and adjust the fixings/loops etc to suit.
MATERIALS
- Large pieces of net/voile or smaller widths which will need to be stitched together
- Cotton tape (colour to suit) - 25mm and 12mm widths [do NOT use bias edging type tape which can 'twist' and stretch in use and offer no strength to the voile].
- Wide elastic (colour to suit)
- Single sided Kador awning piping strip = 4mm piping for Fiamma awnings, 6mm piping for Thule/Omnistor awnings (how much you need will depend on how you intend to attach the front panel)
- Thread (colour to suit)
- Sew on Velcro for securing the screen sides to the front legs
- 2 x extending clothes props
MEASURING - The most important thing is to get the size of the net right!
On level ground wind out the awning and set it as you would in normal use.
Side Panels' Size
Height: Measure from ground to the underside of the awning casing on the MH wall to get the height for the rear edge, and for the front edge from the piping 'track' to the ground, then deduct 100mm from this measurement to allow for the elastic hoops.
Width: Measure the outer edge of front awning leg to side wall of MH and add 100mm
Width: Measure the outer edge of front awning leg to side wall of MH and add 100mm
Front Panel Size
Height: Same measurement as used for side panel front edge
Width: Measure width of front of awning and add 100mm
Width: Measure width of front of awning and add 100mm
PREPARATION OF MATERIALS
Voile/Net: Cut to size* ensuring that it is 'square' when you measure and hasn't been pulled askew/out of shape, also make sure you know which piece is which/which is the 'good' side (* triple check measurements before wielding scissors!).
Side and Front Loops: Cut elastic into 200mm lengths - you'll need at least 10 for each side panel (5 top, 5 bottom) and at least 7 x 200mm for the front (bottom only).
Front Top Piping Tape (Kador strip): The amount you need will depend on how you intend to use it - if you wish to have the piping running continuously for the whole width of the awning this will need to be bought to fit the full width, however if you want to be able to push the front panel open easily you should only sew it on in small pieces with a gap between each (50mm pieces) and therefore you will only need enough so that the panel hangs correctly once up (a 5omm piece at each end and several in the middle).
Vertical Strengthening Strips: These are best cut as you sew them on, you will need quite a bit.
Edging Tape: This needs to be folded along it's length to 'enclose' the edge of the net - fold 25mm wide tape in half along its whole length and iron it to keep it folded - you will need loads as it goes round the edges of each panel!
TO MAKE UP
Panel Hems: Fold the edges of each voile panel over by 10mm and iron flat, then fold again by 10mm and iron flat once more so that you have a double fold (2 x 10mm folds), pin to keep folded.
Side panels strips: Divide the width by 3** and mark out on the net at these points to give 3 equal 'section' widths, then take the 12mm tape and pin it vertically from top to bottom on the inside of each panel at these ⅓ and ⅔ widths, then sew it on being careful not to stretch the net whilst you do so; the ends of the tape should be cut level with the edge of the folded voile.
[**You can increase the number of strips/panels by adjusting the width of each 'section' to suit (if you are using voile which is in narrow strips which you have joined together to make one piece, rather than one large single piece then each join can be the section width to which you attach the vertical strip.]
Front panel strips Divide the width evenly to approximately match the side panel section widths (how many sections you have will depend on the overall width of the front panel but each one should be no more than 900mm). Mark these points onto the net and then pin the 12mm tape vertically from top to bottom on the inside of the panel at these section widths and sew it on using a small zig-zag stitch ideally - the ends of the tape should be cut level with the folded voile edge.
Edging Tape Pin the pre-folded 25mm tape over all the panel edges (so that the folded voile edge is the 'filling' in the tape sandwich) and sew it on (stitch line appro 7mm in from edge), ensuring that the vertical strip ends are tucked under the edging tape so they are sewn in; take care at the corners to get a nice finish (may have to trim excess tape) and ensure you don't stretch the material or tape in the process.
Side Panel Loops
Fold each 200mm piece of elastic in half and pin on to the inside of the side panel top tape at each end and on the end of each vertical tape then sew on well, use the same method to attach the loops to the bottom tape - I used a zig-zag stitch and did several 'rows' to make each secure.
Front Panel Piping & Loops
Top Piping: choose which method you wish to use:
either:
Continuous strip - if you want a continuous strip of piping along the full width of the top of the front panel then pin it to the inside top edge and sew on well.
or:Sectional strip - if you only want small sections of piping along the top of the front panel (so that it can be pushed open easily) then pin each piece to the inside of the top edge at each end, above each horizontal tape section, and also in between each section and sew on well.
Bottom Loops Fold each 200mm piece of elastic in half and pin on to the inside of the side panel bottom tape at each end and on the end of each vertical tape then sew on well - I used a zig-zag stitch and did several 'rows' to make each secure.
Side Panel Corners
Cut the Velcro (hook and loop strips) into approx 50mm lengths. Take a 'hook' piece and with the hook part facing upwards place a 'loop' piece onto it a with the loop piece facing upwards so that they don't 'cling' and then on the inside of the side panel's front vertical edging tape, pin one pair at the top, one at the bottom and several in between with approx 450mm spacings - each pair should stick out from the panel once sewn on - this will allow them to be wrapped round the awning legs so the Velcro will 'cling' and hold the side of the panel in place.
Front Panel Corners
As for side panel corners but adjust the spacing slightly so that they are in different place so they don't 'clash' with the side panel Velcro.
TIPS
Whilst you can replace the clothes prop 'hook' ends with walking stick ferrules, I found that keeping them on allows the rear top loop of the side panel to be hooked onto them before being put in place into the awning casing on the side of the MH and prevents the panels from sliding down the pole.
Another tip is instead of pegging out every one of the bottom elastics, thread a bungee cord through and peg it at each end and in the middle instead - much better.
Minxy
LIFE MEMBER
- Aug 22, 2007
- 32,623
- 66,459
- Funster No
- 149
- MH
- Carthago Compactline
- Exp
- Since 1996, had Elddis/Swift/Rapido/Rimor/Chausson MHs. Autocruise/Globecar PVCs/Compactline i-138
I wish ... around £200 now I'm afraid, obviously depends on the size of your awning ... if you want the ones with the membrane then you can add at least another £60!I think they cost about £ 100 for two sides and the front, complete with the expanding side poles but it was about 5 years ago so best check prices on line, or better still, at the show.
Dont forget to come and see us at Malvern, we sell to a number of people who have had the net type and want to change to a waterproof one.Thanks for that !! They do look very good.
Will try to get to the Malvern show and have a look .
http://s478.photobucket.com/albums/rr149/jezport/Awnings/MOVConservatory.mp4.html
Charlie
Free Member
- May 16, 2015
- 3,211
- 3,639
- Funster No
- 36,385
- MH
- Auto Sleeper Kemerton.
- Exp
- Im a newbie
A question....
I see a pole is required for the things to hang on ?
We have a Thule Omnistor on our van. I can see where the end of the pole would go on the end of the canopy but where would the other end fix to ? Would it mean fixing a bracket to the vehicle ?
Our van is a PVC so I would be extremely reluctant to start drilling that !
Jezport. I do hope to get to the Malvern show. The list of purchases is growing ! So getting some discounts and hopefully saving some of the postage charges along with getting better advice and seeing the products is or will be awesome.
But its by no means certain we will make it so would you please PM me any prices and information ?
Thanks
Shrimp
Funster
We have Lillypad wind blockers, we only have one side as it can be used either side, and the front! They work well and are easy to use & store!
The other end fits in the awning case, no drilling required. Our rafter poles have more overlap when extended so don't bend and fall out in windy weather like some do.A question....
I see a pole is required for the things to hang on ?
We have a Thule Omnistor on our van. I can see where the end of the pole would go on the end of the canopy but where would the other end fix to ? Would it mean fixing a bracket to the vehicle ?
Our van is a PVC so I would be extremely reluctant to start drilling that !
Jezport. I do hope to get to the Malvern show. The list of purchases is growing ! So getting some discounts and hopefully saving some of the postage charges along with getting better advice and seeing the products is or will be awesome.
But its by no means certain we will make it so would you please PM me any prices and information ?
Thanks
@MinxyGirl

Wow, thank you for so much detail, wasn’t expecting that! An evening's reading here to digest, methinks!
Wow, thank you for so much detail, wasn’t expecting that! An evening's reading here to digest, methinks!
I am going to use Minxygirls extremely useful instructions to make some. Thank you
I post here to say I bought material - 25 yards- off eBay and was sent black when I ordered navy
Seller thought return too much trouble sent me the navy but left me with the black
It’s on eBay at the moment with a fairly high start so not so surprising noones really interested!
Let me know if anyone here is
Main problem with safari rooms is the van is tied down to the pitch! We used ours once, when we were away with the car as well, so the van being immobilised wasn't a problem. Mine came with the van, I sold it on Ebay last year. It was a quality product but as others have said above, too heavy & cumbersome and not really needed unless you wanted to have someone sleeping out there.
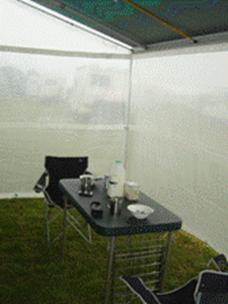
I bought a couple of windbocker panels from a clearance sale at Lillypad, that I can fix to the side or end of the wind-out awning roof - more to give some shade than anything, I found myself in summer chasing smaller and smaller patches of shade at times (I'm not a sun worshiper at all!). They do block the wind out well though and fold down very very small indeed, and weigh next to nothing.
I bought a couple of windbocker panels from a clearance sale at Lillypad, that I can fix to the side or end of the wind-out awning roof - more to give some shade than anything, I found myself in summer chasing smaller and smaller patches of shade at times (I'm not a sun worshiper at all!). They do block the wind out well though and fold down very very small indeed, and weigh next to nothing.
Funsters who are viewing this thread
Total: 2 (members: 0, guests: 2)