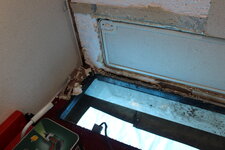
Damp in rear corner on autotrail apache (1 Viewer)

threeply

Free Member
May 18, 2015
29
13
watford
Funster No
36,418
MH
autotrail 700 se
Exp
I'm a newbie
we have a soggy bit of wood behind the valance, this has a galvanised metal cover around it. does anyone know if it is possible to replace the rotten wood without having to remove the outer valance.
if so how would you go about it.
 

andy63

Free Member
Jan 19, 2014
4,672
15,017
south shields
Funster No
29,767
MH
None
Exp
since 1990
I can't picture what you mean as I don't know your van ...
Could you post pictures. . I'll bet you get a lot more help if people can see what you are referring to. .
Andy
 
OP
OP
threeply

threeply

Free Member
May 18, 2015
29
13
watford
Funster No
36,418
MH
autotrail 700 se
Exp
I'm a newbie
IMG_8841.JPG
Hope this helps....top black bit is floor, silver bit is the galvanised or ally plate that surrounds the wet wood, bottom of pic is valence taken from underneath. autotrail 700 se 2006

Subscribers  do not see these advertisements


irnbru

LIFE MEMBER
Jun 27, 2013
13,511
31,135
Glasgow
Funster No
26,684
MH
Benimar 264
Exp
11 yrs
Can you show a photo taken a little further away too. We have an AT apache too. Im trying to figure out what your showing exactly.
 

TheBig1

LIFE MEMBER
Nov 27, 2011
17,575
42,952
Dorset
Funster No
19,048
MH
A class
Exp
many many years! since I was a kid
it looks like the bottom of the wall panel. the rear plastic panels need to come off for the repair and to reseal correctly
 
Jul 21, 2011
194
179
Up’t North West
Funster No
17,452
MH
coach built
Exp
1999
Hi Threeply​
There is a thread on MH facts about this somewhere, about a similar water ingress on a Autotrail.
It has been a common fault. The side sits in the aluminium channel which holds water and then makes the floor damp.
I've had two brand new Autotrails kept them 18 months because they both suffered water ingress around the floor area.

Subscribers  do not see these advertisements

 
Jul 12, 2013
3,865
5,246
The City of Henlow
Funster No
26,906
MH
Adria Supreme
Exp
Since 1980
Just a couple of thoughts to add. Some time ago I had a similar problem but possibly worse and tackled it from the inside of the van (not an Autotrail). Once access was achieved and the problem was clear, the task of replacing timber using marine glue was not as daunting as expected. Repair lasted several years before I lost track of the van.
Do not leave damp, for it will not go away unless you live in Seville.
As it is a known problem, several people will have knowledge of the best way to tackle the damp, so all the best and please come back to tell us how you solved it, as you surely will.
I just Googled "Autotrail motorhome damp" and under Images, got lots of pictures of people repairing what looked just like your picture.
 
OP
OP
threeply

threeply

Free Member
May 18, 2015
29
13
watford
Funster No
36,418
MH
autotrail 700 se
Exp
I'm a newbie
Hi Rosalan thankyou for your reply, when you had to replace the timber was it glued to the outer grp or aluminium and if so how did you separate the two. also where can you purchase marine type glue as I have tried a few diy places to no avail. what timber did you use?. if all else fails and we can`t fix it we will move to Seville.

Subscribers  do not see these advertisements

 
Last edited:
OP
OP
threeply

threeply

Free Member
May 18, 2015
29
13
watford
Funster No
36,418
MH
autotrail 700 se
Exp
I'm a newbie
TheBig1. Do I have to take the valance off, the wallboard goes 200mm below the floor, the wood runs along behind the valance and inside a angled metal channel. do you know if the wood is glued to the grp and if so how do you separate it without messing up the grp. also do you know what type of glue to use. hope this makes sense. thanks for your interest in my thread.
 
Nov 13, 2012
440
438
Somerset
Funster No
23,678
MH
coachbuilt
Exp
since 2000
When I part exchanged my Apache the dealer found damp in rear locker and said it was caused by worn door seal a common fault apparently and easy to fix. They did not try to knock exchange price.

Subscribers  do not see these advertisements

 
OP
OP
threeply

threeply

Free Member
May 18, 2015
29
13
watford
Funster No
36,418
MH
autotrail 700 se
Exp
I'm a newbie
hi gellyneck will the plastic padding marine resin stick wood to the inside of the grp or aluminium outer panel. I don`t know what mh manufacturers use, do you have an idea as to what it could be. thanks.
 
OP
OP
threeply

threeply

Free Member
May 18, 2015
29
13
watford
Funster No
36,418
MH
autotrail 700 se
Exp
I'm a newbie
You'll get adhesive suitable for marine use at a yacht chandler (via online if none locally), eg first one on Google http://www.force4.co.uk/department/maintenance/sealants-lubricants-waterproofing.html
Just a couple of thoughts to add. Some time ago I had a similar problem but possibly worse and tackled it from the inside of the van (not an Autotrail). Once access was achieved and the problem was clear, the task of replacing timber using marine glue was not as daunting as expected. Repair lasted several years before I lost track of the van.
Do not leave damp, for it will not go away unless you live in Seville.
As it is a known problem, several people will have knowledge of the best way to tackle the damp, so all the best and please come back to tell us how you solved it, as you surely will.
I just Googled "Autotrail motorhome damp" and under Images, got lots of pictures of people repairing what looked just like your picture.

Hi Rosalan thank you for your reply ,when you had to replace the timber was it glued to the outer grp or aluminium, and if so how did you separate the two. also where can you purchase marine glue and what timber did you use.
 
OP
OP
threeply

threeply

Free Member
May 18, 2015
29
13
watford
Funster No
36,418
MH
autotrail 700 se
Exp
I'm a newbie
it looks like the bottom of the wall panel. the rear plastic panels need to come off for the repair and to reseal correctly

Do I have to take the valance off, the wallboard goes 200mm below the floor, the wood runs along behind the valance and inside a angled metal channel. do you know if the wood is glued to the grp and if so how do you separate it without messing up the grp. also do you know what glue is used. hope this makes sense and thanks for the interest in my thread.

Subscribers  do not see these advertisements

 
OP
OP
threeply

threeply

Free Member
May 18, 2015
29
13
watford
Funster No
36,418
MH
autotrail 700 se
Exp
I'm a newbie
Hi Threeply​
There is a thread on MH facts about this somewhere, about a similar water ingress on a Autotrail.
It has been a common fault. The side sits in the aluminium channel which holds water and then makes the floor damp.
I've had two brand new Autotrails kept them 18 months because they both suffered water ingress around the floor area.

did you have to effect repairs and if so what was involved in it. was the problem with the wood running along the valance.
 

TheBig1

LIFE MEMBER
Nov 27, 2011
17,575
42,952
Dorset
Funster No
19,048
MH
A class
Exp
many many years! since I was a kid
the valance is attached using wood screws through the grp into the wood. unfortunately they use cheap steel screws that rust out causing in part the damage you can see, the rest being water and mud splashed up there from the road

the wood needs replacing with dried treated timber and the original is bonded to the grp using an industrial contact adhesive. removal can be done carefully with a sharp chisel but dont be tempted to just wrench a long strip out, take your time. once fully cleaned up, you could use sikaflex to rebond the new timber. I suggest replacing the exposed rotten ply with either a sheet of aluminium or even upvc board. I have used both to make similar repairs which looked good and where far more rot resistant than the original. refit external plastics using quality stainless steel screws sealed with a dot of sikaflex
 
OP
OP
threeply

threeply

Free Member
May 18, 2015
29
13
watford
Funster No
36,418
MH
autotrail 700 se
Exp
I'm a newbie
the valance is attached using wood screws through the grp into the wood. unfortunately they use cheap steel screws that rust out causing in part the damage you can see, the rest being water and mud splashed up there from the road

the wood needs replacing with dried treated timber and the original is bonded to the grp using an industrial contact adhesive. removal can be done carefully with a sharp chisel but dont be tempted to just wrench a long strip out, take your time. once fully cleaned up, you could use sikaflex to rebond the new timber. I suggest replacing the exposed rotten ply with either a sheet of aluminium or even upvc board. I have used both to make similar repairs which looked good and where far more rot resistant than the original. refit external plastics using quality stainless steel screws sealed with a dot of sikaflex

thank you for that info you give a bit more confidence to do this repair. one other thing in the rear corner the wood going upwards is also rotten, but I cannot see to what extent. I think maybe I will have to remove the rear wallboard to see how bad it is. is it possible to join the wood to where it is more solid, maybe splice it.

Subscribers  do not see these advertisements


TheBig1

LIFE MEMBER
Nov 27, 2011
17,575
42,952
Dorset
Funster No
19,048
MH
A class
Exp
many many years! since I was a kid
splicing in is not too easy as there isnt much wood there, but a good butt joint secured with a steel plate and stainless screws works well because it will also be glued to the wall. i would also treat the cut end with hardener and wood preserver and allow to dry before assembly. avoid going in above floor level if you can avoid it because the job then gets more complicated
 
OP
OP
threeply

threeply

Free Member
May 18, 2015
29
13
watford
Funster No
36,418
MH
autotrail 700 se
Exp
I'm a newbie
splicing in is not too easy as there isnt much wood there, but a good butt joint secured with a steel plate and stainless screws works well because it will also be glued to the wall. i would also treat the cut end with hardener and wood preserver and allow to dry before assembly. avoid going in above floor level if you can avoid it because the job then gets more complicated

unfortunately the wood going up in the corner is about two foot above the floor. complicated ! any advice or ideas.
I really appreciate your help, thanks
 

TheBig1

LIFE MEMBER
Nov 27, 2011
17,575
42,952
Dorset
Funster No
19,048
MH
A class
Exp
many many years! since I was a kid
Then you need to always bear in mind that the corner is structural. on the inside you will have to strip out wall board from the back and the side. if both corners are bad do one at a time to retain some strength.
you will find the timber in the corner is bigger and is held in place with screws through the edge trim (like awning rail). again the screws rot off as they are cheap steel but make removing the corner difficult. plus the insulation is likely now wet so after removing the wall board, let the insulation and timber dry out. a dehumidifier will speed this up as will a little warmth but dont overheat.
when it comes to rebuilding, you need to splice the corners or add extra timber each side covering the joint. in an ideal world try to source ash wood especially for the corners as it is structurally better. glue and screw everything and the strength should be maintained

its not actually as difficult as some folk make out, so longer as you have decent woodworking skills and are patient enough to do the work slowly

Subscribers  do not see these advertisements

 
OP
OP
threeply

threeply

Free Member
May 18, 2015
29
13
watford
Funster No
36,418
MH
autotrail 700 se
Exp
I'm a newbie
Then you need to always bear in mind that the corner is structural. on the inside you will have to strip out wall board from the back and the side. if both corners are bad do one at a time to retain some strength.
you will find the timber in the corner is bigger and is held in place with screws through the edge trim (like awning rail). again the screws rot off as they are cheap steel but make removing the corner difficult. plus the insulation is likely now wet so after removing the wall board, let the insulation and timber dry out. a dehumidifier will speed this up as will a little warmth but dont overheat.
when it comes to rebuilding, you need to splice the corners or add extra timber each side covering the joint. in an ideal world try to source ash wood especially for the corners as it is structurally better. glue and screw everything and the strength should be maintained

its not actually as difficult as some folk make out, so longer as you have decent woodworking skills and are patient enough to do the work slowly

thank you for your great help, we are looking to get all the bits together and hopefully repair the problem. if I get stuck on anything can I call on you again. if all goes well I will also let you know .thanks again for your help.
 

Join us or log in to post a reply.

To join in you must be a member of MotorhomeFun

Join MotorhomeFun

Join us, it quick and easy!

Log in

Already a member? Log in here.

Latest journal entries

Funsters who are viewing this thread

Back
Top