DBK
LIFE MEMBER
Our Murvi Morocco has a 100W solar panel which we have found adequate but since buying a compressor coolbox (Dometic CDF 25) we found after a couple of days off EHU in Brittany last September the batteries were getting a bit low. So it was time to look at fitting an extra panel. The problem is space on the roof is tight.

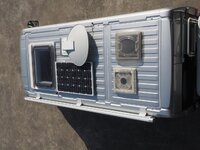
You can see there is no room for a conventionally shaped panel, like the one already fitted. The only places are the strips of unused roof above and below the two roof lights you can see at the bottom of the picture. I did think about sticking a flexible panel across the front above the windscreen but felt it would be too vulnerable to branches.
I also looked at whether several smaller panels could be made to fit but there was no satisfactory solution I could find apart from fitting a long narrow panel across the roof of the 'van.
You can get slimline panels but they are not cheap. This is the one I went for (the 100W version):
http://www.csevolution.net/?q=node/74 This is just wide enough at 410 mm to fit between the current panel and the pair of roof lights, ie. across the middle of the roof. This still leaves space for a third panel across the rear, above the back doors, if needed later although this will be a slightly trickier fit as it will overhang the rear by a small amount. At 1.6m long it also goes across virtually the full width of the roof.
I bought the panel from these folk: http://www.motorcaravanning.co.uk/shopuk/solar_panels.htm who were very helpful with prompt delivery and their price, at a shade over £200 was half what someone else was selling the same panel for. Having now found out who makes the panel (which I didn't know until it arrived) I guess it may be possible to buy from the manufacturer directly even if you have to pick it up on a trip to Italy! Of course you can get 100W panels for under a £100 but not of this shape - and if you know of one please DON'T tell me!")
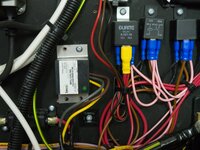
I also needed to change the existing solar regulator from the very basic shunt regulator which was fitted. You can see it in the picture below, it has "beco" written on it and a green light. I had already removed it before realising I wanted a photograph so I refitted it for this shot, which is why it probably looks a bit untidy. The wires were originally all neatly clipped in.

Curiously, or so it seemed to me, it has three wires coming from it, this is because one of the wires is a common negative for both the batteries and the solar panel. After a bit of head-scratching I decided I could use the same wires for the new controller which is a Victron 75/15, chosen because it gets good reviews, is very compact and the manufacturer was very helpful in responding to an email I sent them.
Here is the new controller in position.

The brown loop of wire you can see connects the two negative terminals for the battery and solar feeds together. The single existing common negative is connected to one of these terminals. I'm not sure if this counts as a bodge - ideally I should have run a second wire but the common wire is very short - it only goes to the big busbar you can see on the right. I think I will leave it and check on a sunny day when there is a decent load running and see if it gets warm.
Note the load terminals of the controller are not used. This is fine and is what I confirmed with Victron by email. The actual MH 12 volt feeds all come off a fuse box which is fed by thick wires from the batteries. A separate meter senses the battery voltage and current.
The compact size of the Victron controller was a big bonus as space is limited and I still had to reposition one component, the curious black thing you can see arranged vertically with the thick red wires below the left hand edge of the controller. You can see it mounted horizontally in the second picture. It isn't a fuse, that's the red rectangular thing you can see on the left, perhaps it is an RF choke? Answers on a postcard please!
Just need to wait for some daylight to see if it is all working.
The panel fit will happen when we get some dry weather. So don't wait up expecting an update on this aspect of the job! The second panel is going to be wired in series with the first as recommended by Victron, this should be more efficient in low light levels.
You can see there is no room for a conventionally shaped panel, like the one already fitted. The only places are the strips of unused roof above and below the two roof lights you can see at the bottom of the picture. I did think about sticking a flexible panel across the front above the windscreen but felt it would be too vulnerable to branches.
I also looked at whether several smaller panels could be made to fit but there was no satisfactory solution I could find apart from fitting a long narrow panel across the roof of the 'van.
You can get slimline panels but they are not cheap. This is the one I went for (the 100W version):
http://www.csevolution.net/?q=node/74 This is just wide enough at 410 mm to fit between the current panel and the pair of roof lights, ie. across the middle of the roof. This still leaves space for a third panel across the rear, above the back doors, if needed later although this will be a slightly trickier fit as it will overhang the rear by a small amount. At 1.6m long it also goes across virtually the full width of the roof.
I bought the panel from these folk: http://www.motorcaravanning.co.uk/shopuk/solar_panels.htm who were very helpful with prompt delivery and their price, at a shade over £200 was half what someone else was selling the same panel for. Having now found out who makes the panel (which I didn't know until it arrived) I guess it may be possible to buy from the manufacturer directly even if you have to pick it up on a trip to Italy! Of course you can get 100W panels for under a £100 but not of this shape - and if you know of one please DON'T tell me!
I also needed to change the existing solar regulator from the very basic shunt regulator which was fitted. You can see it in the picture below, it has "beco" written on it and a green light. I had already removed it before realising I wanted a photograph so I refitted it for this shot, which is why it probably looks a bit untidy. The wires were originally all neatly clipped in.
Curiously, or so it seemed to me, it has three wires coming from it, this is because one of the wires is a common negative for both the batteries and the solar panel. After a bit of head-scratching I decided I could use the same wires for the new controller which is a Victron 75/15, chosen because it gets good reviews, is very compact and the manufacturer was very helpful in responding to an email I sent them.
Here is the new controller in position.
The brown loop of wire you can see connects the two negative terminals for the battery and solar feeds together. The single existing common negative is connected to one of these terminals. I'm not sure if this counts as a bodge - ideally I should have run a second wire but the common wire is very short - it only goes to the big busbar you can see on the right. I think I will leave it and check on a sunny day when there is a decent load running and see if it gets warm.
Note the load terminals of the controller are not used. This is fine and is what I confirmed with Victron by email. The actual MH 12 volt feeds all come off a fuse box which is fed by thick wires from the batteries. A separate meter senses the battery voltage and current.
The compact size of the Victron controller was a big bonus as space is limited and I still had to reposition one component, the curious black thing you can see arranged vertically with the thick red wires below the left hand edge of the controller. You can see it mounted horizontally in the second picture. It isn't a fuse, that's the red rectangular thing you can see on the left, perhaps it is an RF choke? Answers on a postcard please!
Just need to wait for some daylight to see if it is all working.
The panel fit will happen when we get some dry weather.
So don't wait up expecting an update on this aspect of the job! The second panel is going to be wired in series with the first as recommended by Victron, this should be more efficient in low light levels.Attachments
Last edited:
